-

-

-
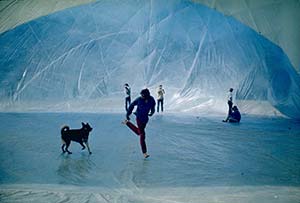
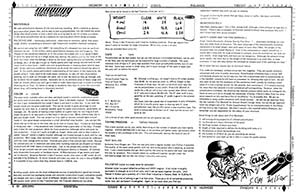
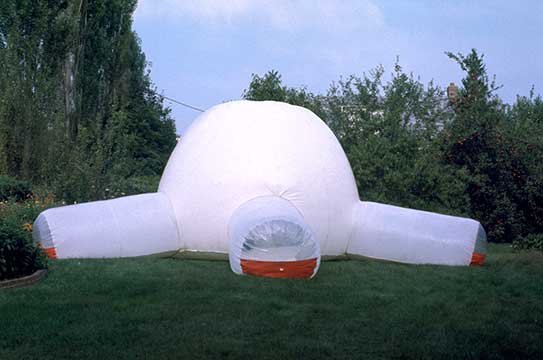
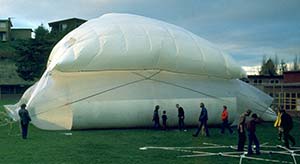
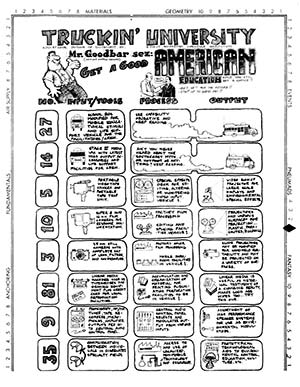
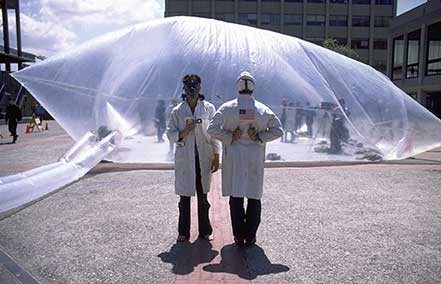
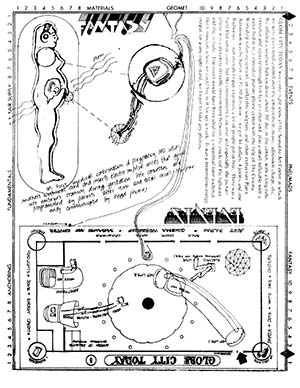
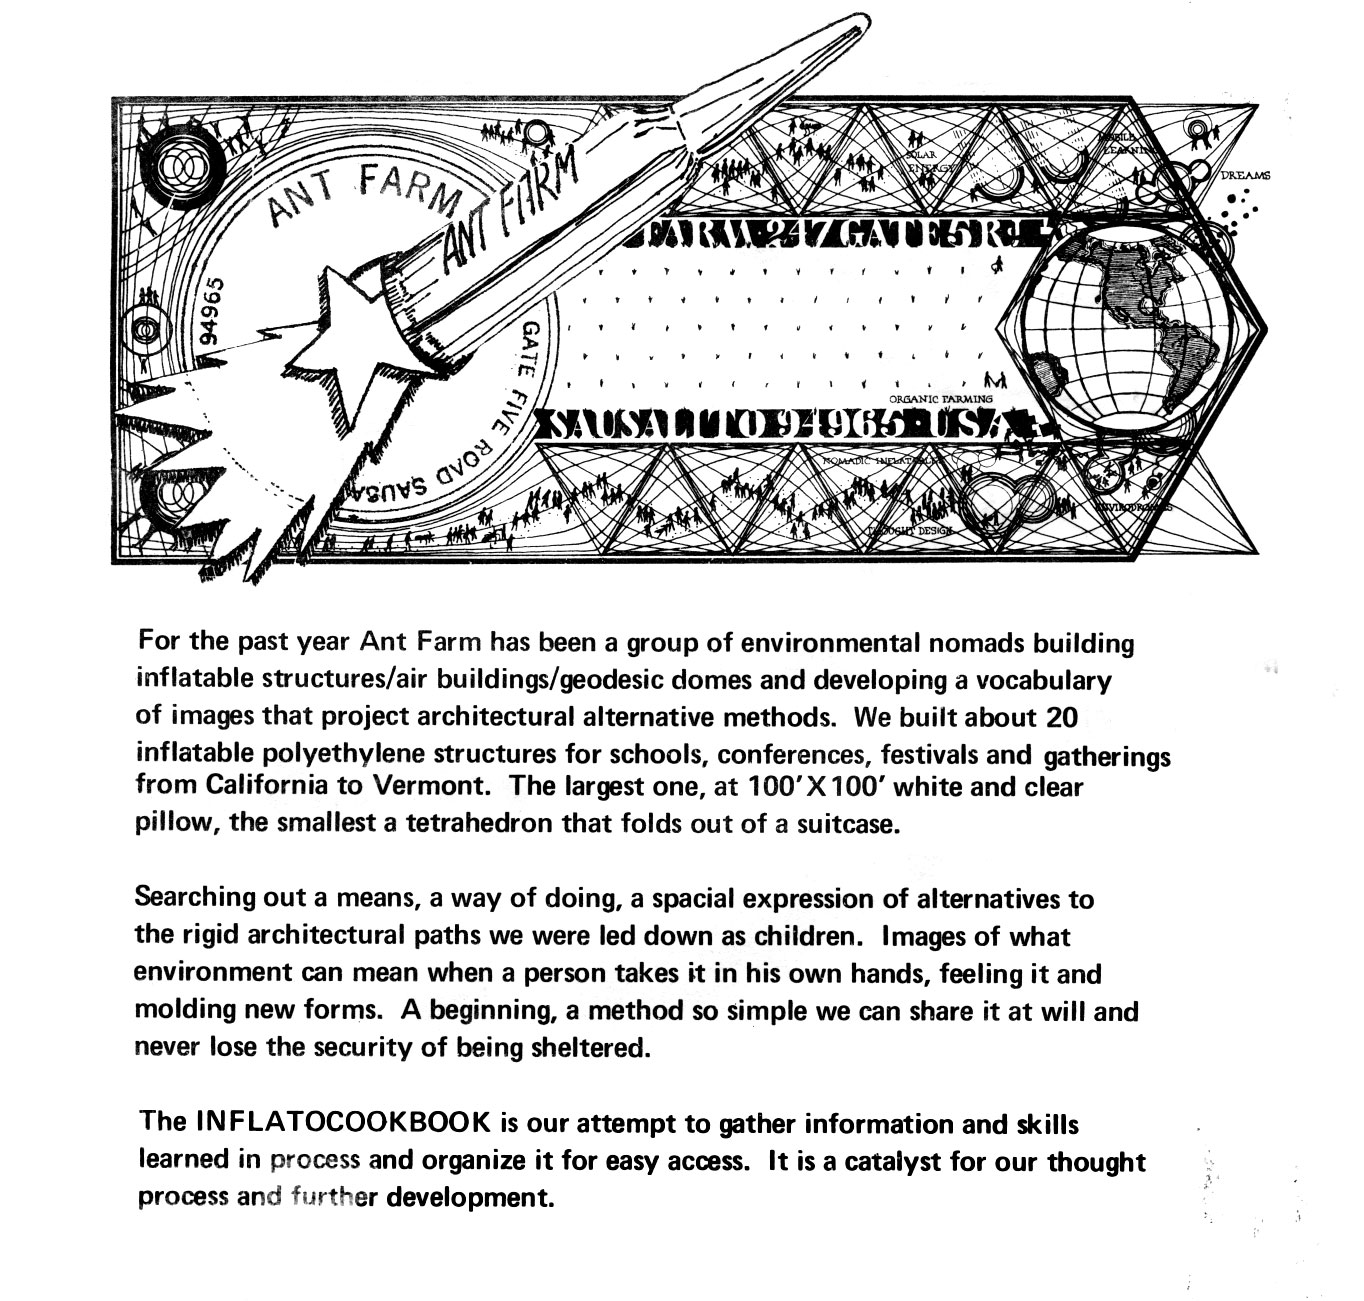
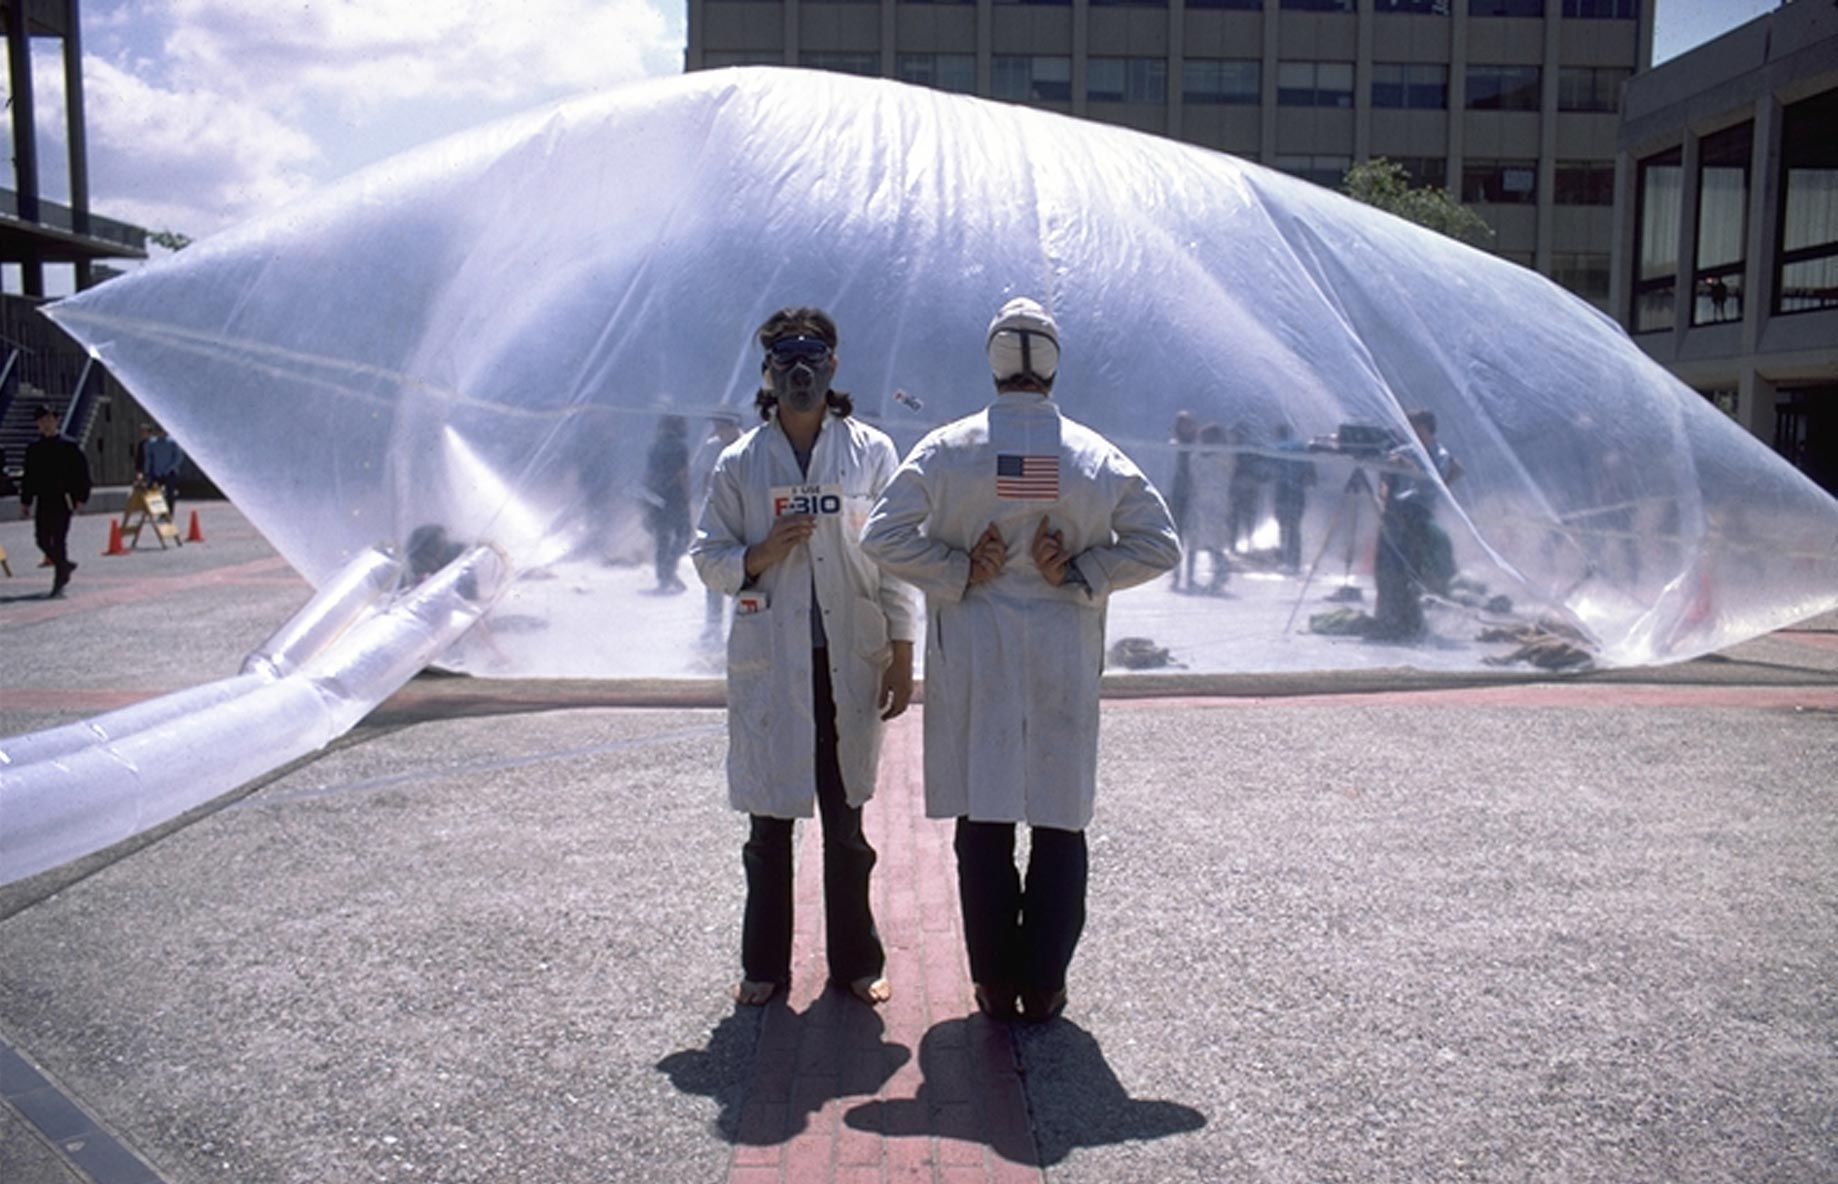
Big Pillow, 1969
-
-
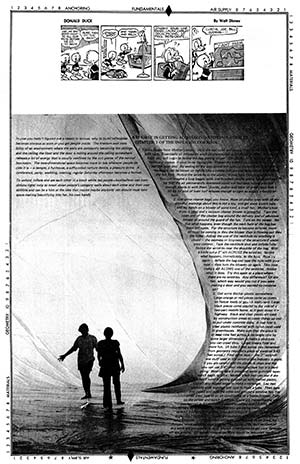
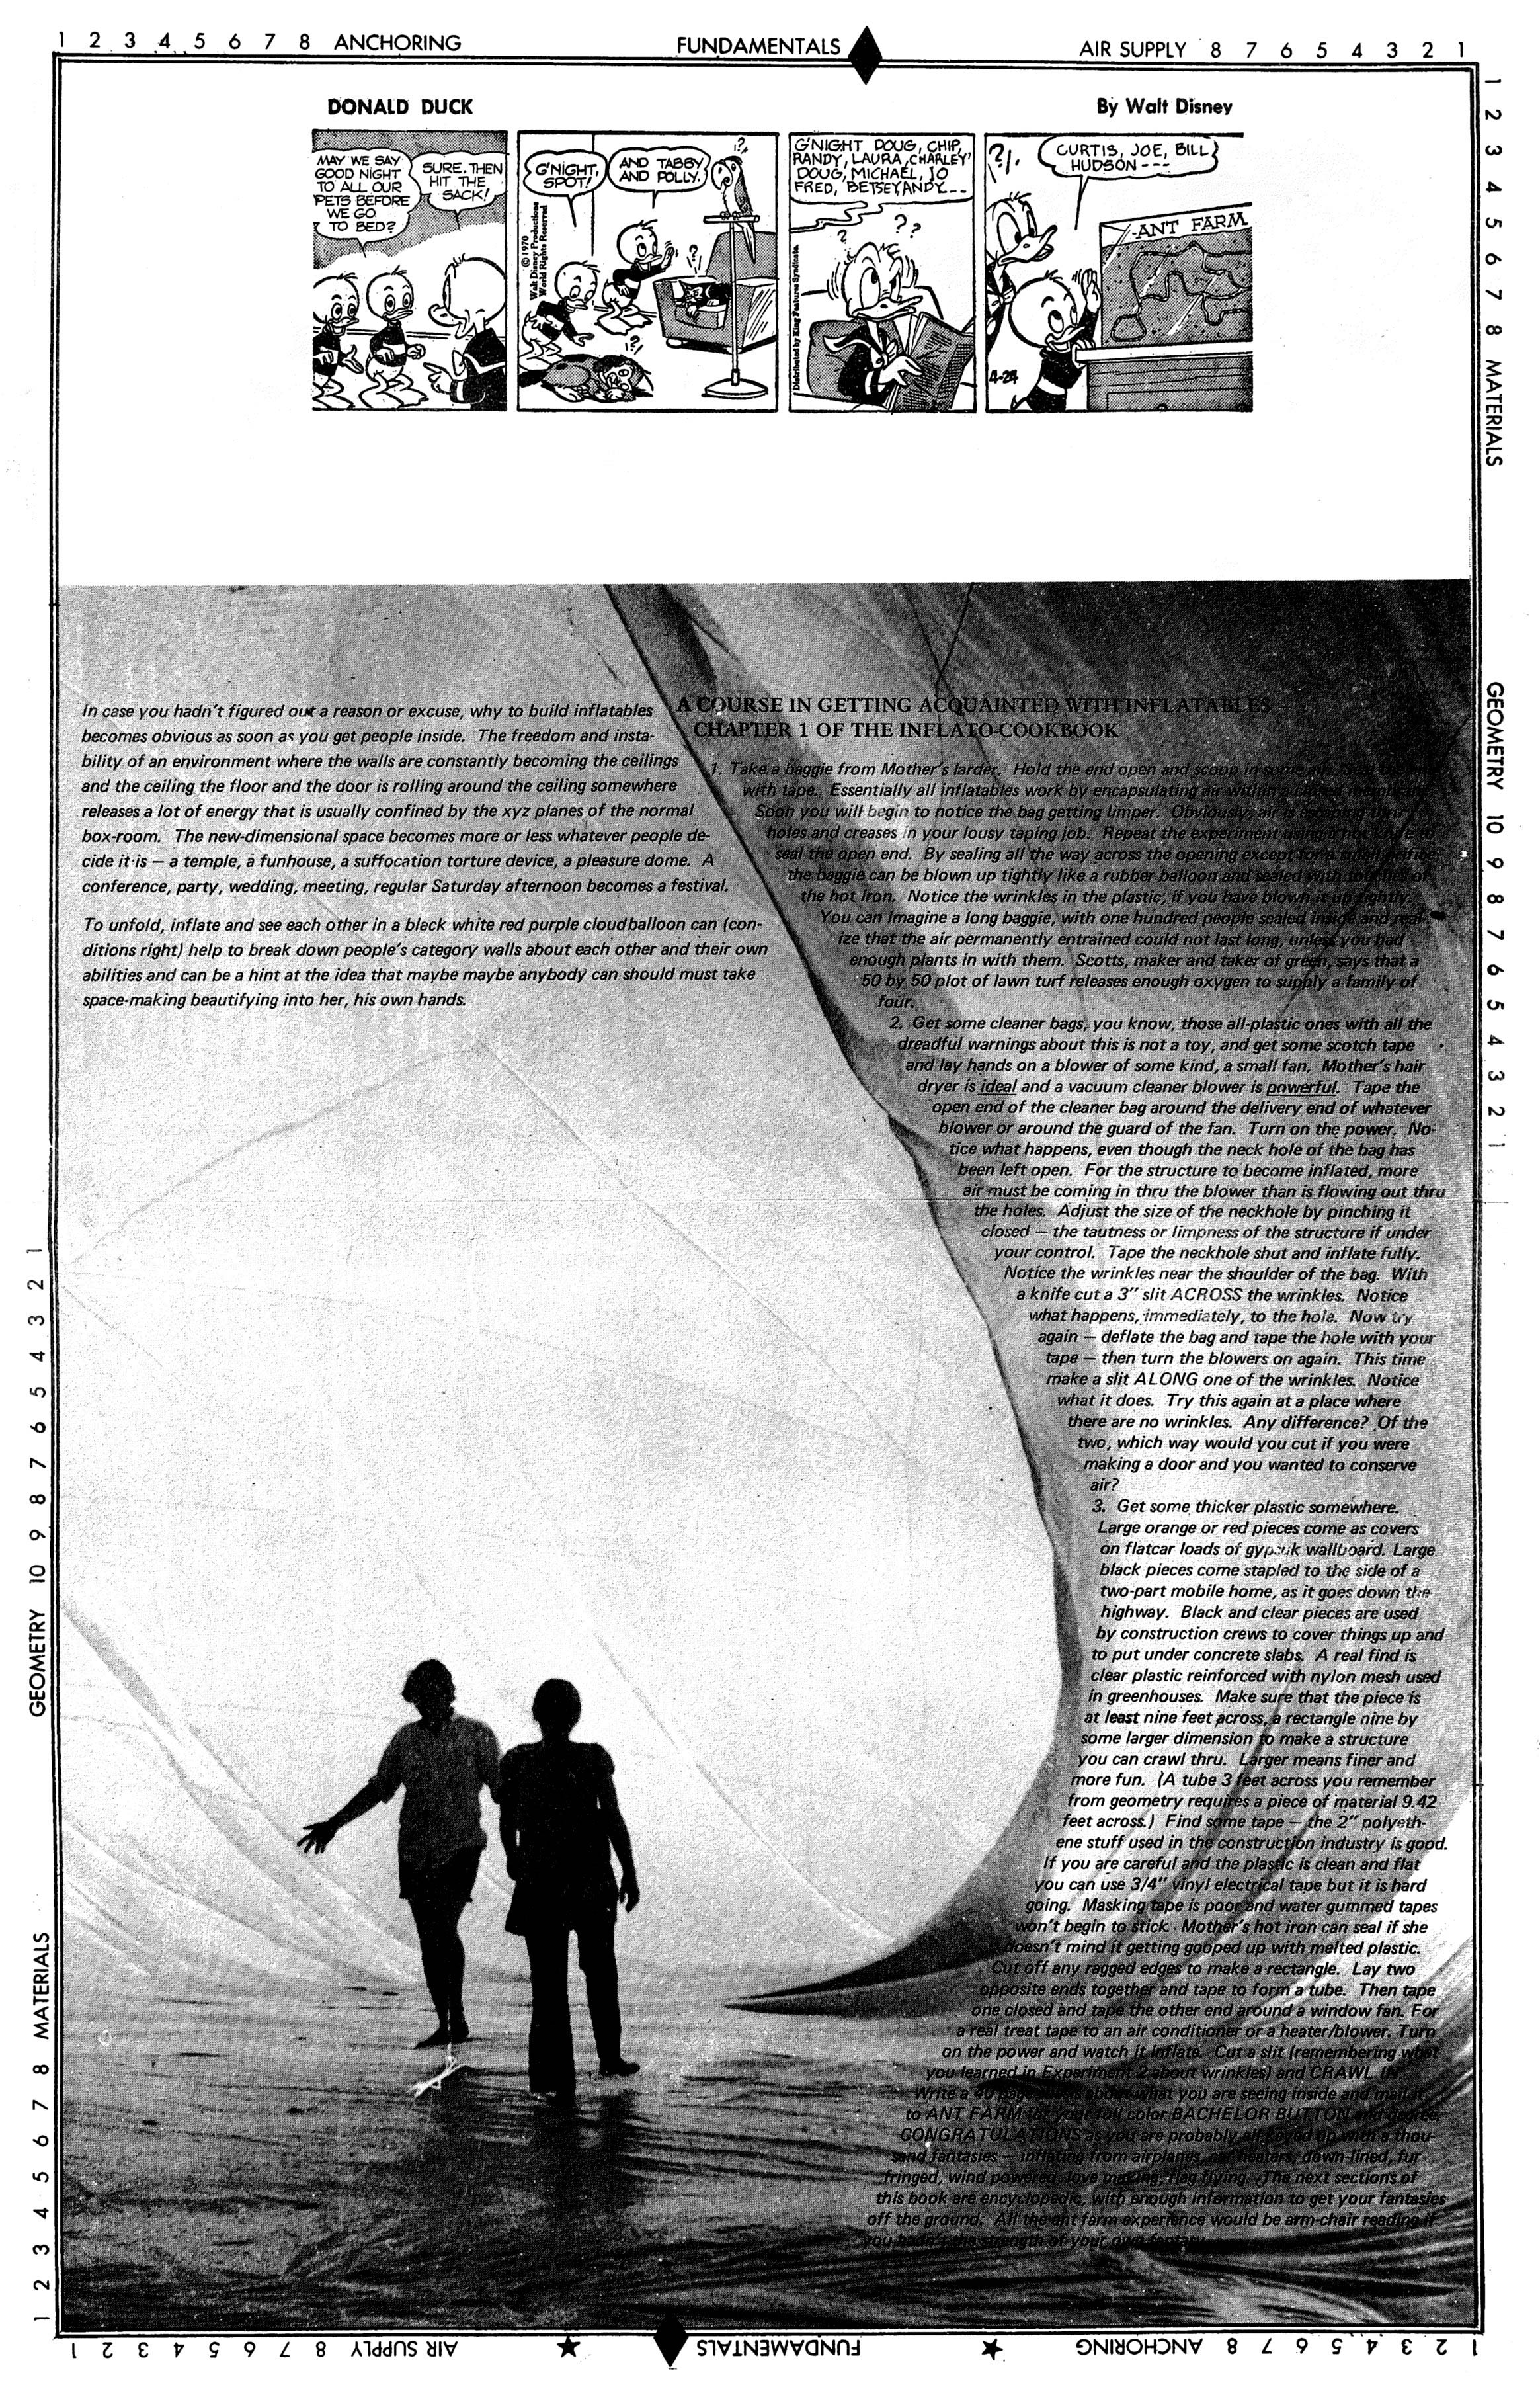
1. Take a baggie from Mother’s larder. Hold the end open and scoop in some air. Seal the end with tape. Essentially all inflatables work by encapsulating air within a closed membrane. Soon you will begin to notice the bag getting limper. Obviously, air is escaping through holes and creases in your lousy taping job. Repeat the experiment using a hot knife to seal the open end. By sealing all the way across the opening except for a small orifice the baggy can be blown up tightly like a rubber balloon and sealed with touches of the hot iron. Notice the wrinkles in the plastic, if you have blown it up tightly. You can imagine a long baggie, with one hundred people sealed inside and realize that the air permanently entrained could not last long, unless you had enough plants in with them. Scott, maker and taker of green, says that a 50 by 50 plot of lawn turf releases enough oxygen to supply a family of four.
Click here for text-only
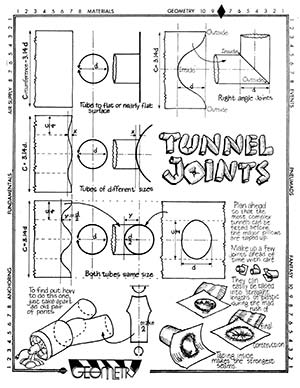
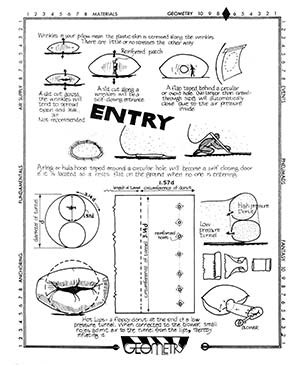
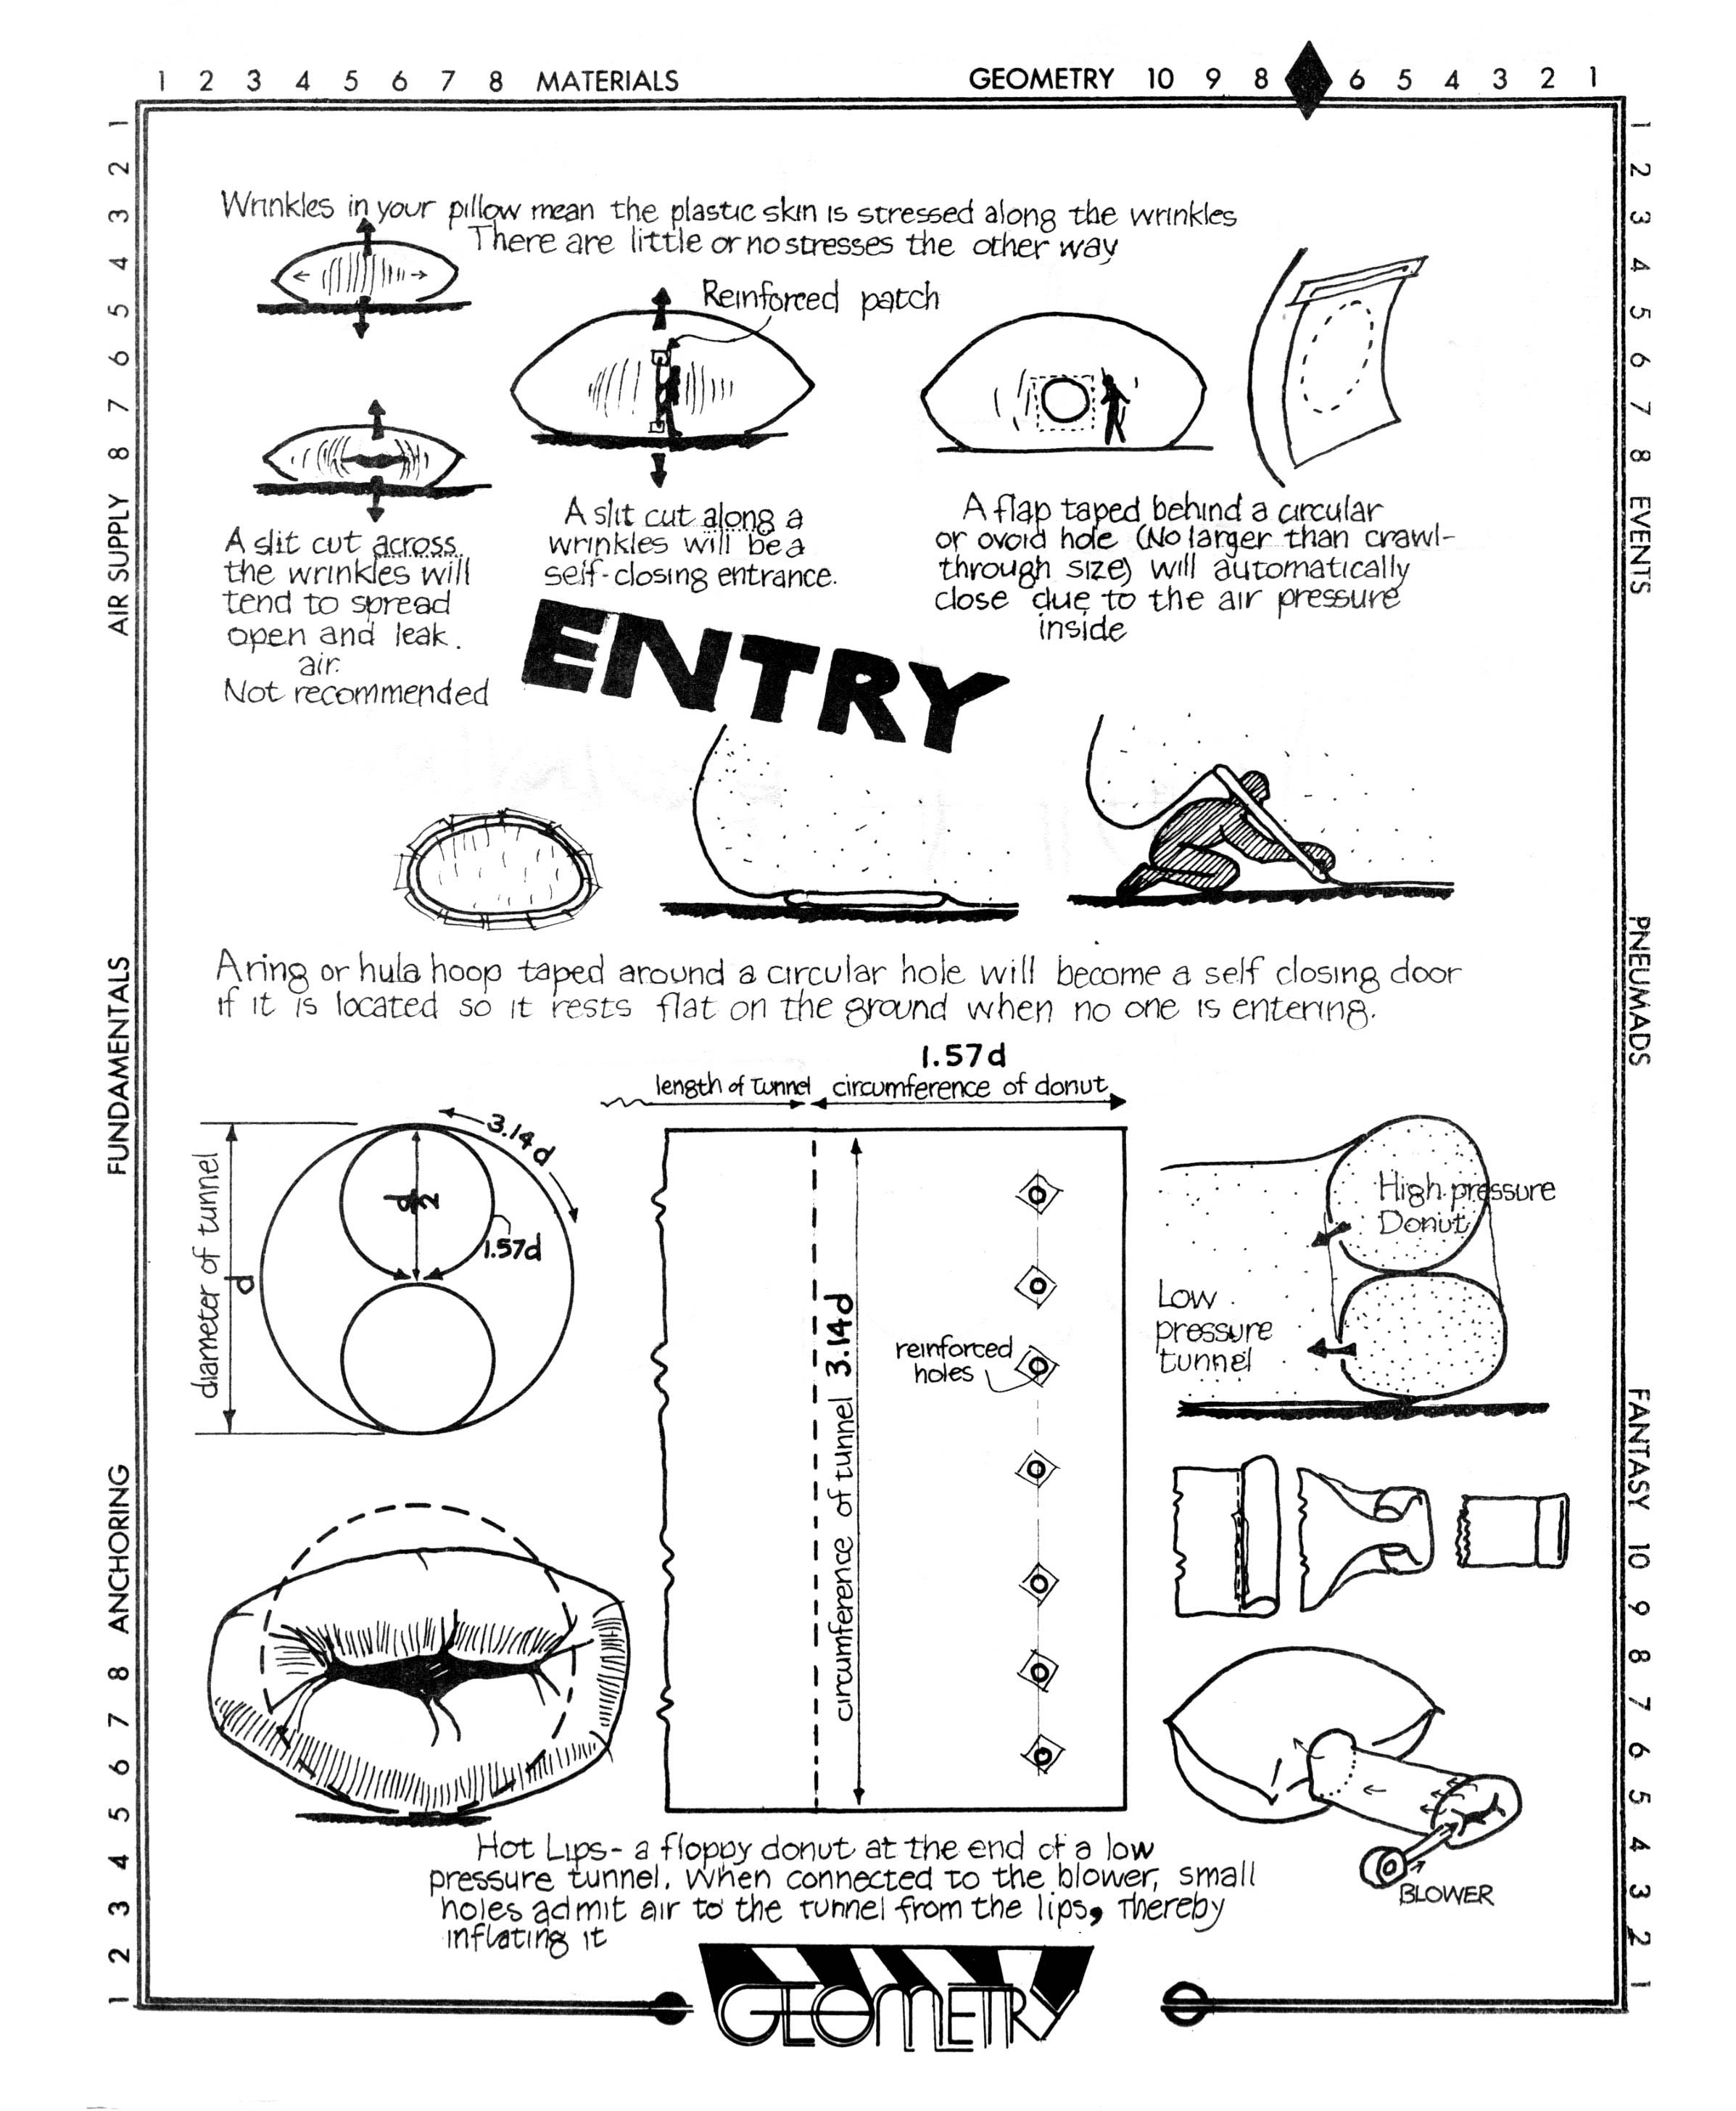
2. Get some cleaner bags, you know, those all-plastic ones with all the dreadful warnings about this is not a toy, and get some scotch tape and lay hands on a blower of some kind, a small fan. Mother’s hair dryer is ideal and a vacuum cleaner blower is powerful. Tape the open end of the cleaner bag around the delivery end of whatever blower or around the guard of the fan. Turn on the power. Notice what happens, even though the neck hole of the bag has been left open. For the structure to become inflated, more air must be coming in thru the blower than is flowing out thru the holes. Adjust the size of the neck hole by pinching it closed—the tautness or limpness of the structure is under your control. Tape the neckhole shut and inflate fully. Notice the wrinkles near the shoulder of the bag. With a knife cut a 3” slit ACROSS the wrinkles. Notice what happens, immediately, to the hole. How try again—deflate the bag and tape the hole with your tape—then turn the blowers on again. This time make a slit ALONG one of the wrinkles. Notice what it does. Try this again at a place where there are no wrinkles. Any difference? Of the two, which way would you cut if you were making a door and you wanted to conserve air?
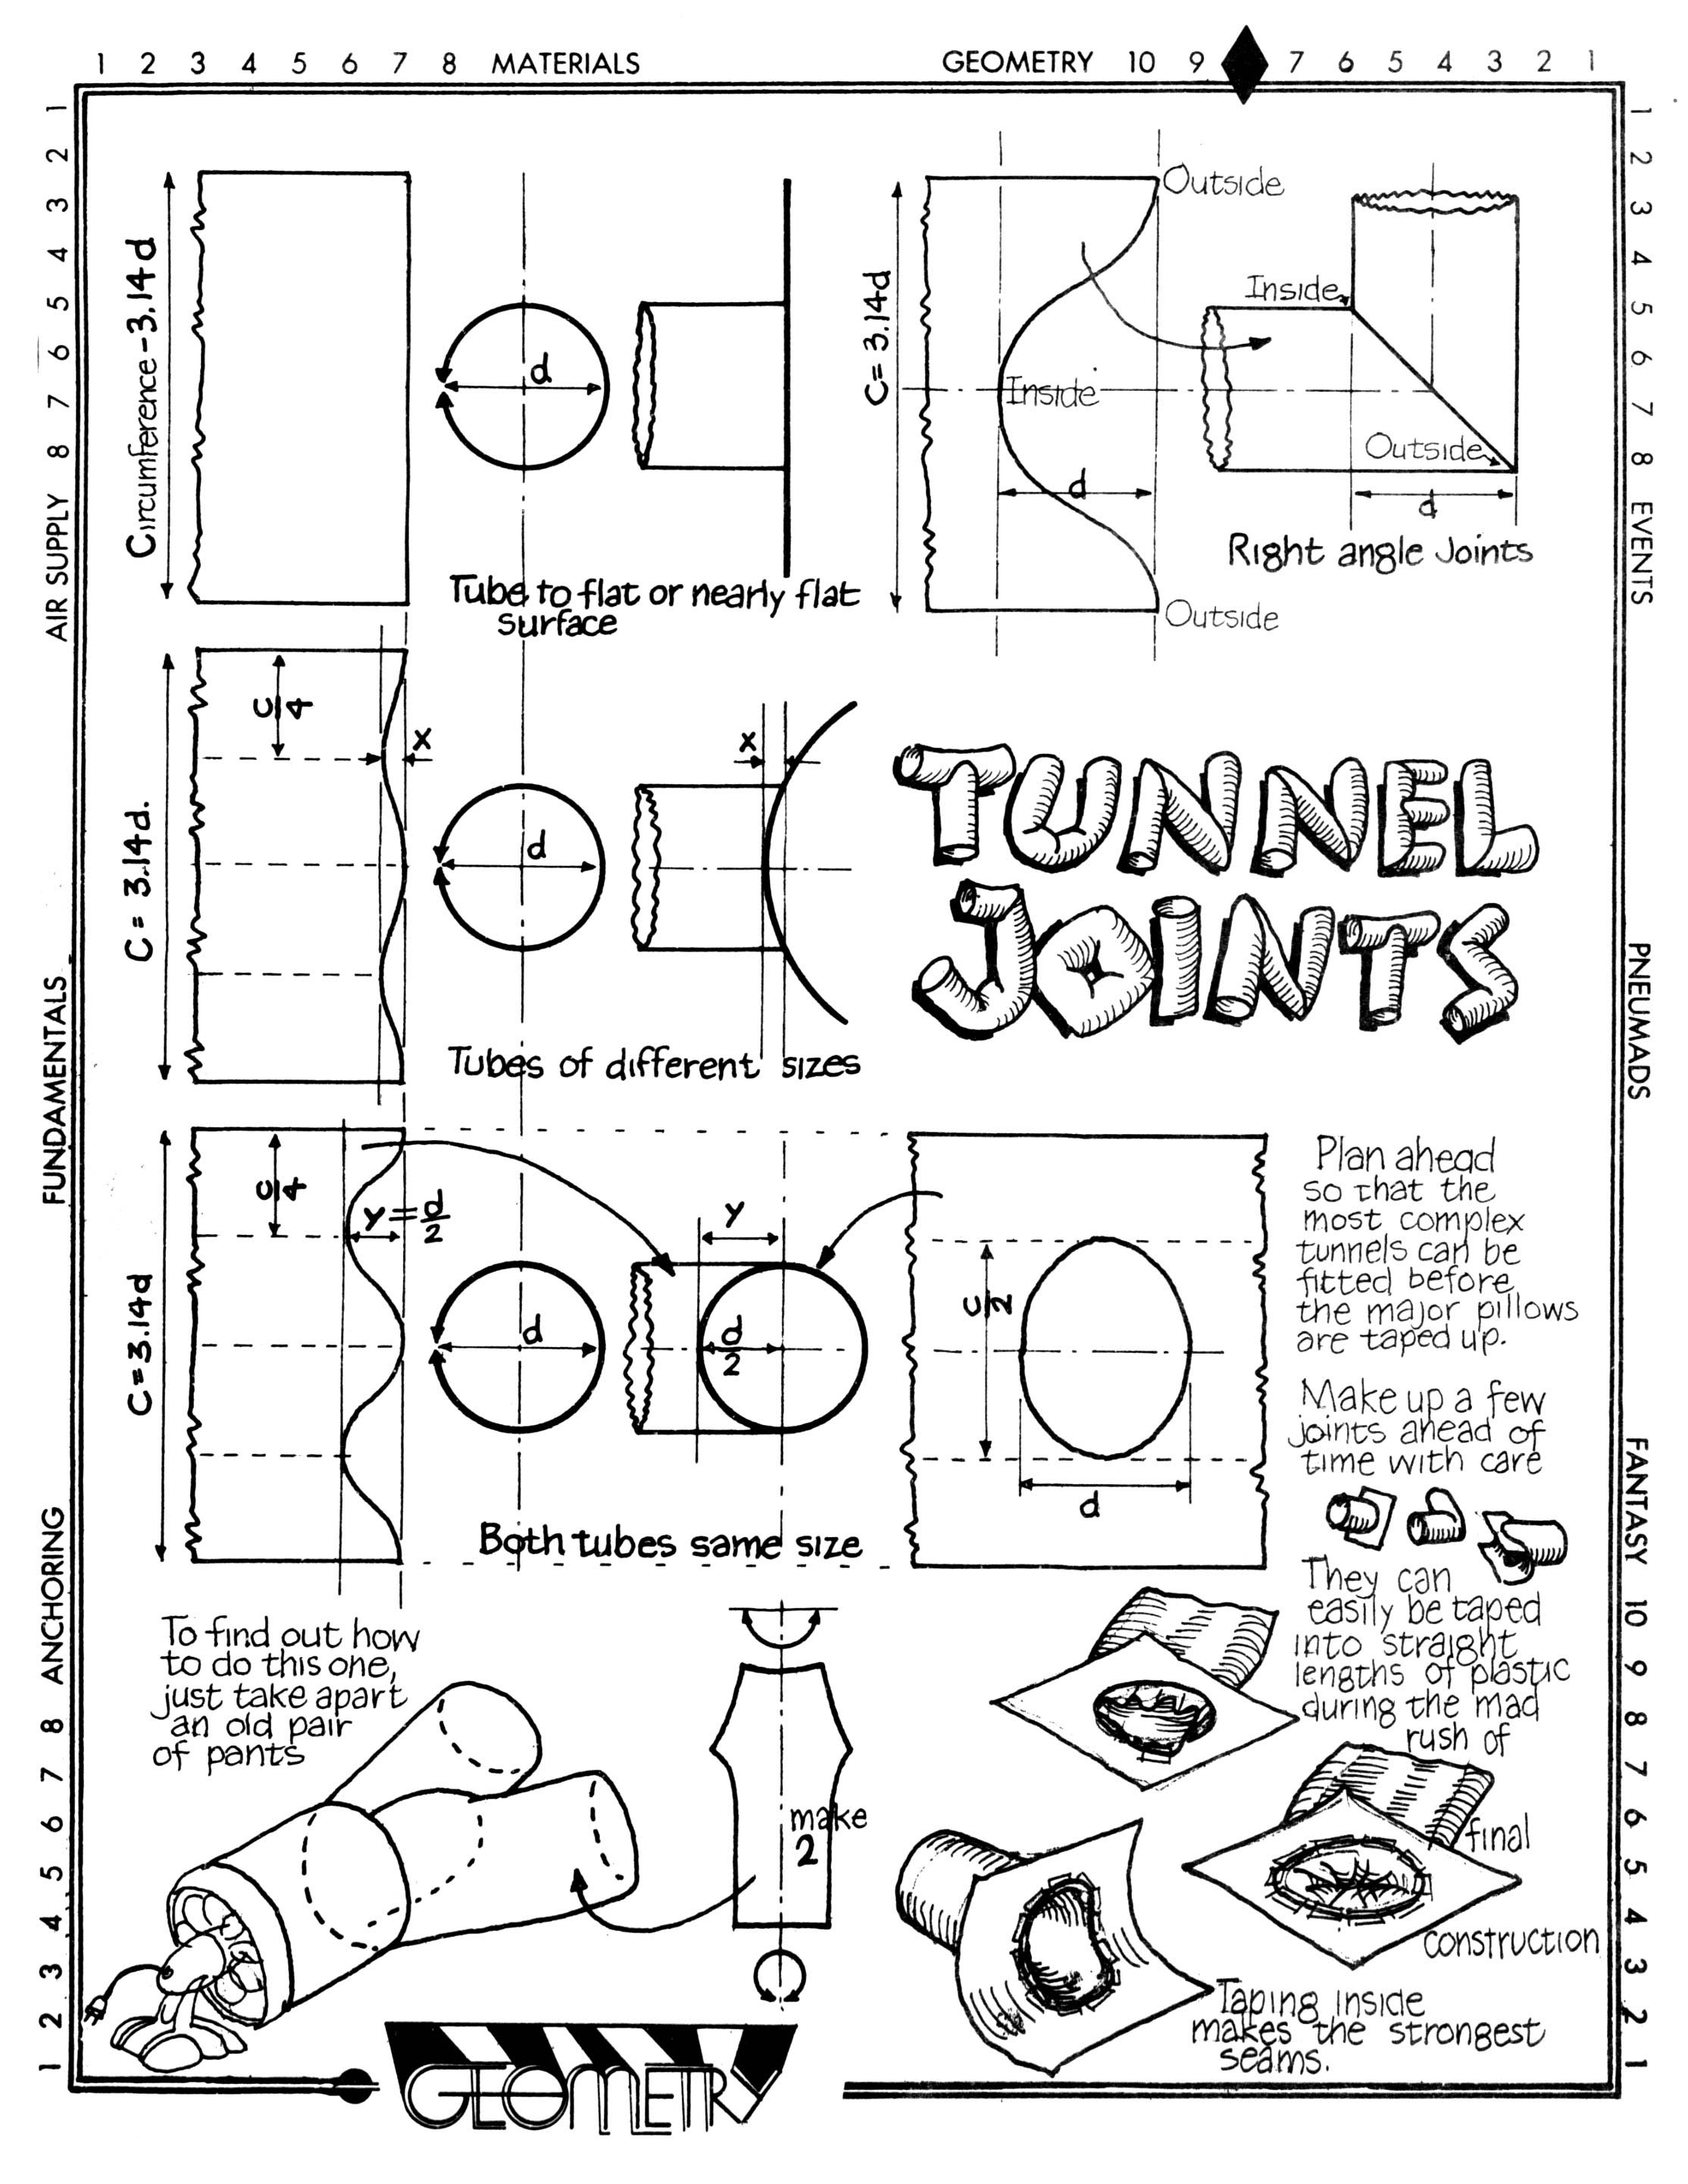
3. Get some thicker plastic somewhere. Large orange or red pieces come as covers on flatcar loads of gypsum wallboard. Large black pieces come stapled to the side of a two-part mobile home, as it goes down the highway. Black and clear pieces are used by construction crews to cover things up and to put under concrete slabs. A real find is a clear plastic reinforced with nylon mesh used in greenhouses. Make sure that the piece is at least nine feet across, a rectangle nine by some larger dimension to make a structure you can crawl thru. Larger means finer and more fun. (A tube 3 feet across you remember from geometry requires a piece of material 9.42 feet across) Fine some tape —the 2” polyethene stuff used in the construction industry is good. If you are careful and the plastic is clean and flat you can use 3/4” vinyl electrical tape but it is hard going. Masking tape is poor and water gummed tapes won’t begin to stick. Mother’s hot iron can seal she doesn’t mind it getting cooped up with melted plastic Cut off any raged edges to make a rectangle. Lay two opposite ends together and tape to form a tube. Then tape a one closed and tape the other end around a window fan. Turn on the power and watch it inflate. Cut a slit (remembering what you learned in Experiment 2 about wrinkles) and CRAWL IN.
Write a 40 page thesis about what you are seeing inside and mail it to ANT FARM for your full color BACHELOR BUTTON and degree. CONGRATULATIONS as you are probably all keyed up with a thousand fantasies—inflating from airplanes, car heaters, down-lined, fur fringed, wind powered love making flag flying. The next sections of this book are encyclopedic, with enough information to get your fantasies off the ground. All the ant farm experience would be arm-chair reading if you hadn’t the strength of your own fantasy. -
-

-
MATERIALS
Click here for text-only
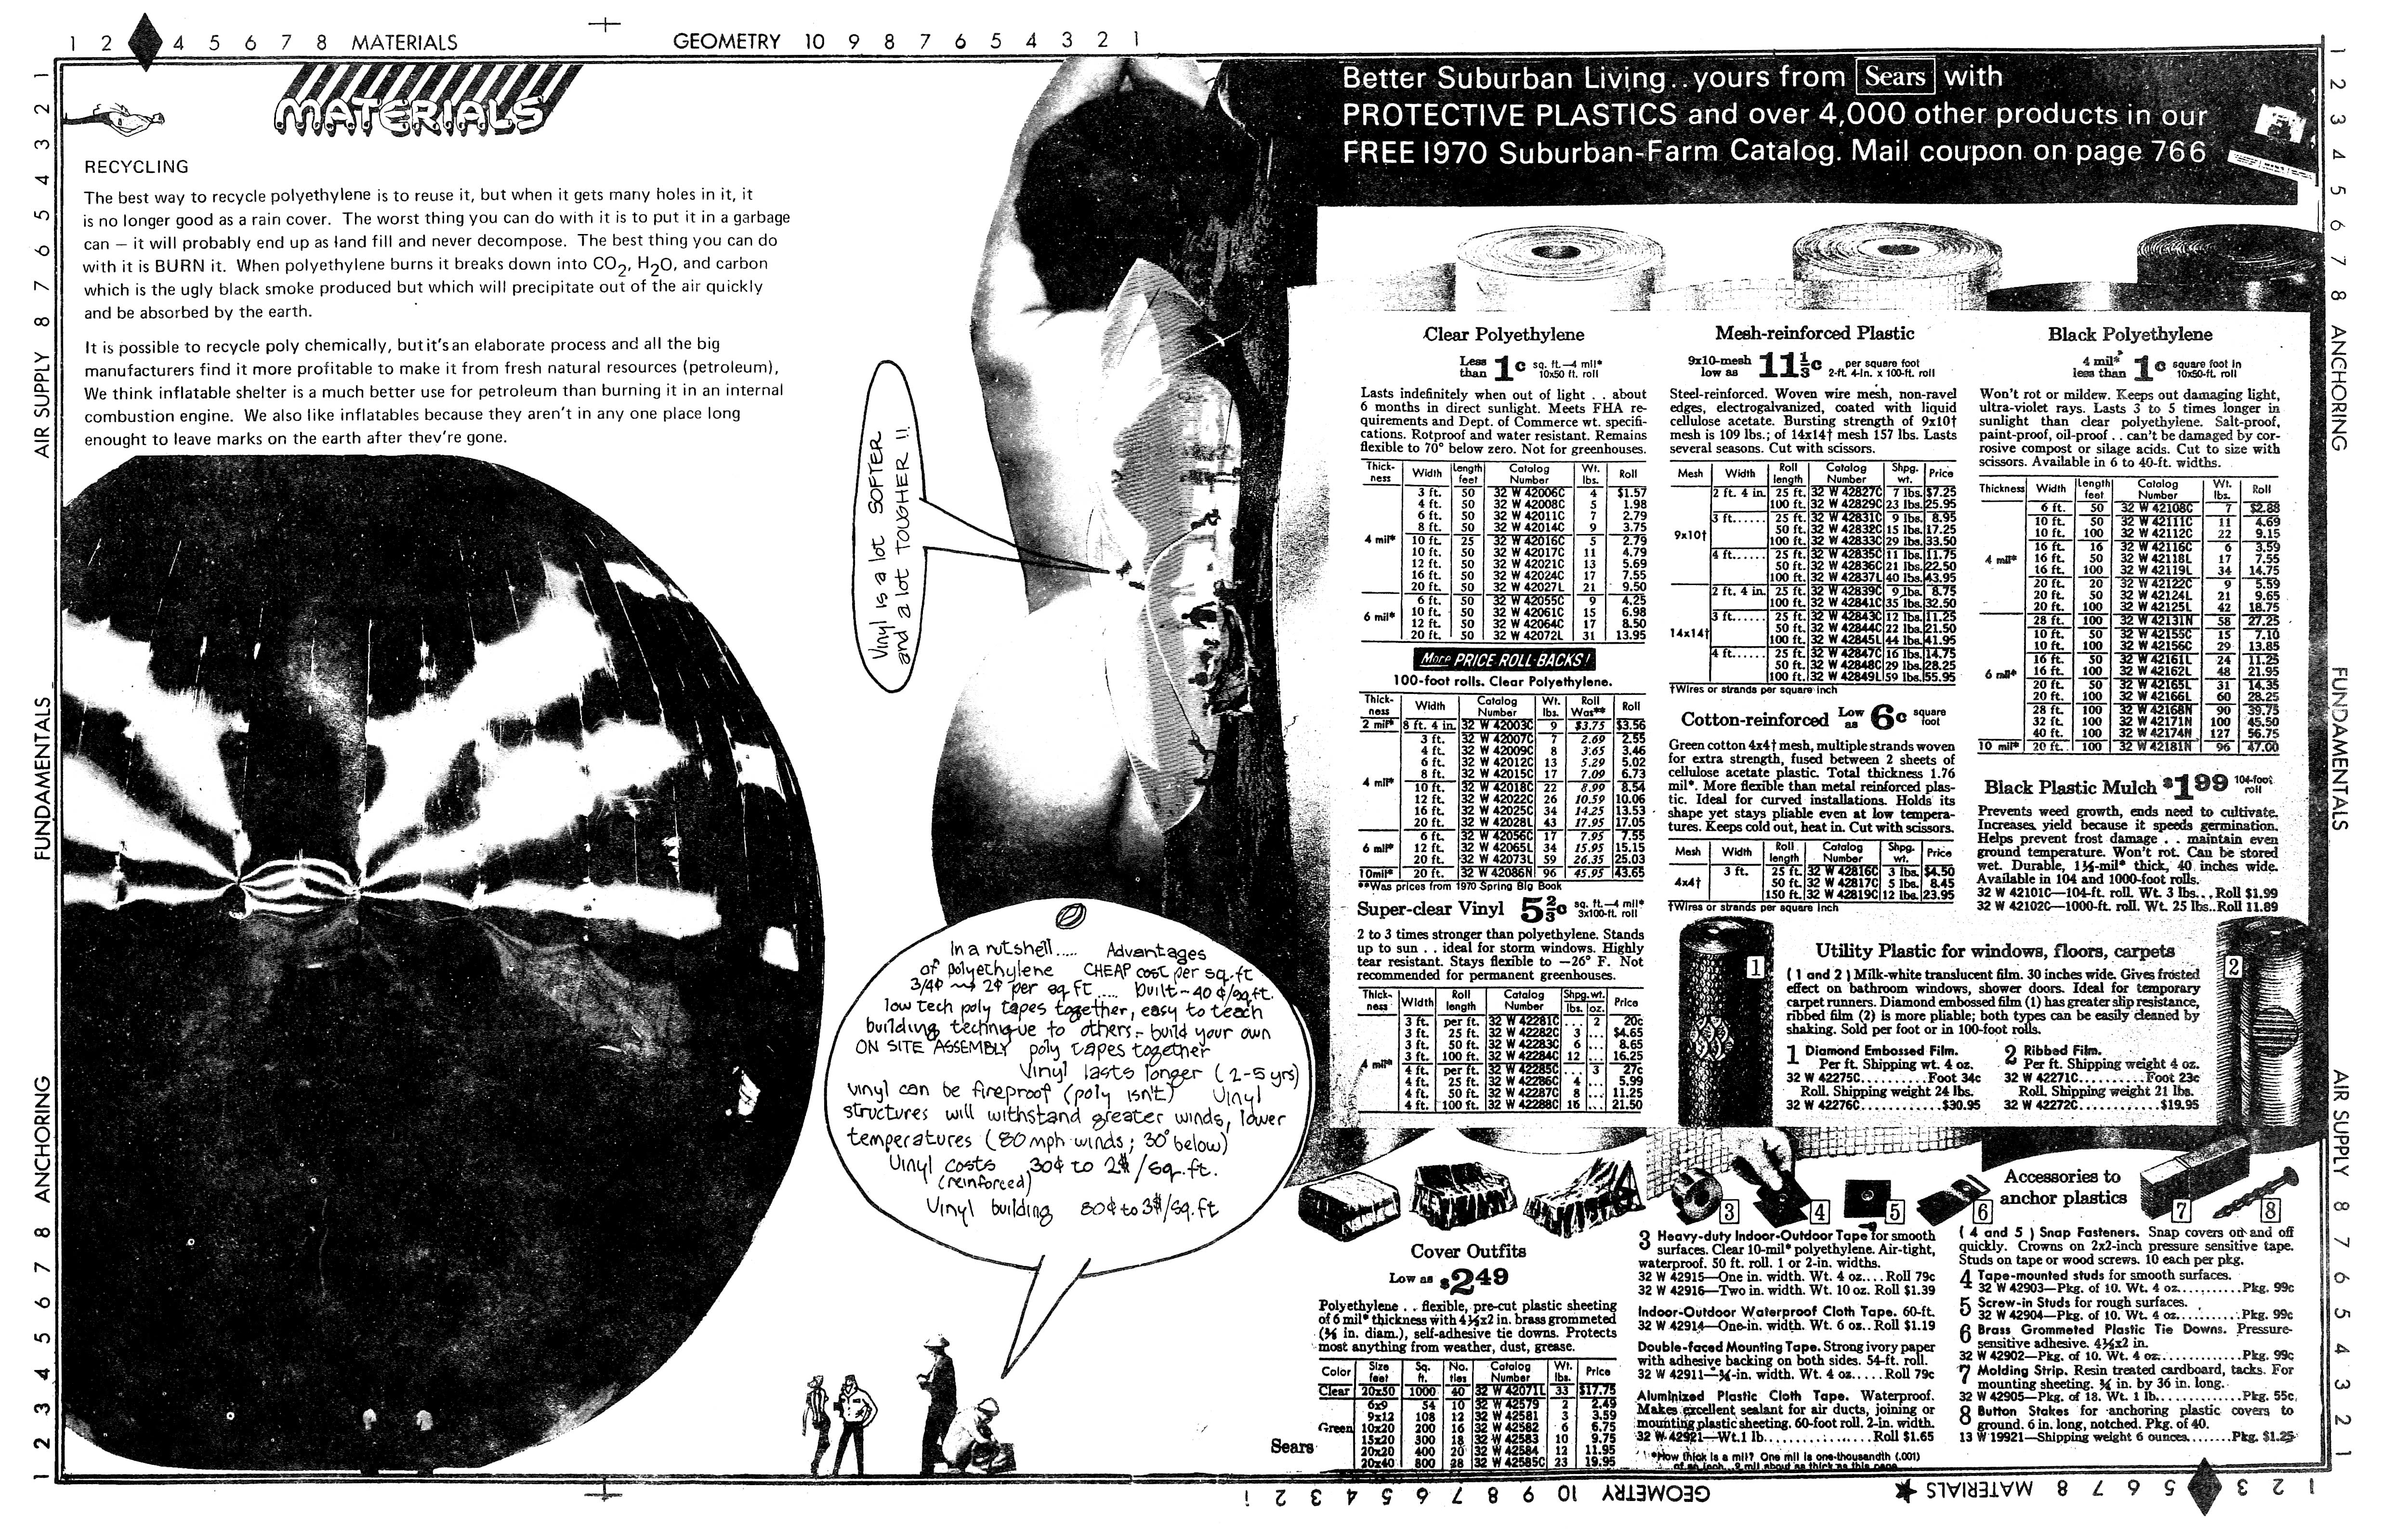
We used polyethylene because of low cost and easy handling. With a material as abstract as a micro-thick plastic film, and as easy to join as polyethylene, one can transit the entire design-then-build process in such a short time as to be able to see the process as a whole. In this sense polyethylene can be a medium for learning about whole design processes.
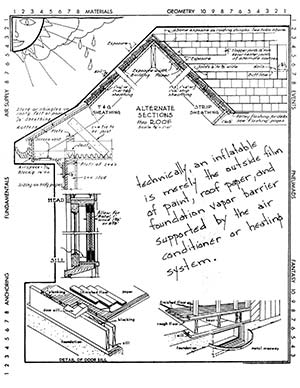
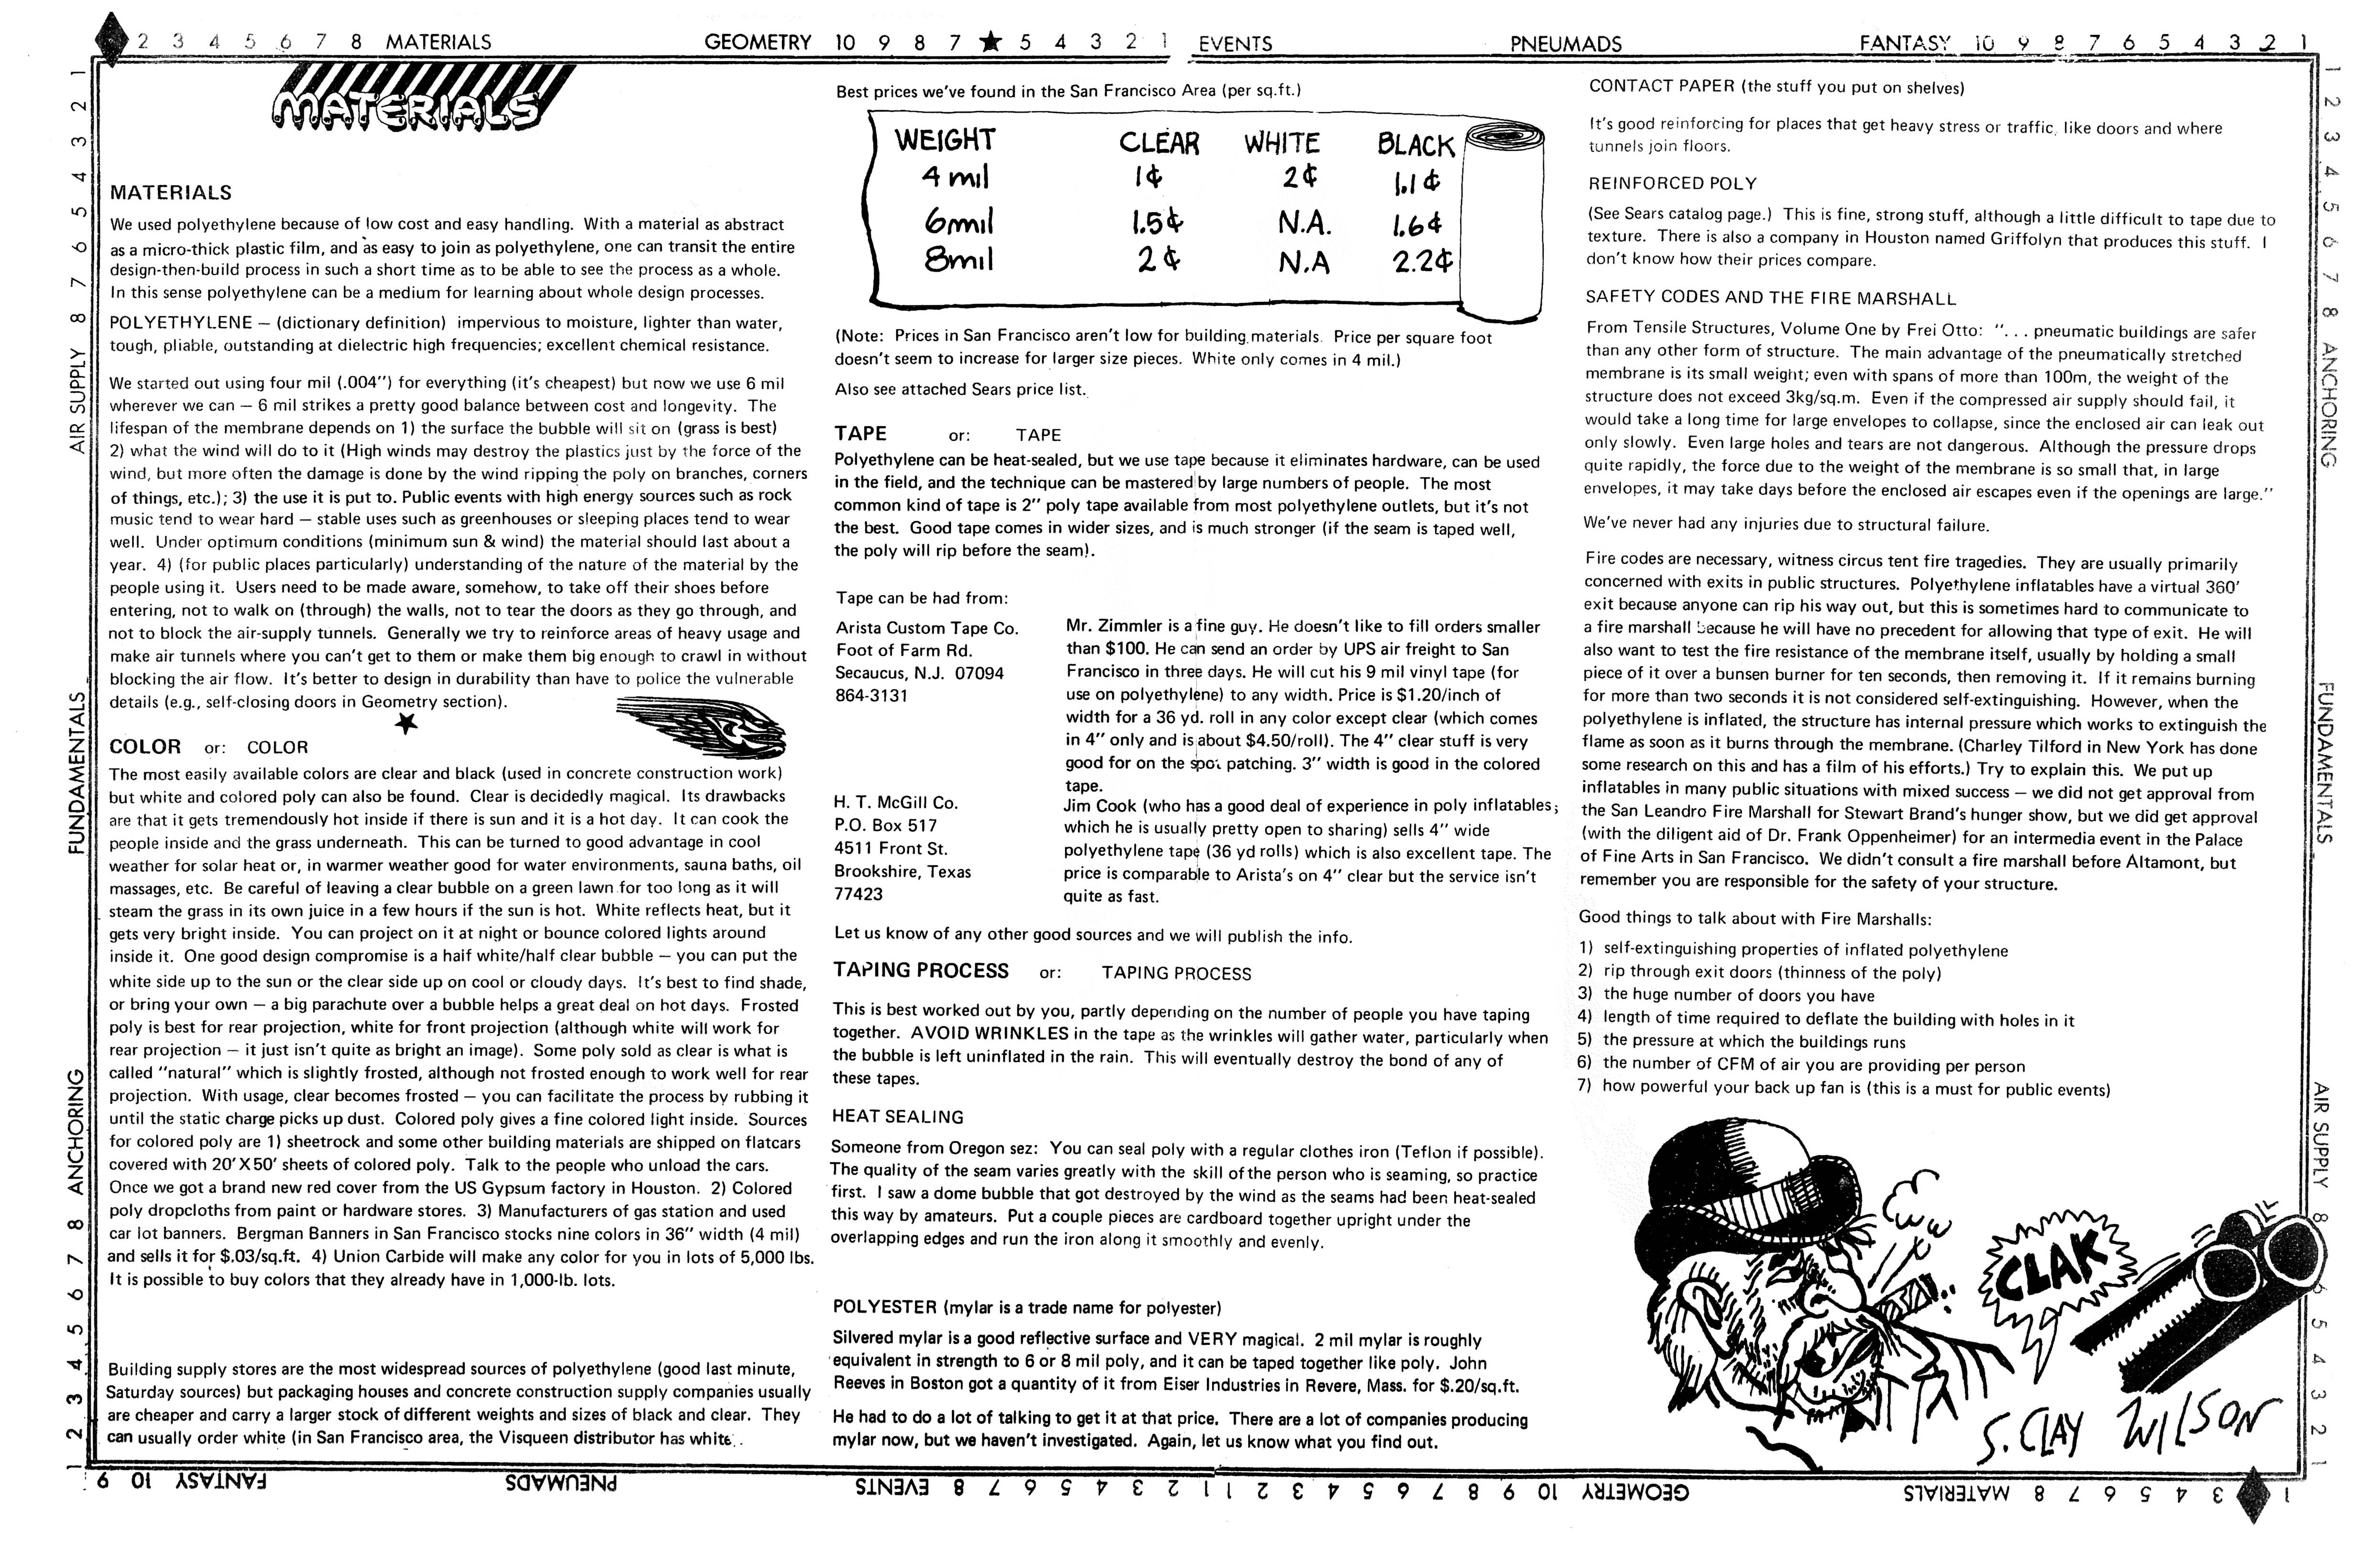
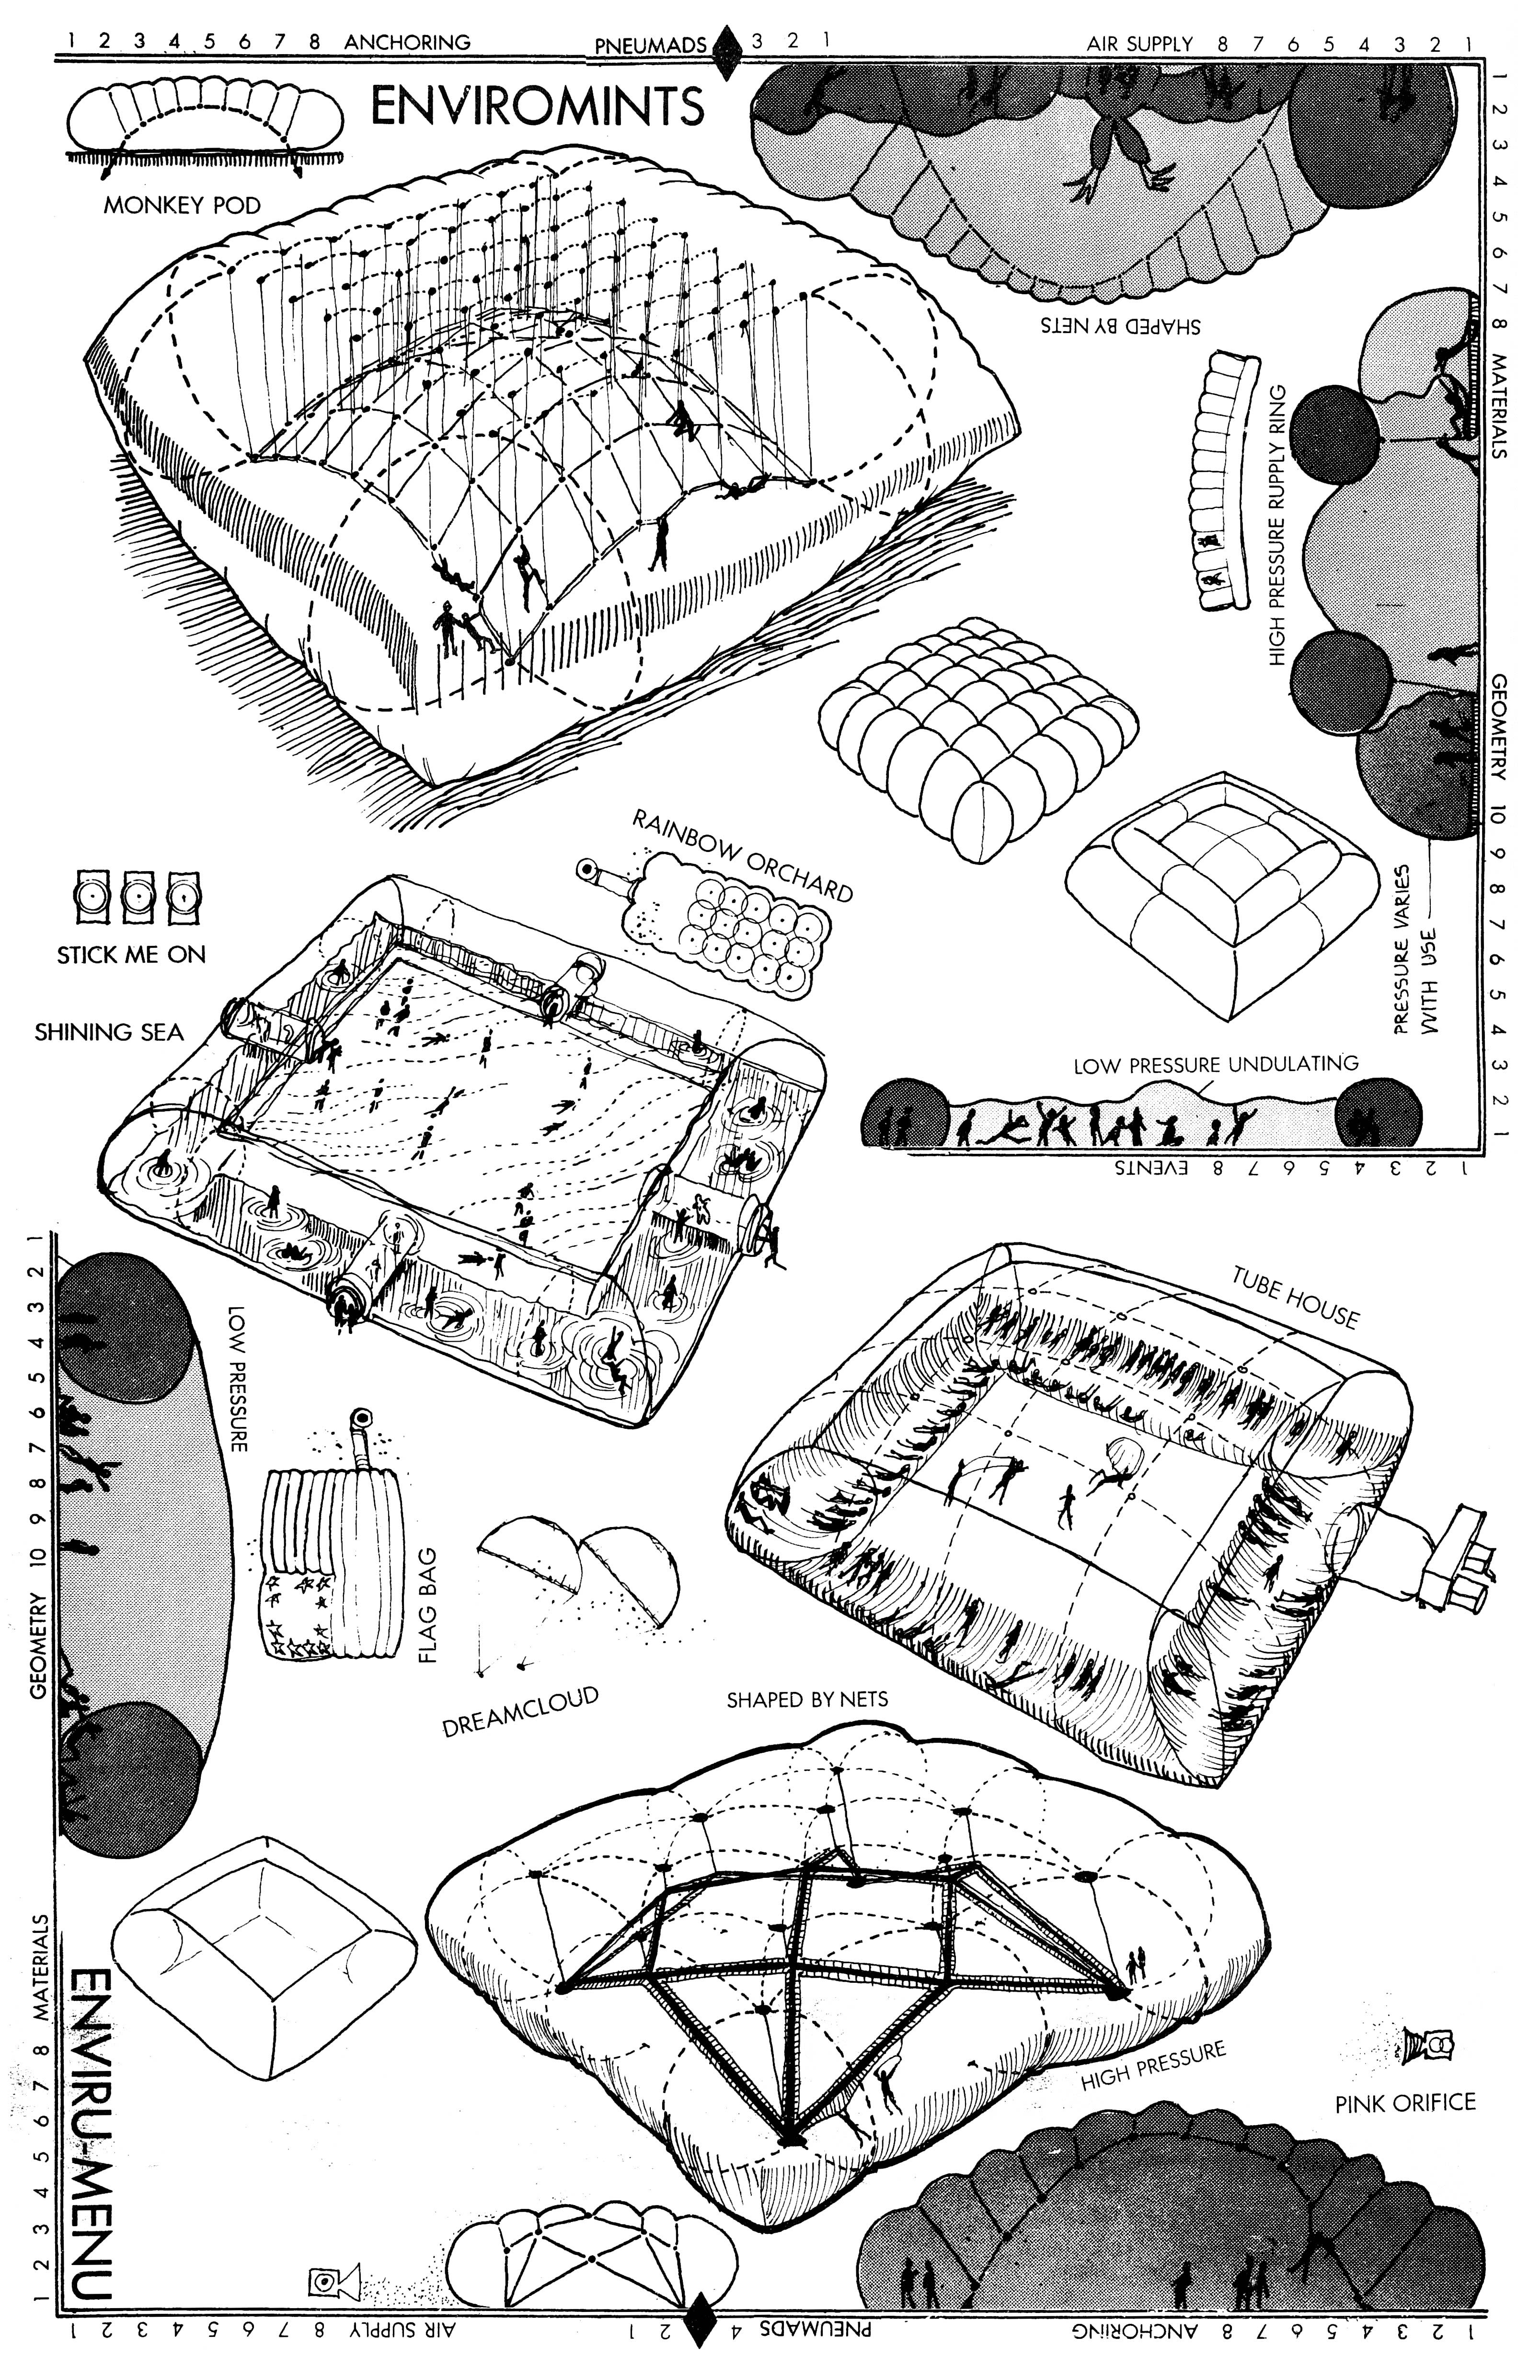
POLYETHYLENE - (dictionary definition) impervious to moisture, lighter than water, tough, pliable, outstanding at dielectric high frequencies; excellent chemical resistance. We started out using four mil (.004") for everything (it's cheapest) but now we use 6 mil wherever we can - 6 mil strikes a pretty good balance between cost and longevity. The lifespan of the membrane depends on 1) the surface the bubble will sit on (grass is best) 2) what the wind will do to it (High winds may destroy the plastics just by the force of the wind but more often the damage is done by the wind ripping the poly on branches, corners of things, etc.); 3) the use it is put to. Public events with high energy sources such as rock music tend to wear hard - stable uses such as greenhouses or sleeping places tend to wear well. Under optimum conditions (minimum sun & wind) the material should last about a year. 4) (for public places particularly) understanding of the nature of the material by the people using it. Users need to be made aware, somehow, to take off their shoes before entering, not to walk on (through) the walls, not to tear the doors as they go through, and not to block the air-supply tunnels. Generally we try to reinforce areas of heavy usage and make air tunnels where you can't get to them or make them big enough to crawl in without blocking the air flow. It's better to design in durability than have to police the vulnerable details (e.g., self -closing doors in Geometry section).
COLOR
The most easily available colors are clear and black (used in concrete construction work) but white and colored poly can also be found. Clear is decidedly magical. Its drawbacks are that it gets tremendously hot inside if there is sun and it is a hot day. It can cook the people inside and the grass underneath. This can be turned to good advantage in cool weather for solar heat or, in warmer weather good for water environments, sauna baths, oil massages, etc. Be careful of leaving a clear bubble on a green lawn for too long as it will steam the grass in its own juice in a few hours if the sun is hot. White reflects heat, but it gets very bright inside. You can project on it at night or bounce colored lights around inside it. One good design compromise is a half white/half clear bubble -you can put the white side up to the sun or the clear side up on cool or cloudy days. It's best to find shade, or bring your own - a big parachute over a bubble helps a great deal on hot days. Frosted poly is best for rear projection, white for front projection (although white will work for rear projection - it just isn't quite as bright an image). Some poly sold as clear is what is called "natural" which is slightly frosted, although not frosted enough to work well for rear projection. With usage, clear becomes frosted - you can facilitate the process by rubbing it until the static charge picks up dust. Colored poly gives a fine colored light inside. Sources for colored poly are 1) sheetrock and some other building materials are shipped on flatcars covered with 20'X50' sheets of colored poly. Talk to the people who unload the cars. Once we got a brand new red cover from the US Gypsum factory in Houston. 2) Colored poly dropcloths from paint or hardware stores. 3) Manufacturers of gas station and used car lot banners. Bergman Banners in San Francisco stocks nine colors in 36" width (4 mil) and sells it for $.03/sq.ft. 4) Union Carbide will make any color for you in lots of 5,000 lbs. It is possible to buy colors that they already have in 1,000-lb. lots.
Building supply stores are the most widespread sources of polyethylene (good last minute, Saturday sources) but packaging houses and concrete construction supply companies usually are cheaper and carry a larger stock of different weights and sizes of black and clear. They can usually order white (in San Francisco area, the Visqueen distributor has white.)
TAPE
Polyethylene can be heat-sealed, but we use tape because it eliminates hardware, can be used in the field and the technique can be mastered by large numbers of people. The most common kind of tape is 2" poly tape available from most polyethylene outlets, but it's not the best. Good tape comes in wider sizes, and is much stronger (if the seam is taped well, the poly will rip before the seam).
TAPING PROCESS
This is best worked out by you, partly depending on the number of people you have taping together. AVOID WRINKLES in the tape as the wrinkles will gather water, particularly when the bubble is left uninflated in the rain. This will eventually destroy the bond of any of these tapes.
HEAT SEALING
Someone from Oregon sez: You can seal poly with a regular clothes iron (Teflon if possible). The quality of the seam varies greatly with the skill of the person who is seaming, so practice first. I saw a dome bubble that got destroyed by the wind as the seams had been heat -sealed this way by amateurs. Put a couple pieces are cardboard together upright under the overlapping edges and run the iron along it smoothly and evenly.
POLYESTER (mylar is a trade name for polyester)
Silvered mylar is a good reflective surface and VERY magical. 2 mil mylar is roughly equivalent in strength to 6 or 8 mil poly, and it can be taped together like poly. John Reeves in Boston got a quantity of it from Eiser Industries in Revere, Mass. for $.20/sq.ft. He had to do a lot of talking to get it at that price. There are a lot of companies producing mylar now, but we haven't investigated. Again, let us know what you find out.
CONTACT PAPER (the stuff you put on shelves)
It's good reinforcing for places that get heavy stress or traffic like doors and where tunnels join floors.
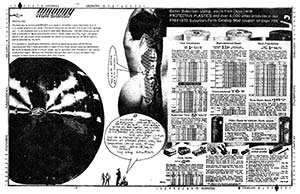
REINFORCED POLY
(See Sears catalog page.) This is fine, strong stuff, although a little difficult to tape due to texture. There is also a company in Houston named Griffolyn that produces this stuff. I don't know how their prices compare.
SAFETY CODES AND THE FIRE MARSHALL
From Tensile Structures, Volume One by Frei Otto: "... pneumatic buildings are safer than any other form of structure. The main advantage of the pneumatically stretched membrane is its small weight; even with spans of more than 100m, the weight of the structure does not exceed 3kg/sq.m. Even if the compressed air supply should fail, it would take a long time for large envelopes to collapse, since the enclosed air can leak out only slowly. Even large holes and tears are not dangerous. Although the pressure drops quite rapidly, the force due to the weight of the membrane is so small that, in large envelopes, it may take days before the enclosed air escapes even if the openings are large." We've never had any injuries due to structural failure.
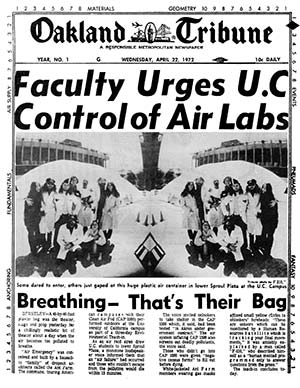
Fire codes are necessary, witness circus tent fire tragedies. They are usually primarily concerned with exits in public structures. Polyethylene inflatables have a virtual 360' exit because anyone can rip his way out, but this is sometimes hard to communicate to a fire marshall because he will have no precedent for allowing that type of exit. He will also want to test the fire resistance of the membrane itself, usually by holding a small piece of it over a bunsen burner for ten seconds, then removing it. If it remains burning for more than two seconds it is not considered self-extinguishing. However, when the polyethylene is inflated, the structure has internal pressure which works to extinguish the flame as soon as it burns through the membrane. (Charley Tilford in New York has done some research on this and has a film of his efforts.) Try to explain this. We put up inflatables in many public situations with mixed success- we did not get approval from the San Leandro Fire Marshall for Stewart Brand's hunger show, but we did get approval (with the diligent aid of Dr. Frank Oppenheimer) for an intermedia event in the Palace of Fine Arts in San Francisco. We didn't consult a fire marshall before Altamont, but remember you are responsible for the safety of your structure.
Good things to talk about with Fire Marshalls:
• self-extinguishing properties of inflated polyethylene
• rip through exit doors (thinness of the poly)
• the huge number of doors you have
• length of time required to deflate the building with holes in it
• the pressure at which the buildings runs
• the number of CFM of air you are providing per person
• how powerful your back up fan is (this is a must for public events)
-
-
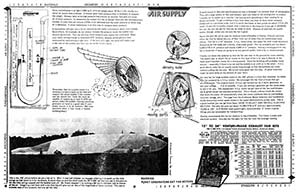
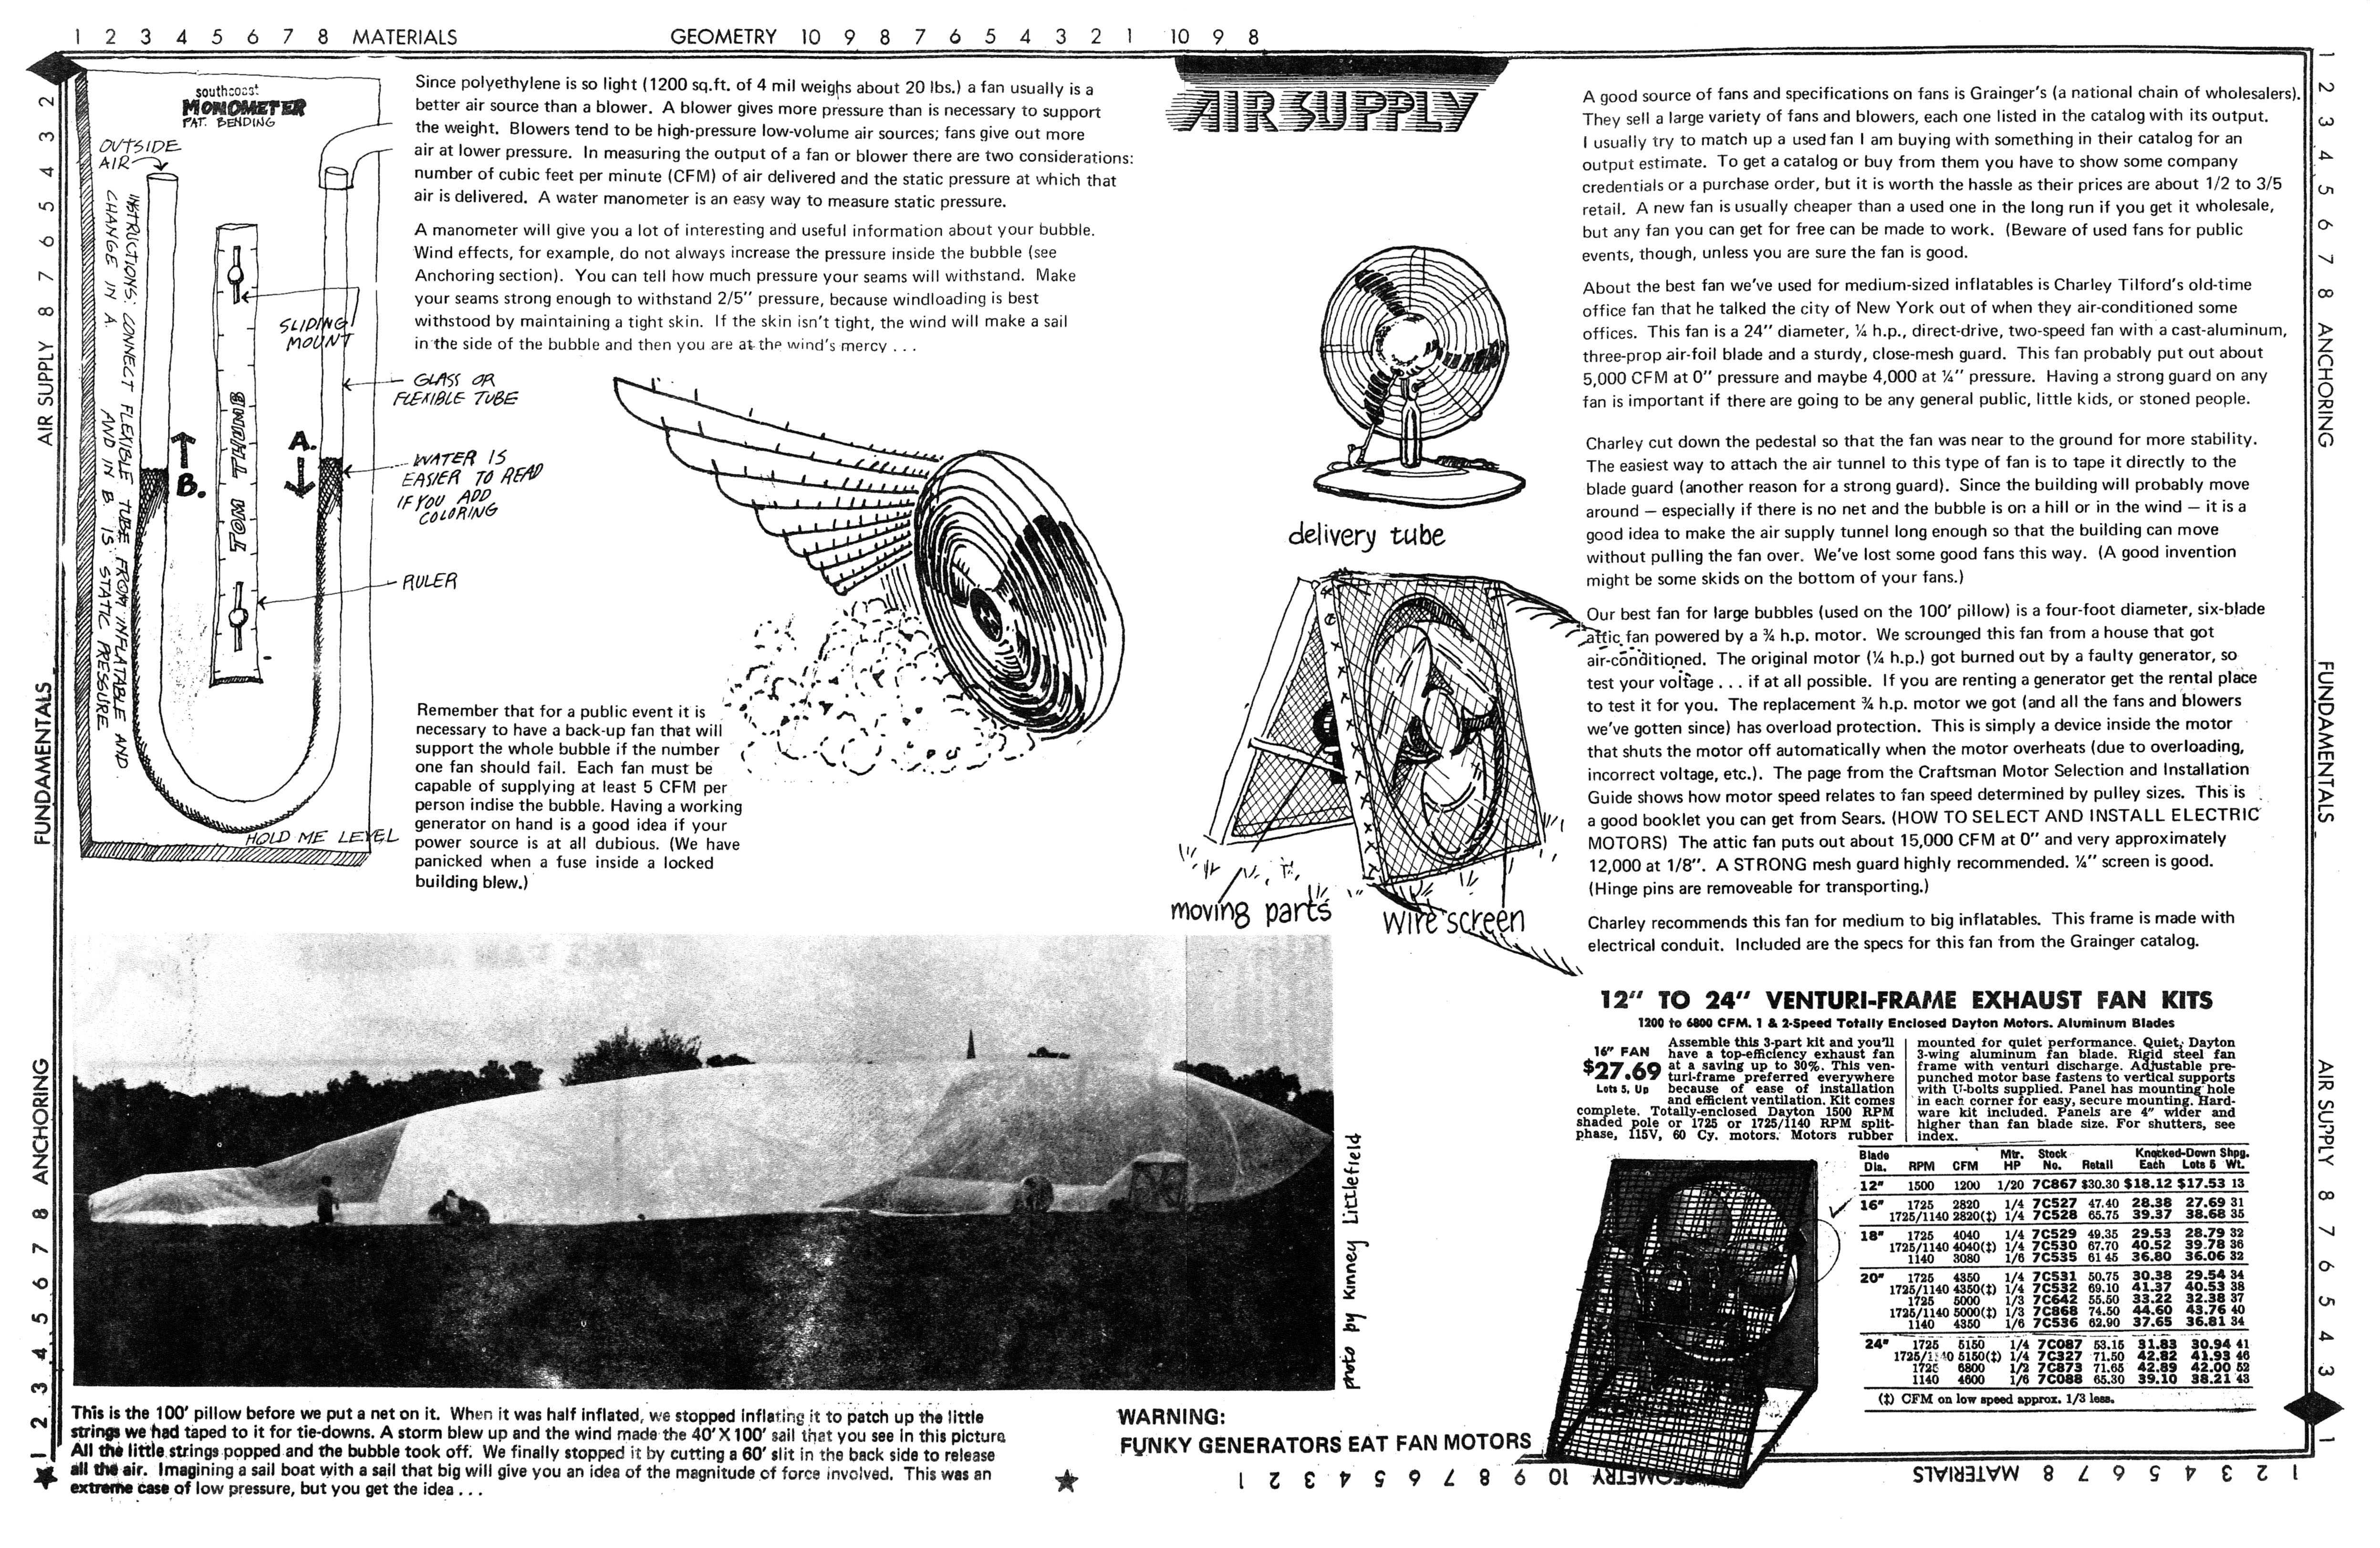
Since polyethylene is so light (1200 sq.ft. of 4 mil weighs about 20 lbs.) a fan usually is a better air source than a blower. A blower gives more pressure than is necessary to support the weight. Blowers tend to be high-pressure low-volume air sources; fans give out more air at lower pressure. In measuring the output of a fan or blower there are two considerations: number of cubic feet per minute (CFM) of air delivered and the static pressure at which that air is delivered. A water manometer is an easy way to measure static pressure.
Click here for text-only
A manometer will give you a lot of interesting and useful information about your bubble. Wind effects, for example, do not always increase the pressure inside the bubble (see Anchoring section). You can tell how much pressure your seams will withstand. Make your seams strong enough to withstand 2/5" pressure, because windloading is best withstood by maintaining a tight skin. If the skin isn't tight, the wind will make a sail in the side of the bubble and then you are at the wind's mercy...
Remember that for a public event it is necessary to have a back-up fan that will support the whole bubble if the number one fan should fail. Each fan must be capable of supplying at least 5 CFM per person indise the bubble. Having a working generator on hand is a good idea if your power source is at all dubious. (We have panicked when a fuse inside a locked building blew.)
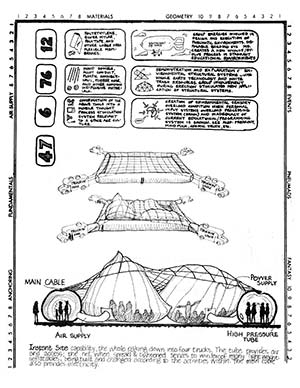
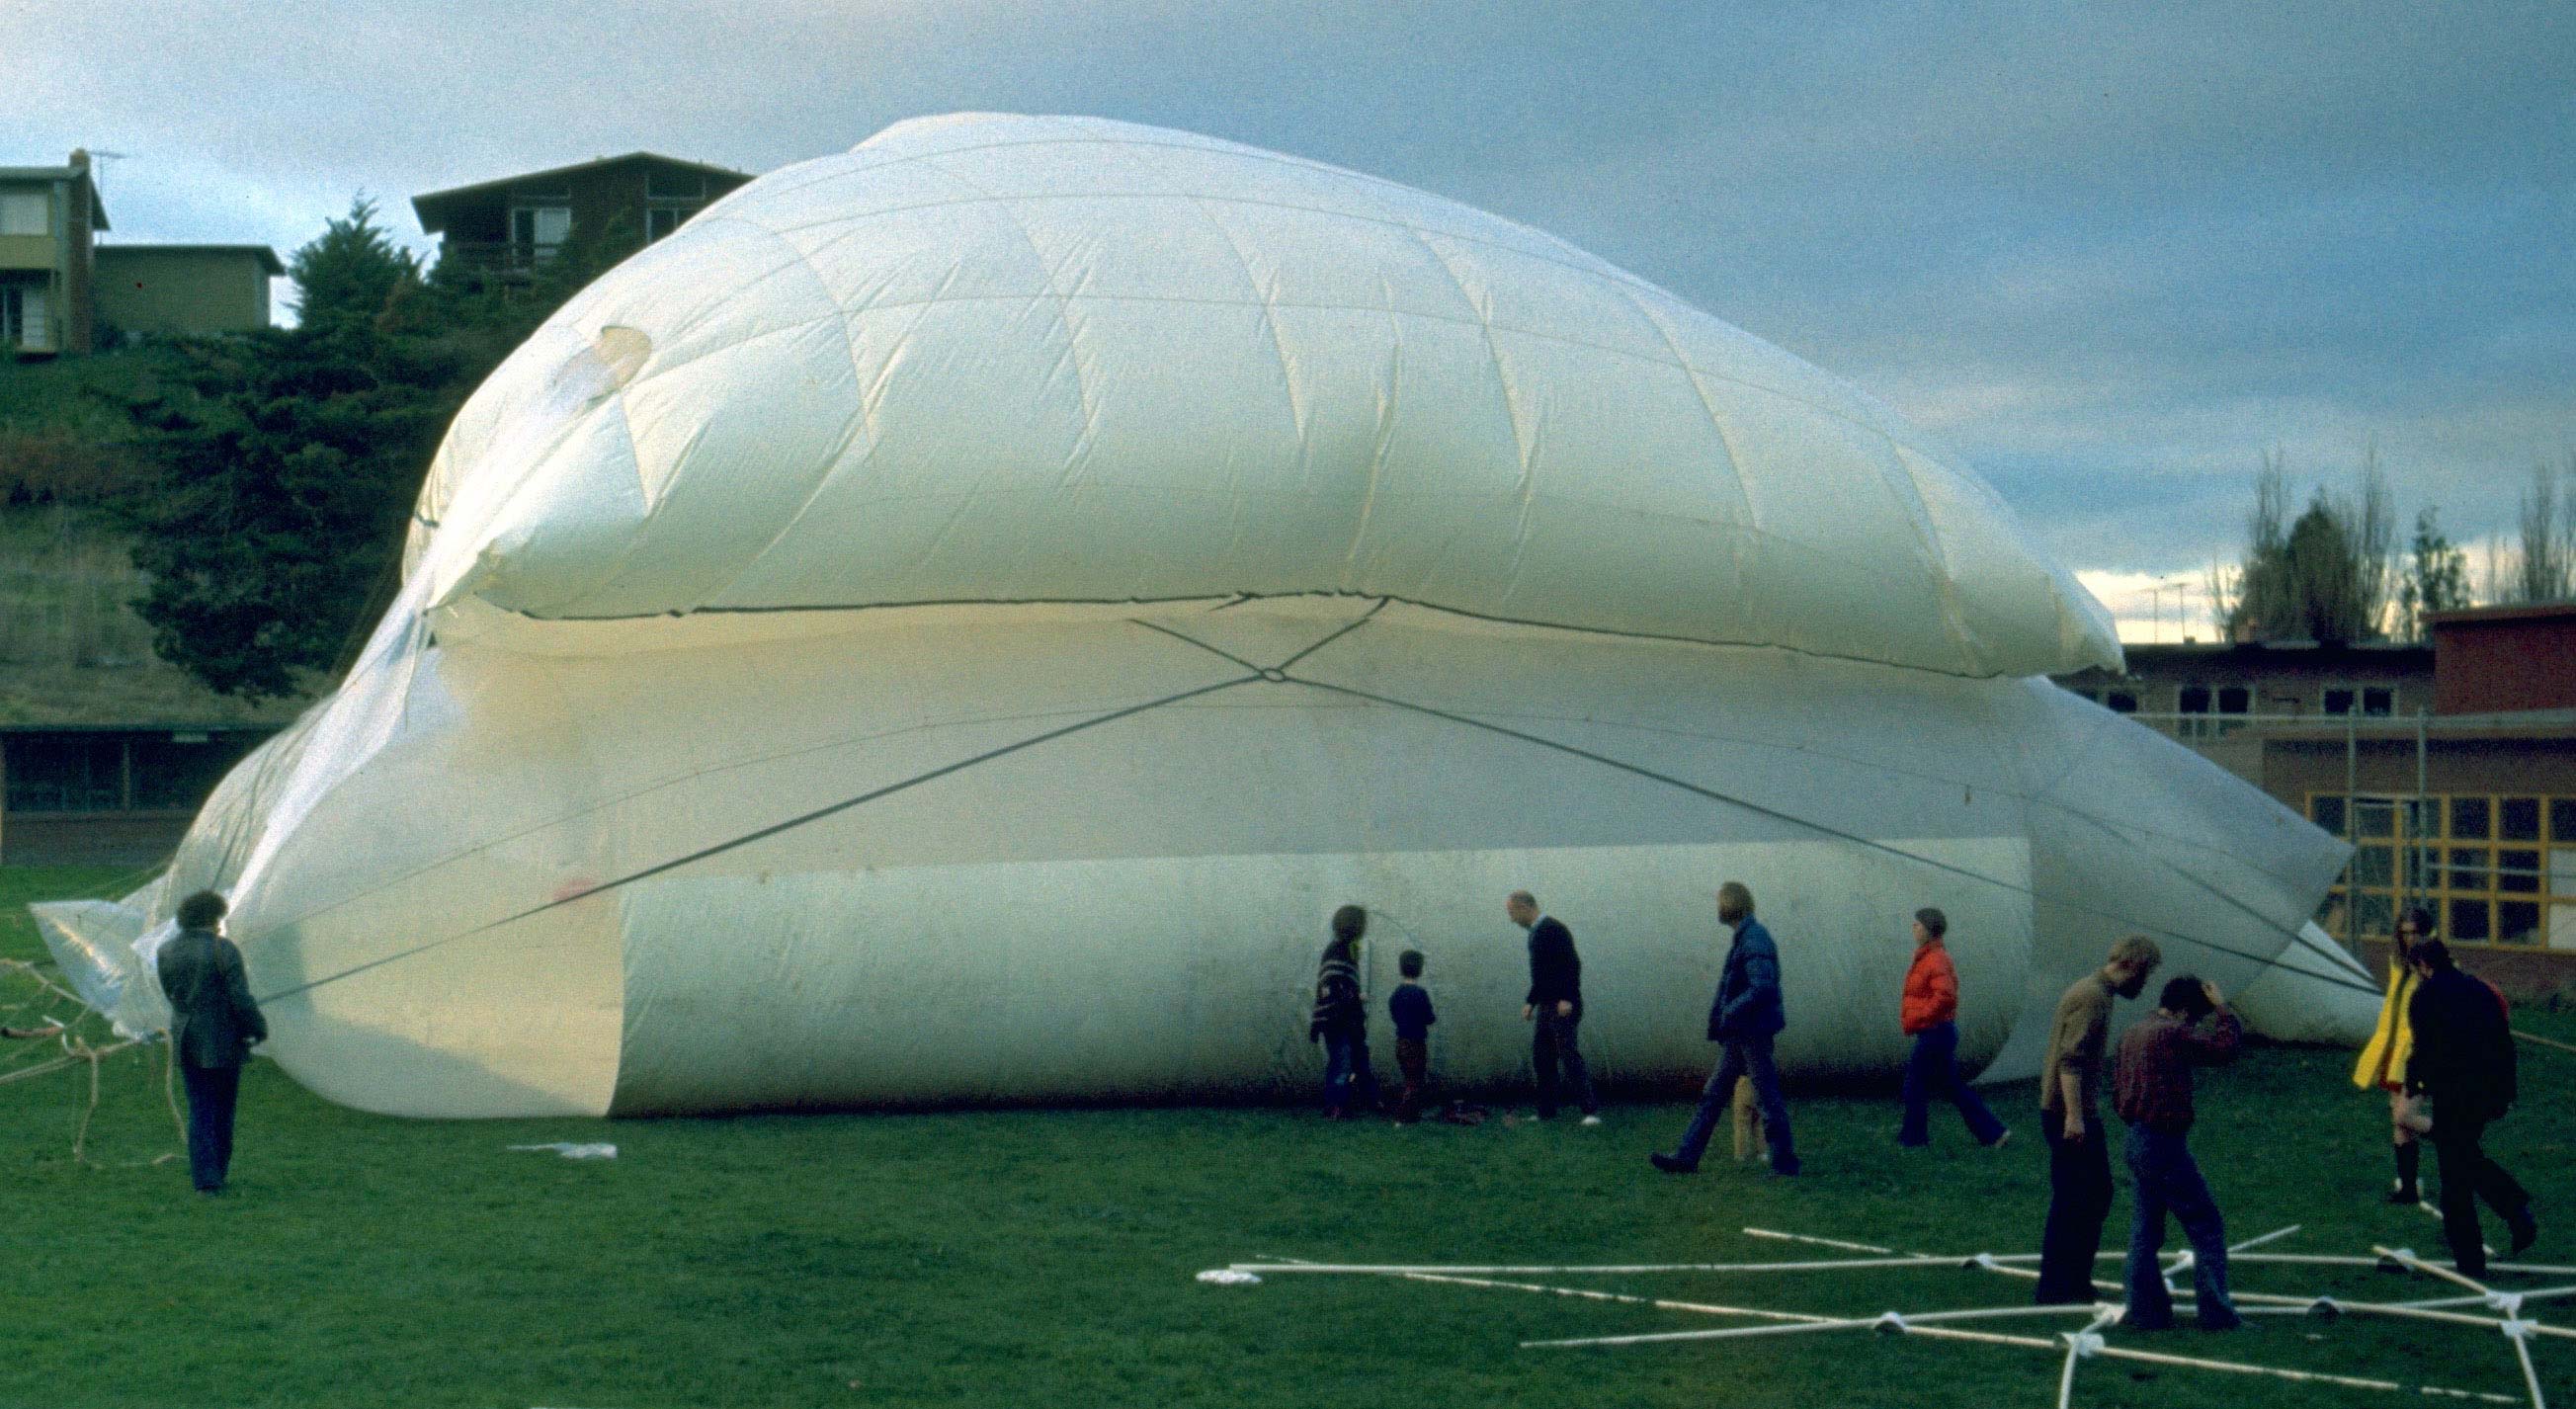
This is the 100 pillow before we put a net on it. When it was half inflated, we stopped inflating it to patch up the little strings we heel taped to it for tie-downs. A storm blew up and the wind made the 40' X 100' sail that you see in this picture. All the little strings popped and the bubble took off: We finally stopped it by cutting a 60' slit in the back side to release all the air. Imagining a sail boat with ail that big will give you an idea of the magnitude of force Involved. This was an extreme case of low pressure, but you get the idea...
A good source of fans and specifications on fans is Grainger's (a national chain of wholesalers). They sell a large variety of fans and blowers, each one listed in the catalog with its output. I usually try to match up a used fan I am buying with something in their catalog for an output estimate. To get a catalog or buy from them you have to show some company credentials or a purchase order, but it is worth the hassle as their prices are about 1/2 to 3/5 retail. A new fan is usually cheaper than a used one in the long run if you get it wholesale, but any fan you can get for free can be made to work. (Beware of used fans for public events, though, unless you are sure the fan is good.
About the best fan we've used for medium-sized inflatables is Charley Tilford's old-time office fan that he talked the city of New York out of when they air-conditioned some offices. This fan is a 24" diameter, ¼ h.p., direct-drive, two-speed fan with a cast-aluminum, three-prop air-foil blade and a sturdy, close-mesh guard. This fan probably put out about 5,000 CFM at 0" pressure and maybe 4,000 at ¼" pressure. Having a strong guard on any fan is important if there are going to be any general public, little kids, or stoned people.
Charley cut down the pedestal so that the fan was near to the ground for more stability. The easiest way to attach the air tunnel to this type of fan is to tape it directly to the blade guard (another reason for a strong guard). Since the building will probably move around - especially if there is no net and the bubble is on a hill or in the wind - it is a good idea to make the air supply tunnel long enough so that the building can move without pulling the fan over. We've lost some good fans this way. (A good invention might be some skids on the bottom of your fans.)
Our best fan for large bubbles (used on the 100' pillow) is a four-foot diameter, six-blade attic fan powered by a ¾ h.p. motor. We scrounged this fan from a house that got air-conditioned. The original motor (1/4 h.p.) got burned out by a faulty generator, so test your voltage... if at all possible.
If you are renting a generator get the rental place to test it for you. The replacement ¾ h.p. motor we got (and all the fans and blowers we've gotten since) has overload protection. This is simply a device inside the motor that shuts the motor off automatically when the motor overheats (due to overloading, incorrect voltage, etc.). -
 Pillow testing in Freestone, CA
 -
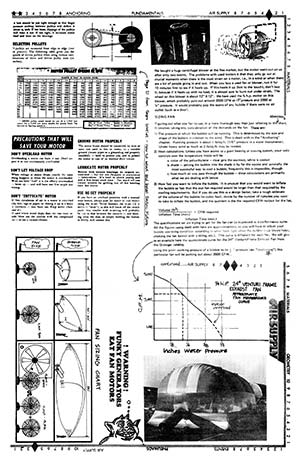
A belt should be just tight enough so that finger pressure midway between pulleys will deflect it about ¼ inch. If too loose, slippage of the pulleys will wear it out. If too tight, it increases motor load and wear on the bearings.
Click here for text-only
SELECTING PULLEYS
V-pulleys are measured from edge co edge (not in groove). The following cable gives you the speeds of driven pulleys when using various combinations of drive and driven pulley sizes (in inches).
PRECAUTIONS THAT WILL SAVE YOUR MOTOR
DON'T OVERLOAD MOTOR Overloading a motor can burn it out. Don't expect it to run continuously overloaded.
DON'T LET VOLTAGE DROP
When voltage at motor drops, exactly the same thing happens as when the motor is overloaded. With too little "fuel" it is (in effect) overworked – heats up – and will burn out. Use ample size wiring.
DON'T "SUFFOCATE" MOTOR
If free circulation of air to a motor is restricted (by dirt, rags or paper, or closing it up in a box) it overheats – may burn out. Keep motor clean and dry. If used where wood chips, dust, etc. can enter inside, blow out the interior with dry compressed air – or use a vacuum cleaner.
GROUND MOTOR PROPERLY
The motor frame should be connected, by wire of same size used in line to motor, to a suitable ground (water pipes or a grounding rod properly installed) - both to protect you, and to protect the motor in case of an internal short circuit.
LUBRICATE MOTOR PROPERLY
Motors with bronze bearings do require occasional - but not too frequent or excessive - lubrication. It's best to check yearly and add a few drops each time. Too much oil can cause trouble by getting out or the bearing into the motor.
USE RE-SET PROPERLY
If you have an overload protector with a manual reset button, always wait for motor to cool before using the re-set. Never hammer the re-set (if it seems so "stick"), as this will break off the switch parts. Any trouble with re-setting will probably be due to dust between the contacts – and blowing away the dust, or simply holding the button in firmly, will correct this.
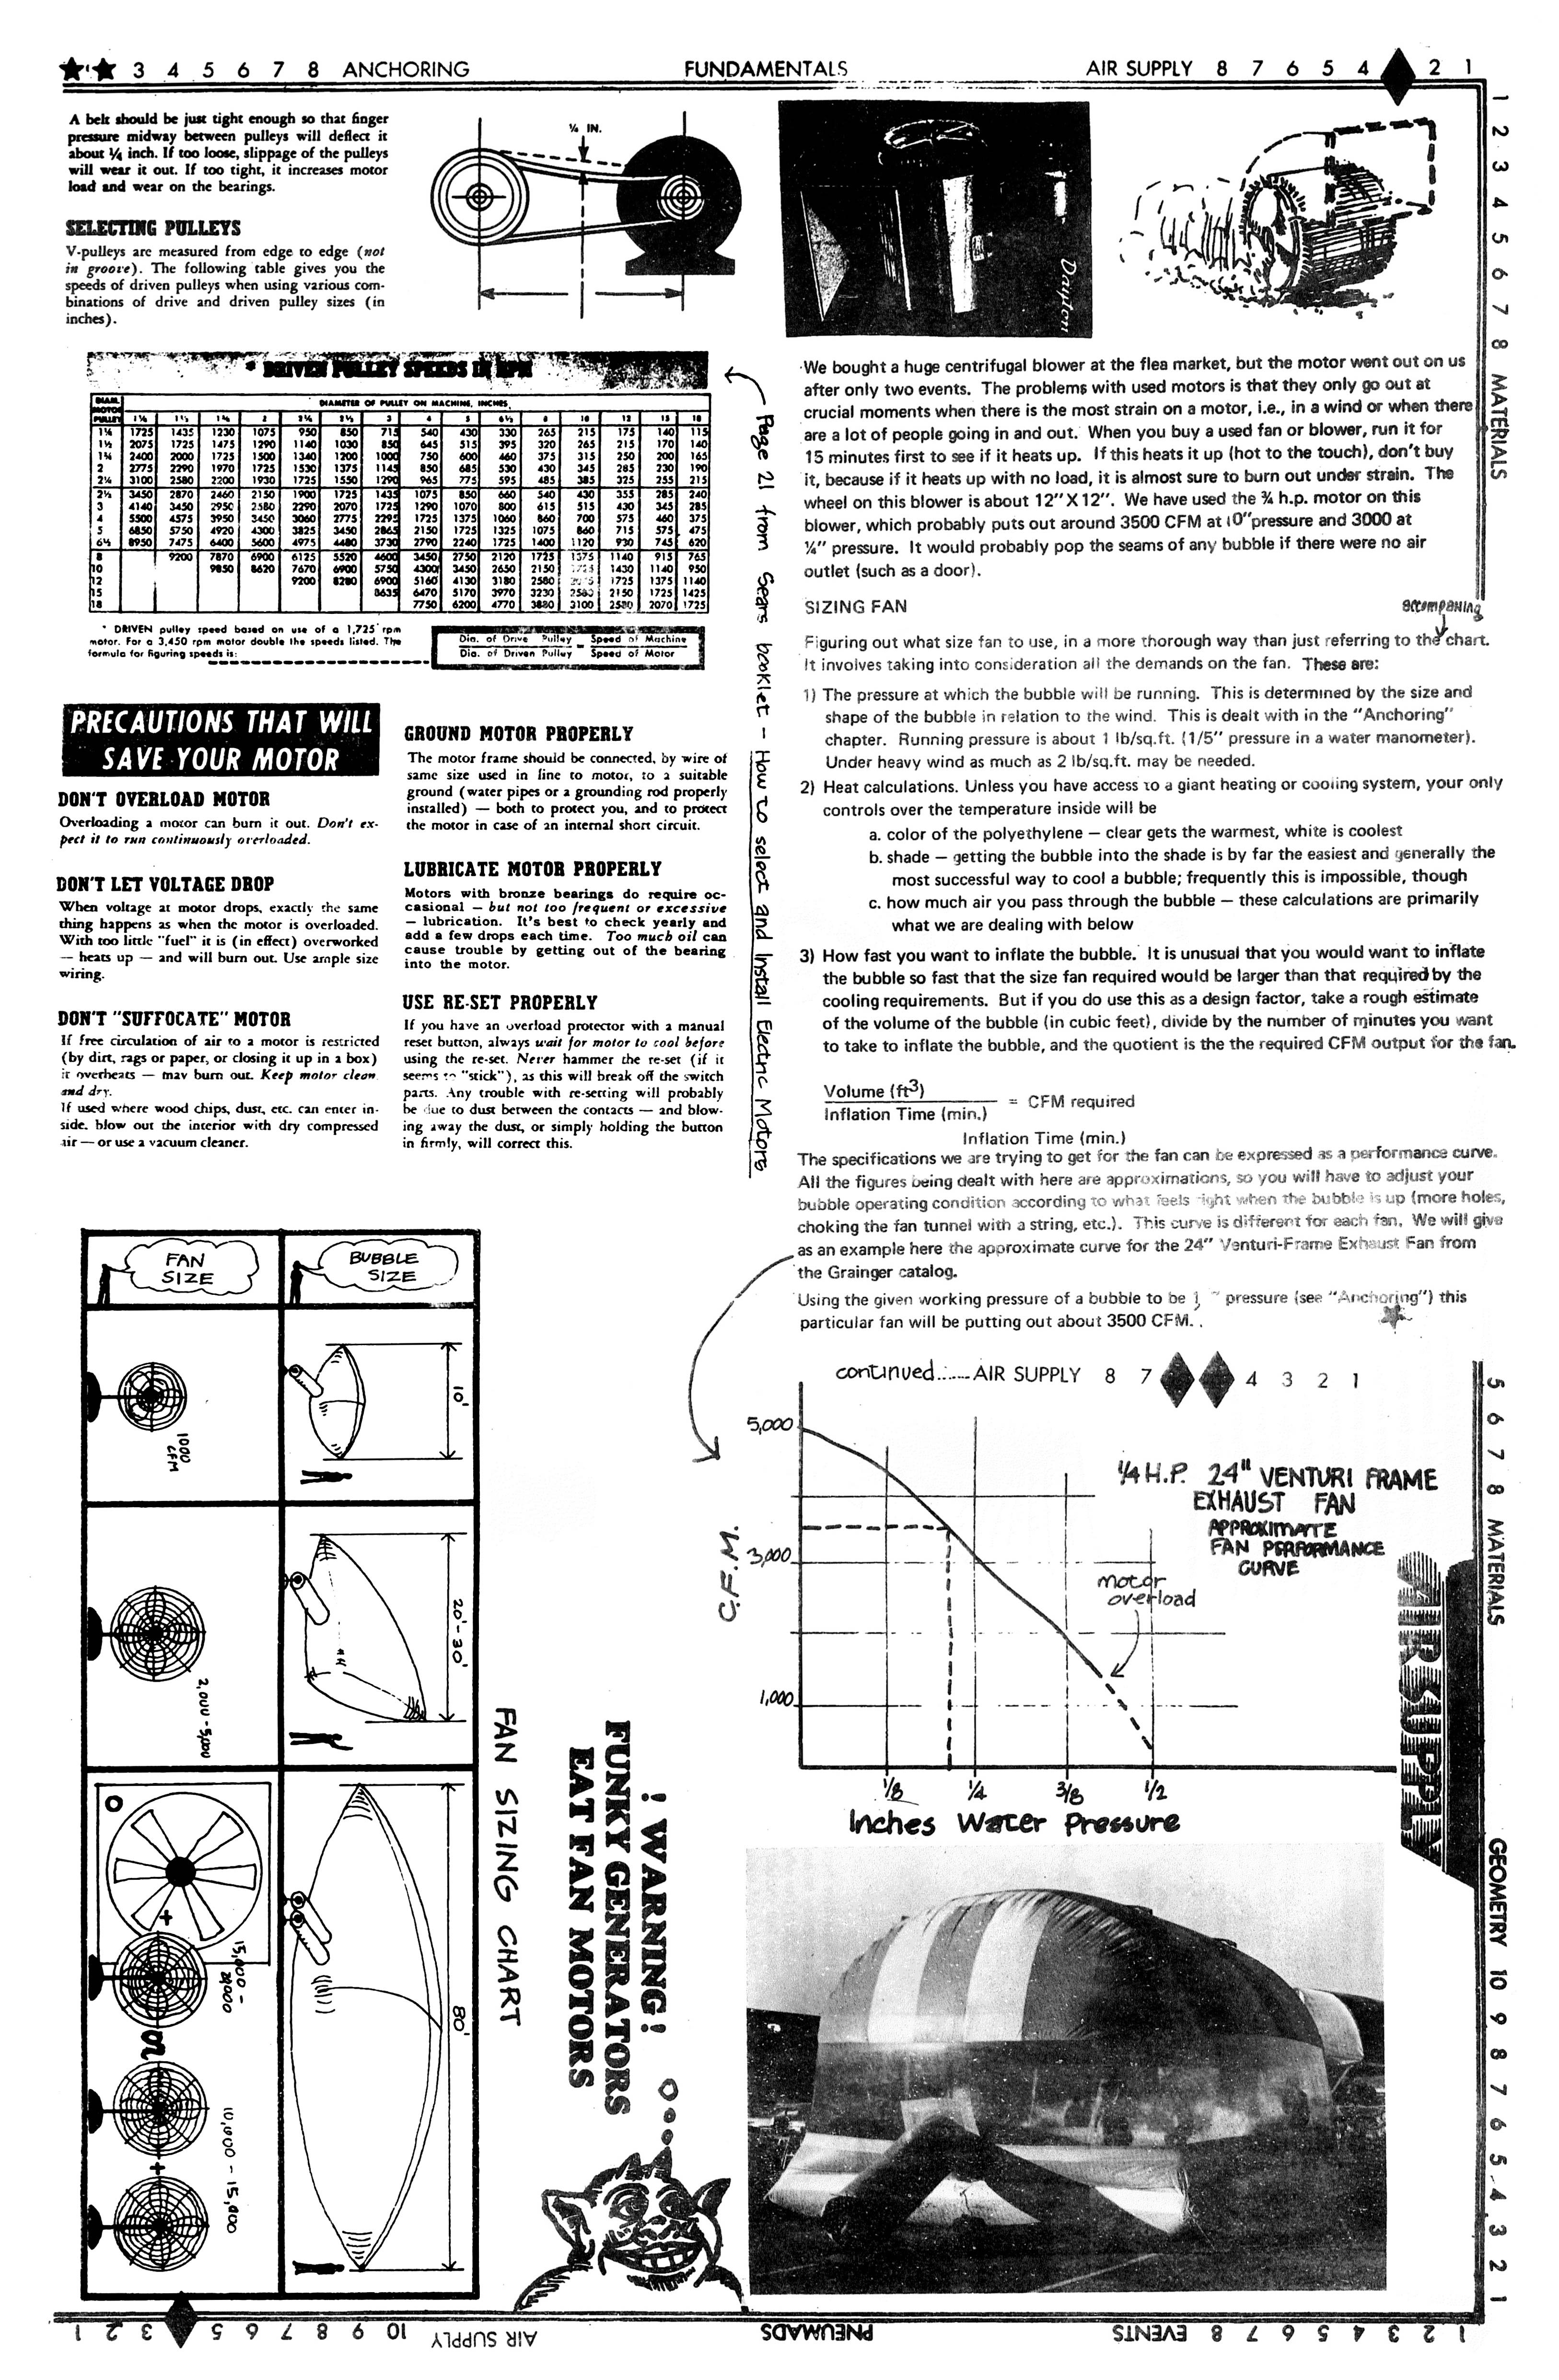
We bought a huge centrifugal blower at the flea market, but the motor went out on us after only two events. The problems with used motors is that they only go out at crucial moments when there is the most strain on a motor, i.e., in a wind or when there are a lot of people going in and out. When you buy a used fan or blower, run it for 15 minutes first to see if it heats up. If this heats it up (hot to the touch), don't buy it, because if it heats up with no load, it is almost sure to burn out under strain. The wheel on this blower is about 12"X 12". We have used the ¾ h.p. motor on this blower, which probably puts out around 3500 CFM at 10"pressure and 3000 at ¼" pressure. It would probably pop the seams of any bubble if there were no air outlet (such as a door).
SIZING FAN
Figuring out what size fan to use, in a more thorough way than just referring to the chart. It involves taking in to consideration all the demands on the fan. These are:
• The pressure at which the bubble will be running. This is determined by the size and shape of the bubble in relation to the wind. This is dealt with in the "Anchoring" chapter. Running pressure is about 1 lb/sq.ft. (1/5" pressure in a water manometer). Under heavy wind as much as 2 lb/sq.ft. may be needed.
• Heat calculations. Unless you have access 10 a giant heating or cooling system, your only controls over the temperature inside will be
• color of the polyethylene - clear gets the warmest, white is coolest
• shade - getting the bubble into the shade is by far the easiest and generally the most successful way to cool a bubble; frequently this is impossible, though
• how much air you pass through the bubble - these calculations are primarily what we are dealing with below
• How fast you want to inflate the bubble. It is unusual that you would want to inflate the bubble so fast that the size fan required would be larger than that required by the cooling requirements. But if you do use this as a design factor, take a rough estimate of the volume of the bubble (in cubic feet), divide by the number of minutes you want to take to inflate the bubble, and the quotient is the required CFM output for the fan. -
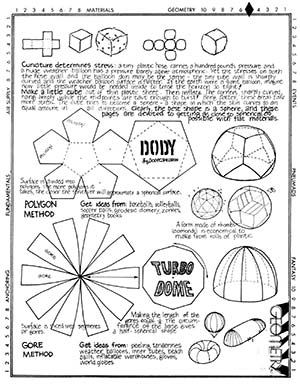
 Turbo dome, Media PA, 1970
 -
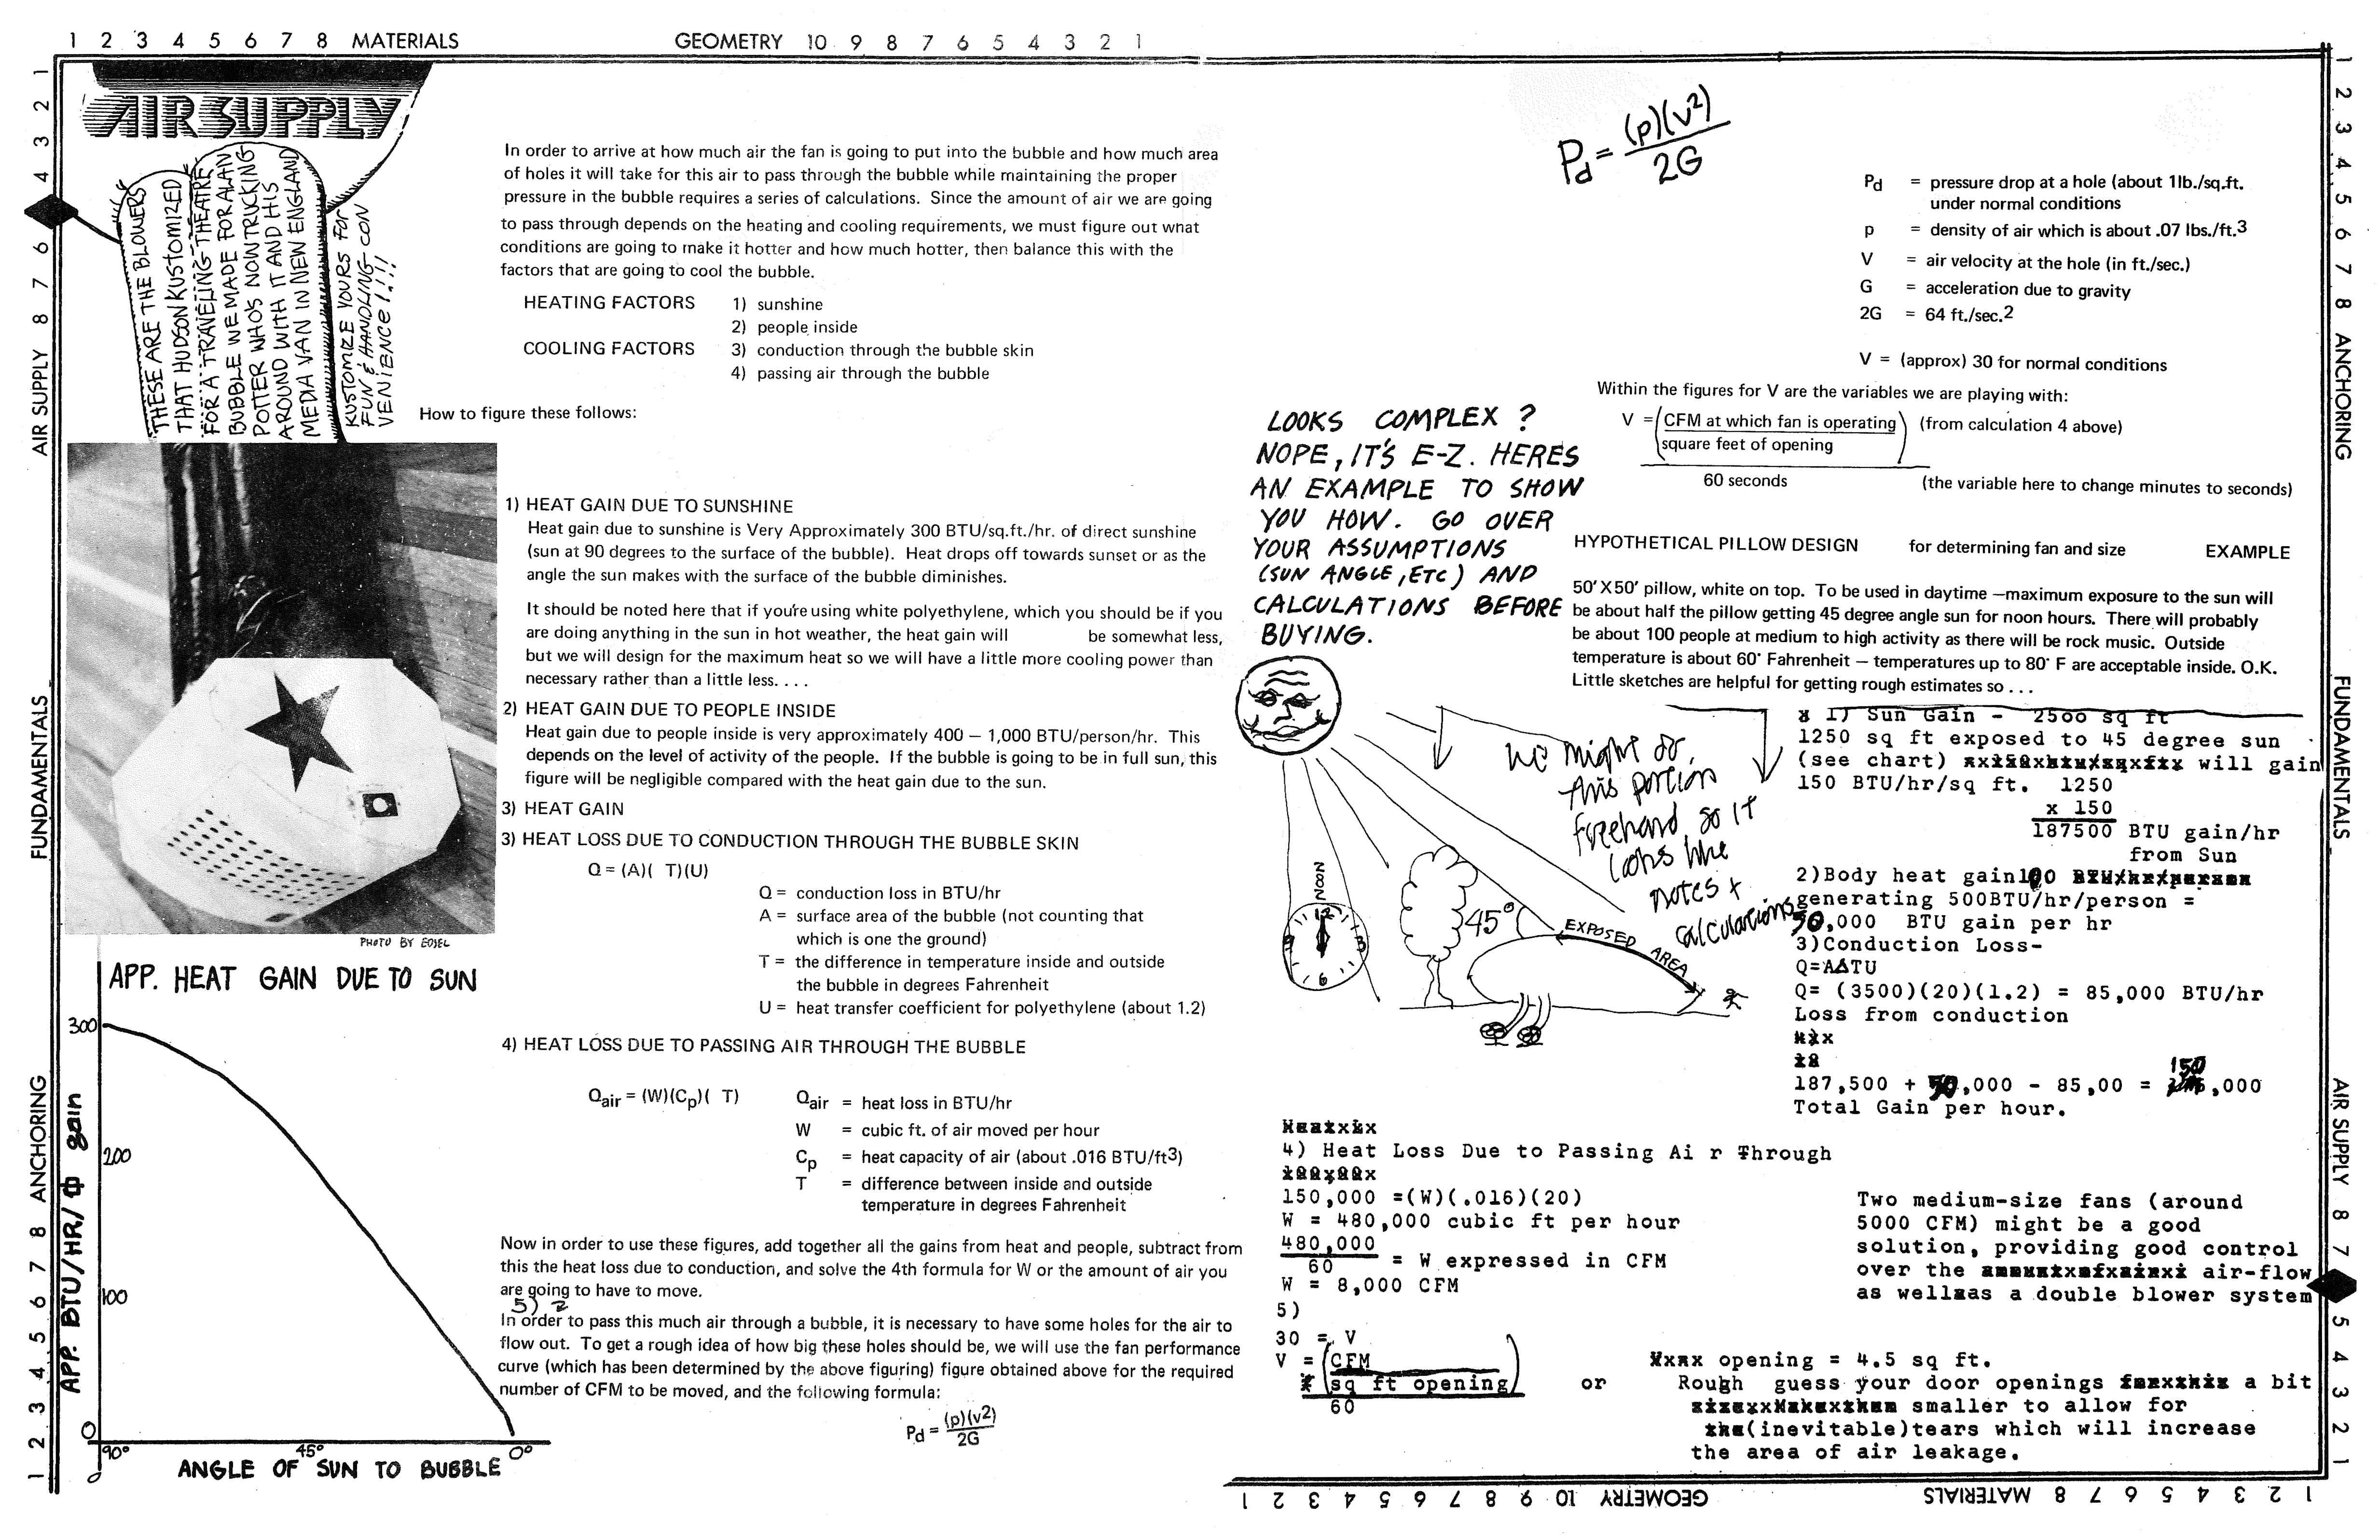
In order to arrive at how much air the fan is going to put into the bubble and how much area of holes it will take for this air to pass through the bubble while maintaining the proper pressure in the bubble requires a series of calculations. Since the amount of air we are going to pass through depends on the heating and cooling requirements, we must figure out what conditions are going to make it hotter and how much hotter, then balance this with the factors that are going to cool the bubble.
Click here for text-only
HEATING FACTORS
1) sunshine
2) people inside
COOLING FACTORS
3) conduction through the bubble skin passing air through the bubble
How to figure these follows:
• HEAT GAIN DUE TO SUNSHINE
Heat gain due to sunshine is Very Approximately 300 BTU/sq.ft./hr. of direct sunshine (sun at 90 degrees to the surface of the bubble). Heat drops off towards sunset or as the angle the sun makes with the surface of the bubble diminishes. It should be noted here that if you're using white polyethylene, which you should be if you are doing anything in the sun in hot weather, the heat gain will be somewhat less, but we will design for the maximum heat so we will have a little more cooling power than necessary rather than a Iittle less....
• HEAT GAIN DUE TO PEOPLE INSIDE
Heat gain due to people inside is very approximately 400 - 1,000 BTU/person /hr. This depends on the level of activity of the people. If the bubble is going to be in full sun, this figure will be negligible compared with the heat gain due to the sun.
• In order to pass this much air through a bubble, it is necessary to have some holes for the air to flow out. To get a rough idea of how big these holes should be, we will use the fan performance curve (which has been determined by the above figuring) figure obtained above for the required number of CFM to be moved, and the following formula:
Pd = pressure drop at a hole (about 1lb./sq.ft.) under normal conditions
p = density of air which is about .07 lbs./ft.3
V = air velocity at the hole (in ft./sec.)
G = acceleration due to gravity
2G = 64 ft./sec.2
V = (approx.) 30 for normal conditions
-
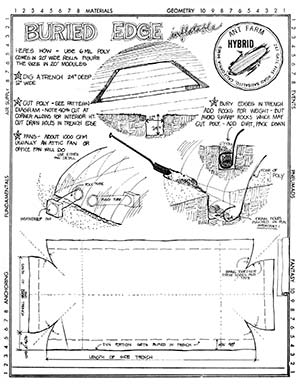
ANCHORING
Click here for text-only
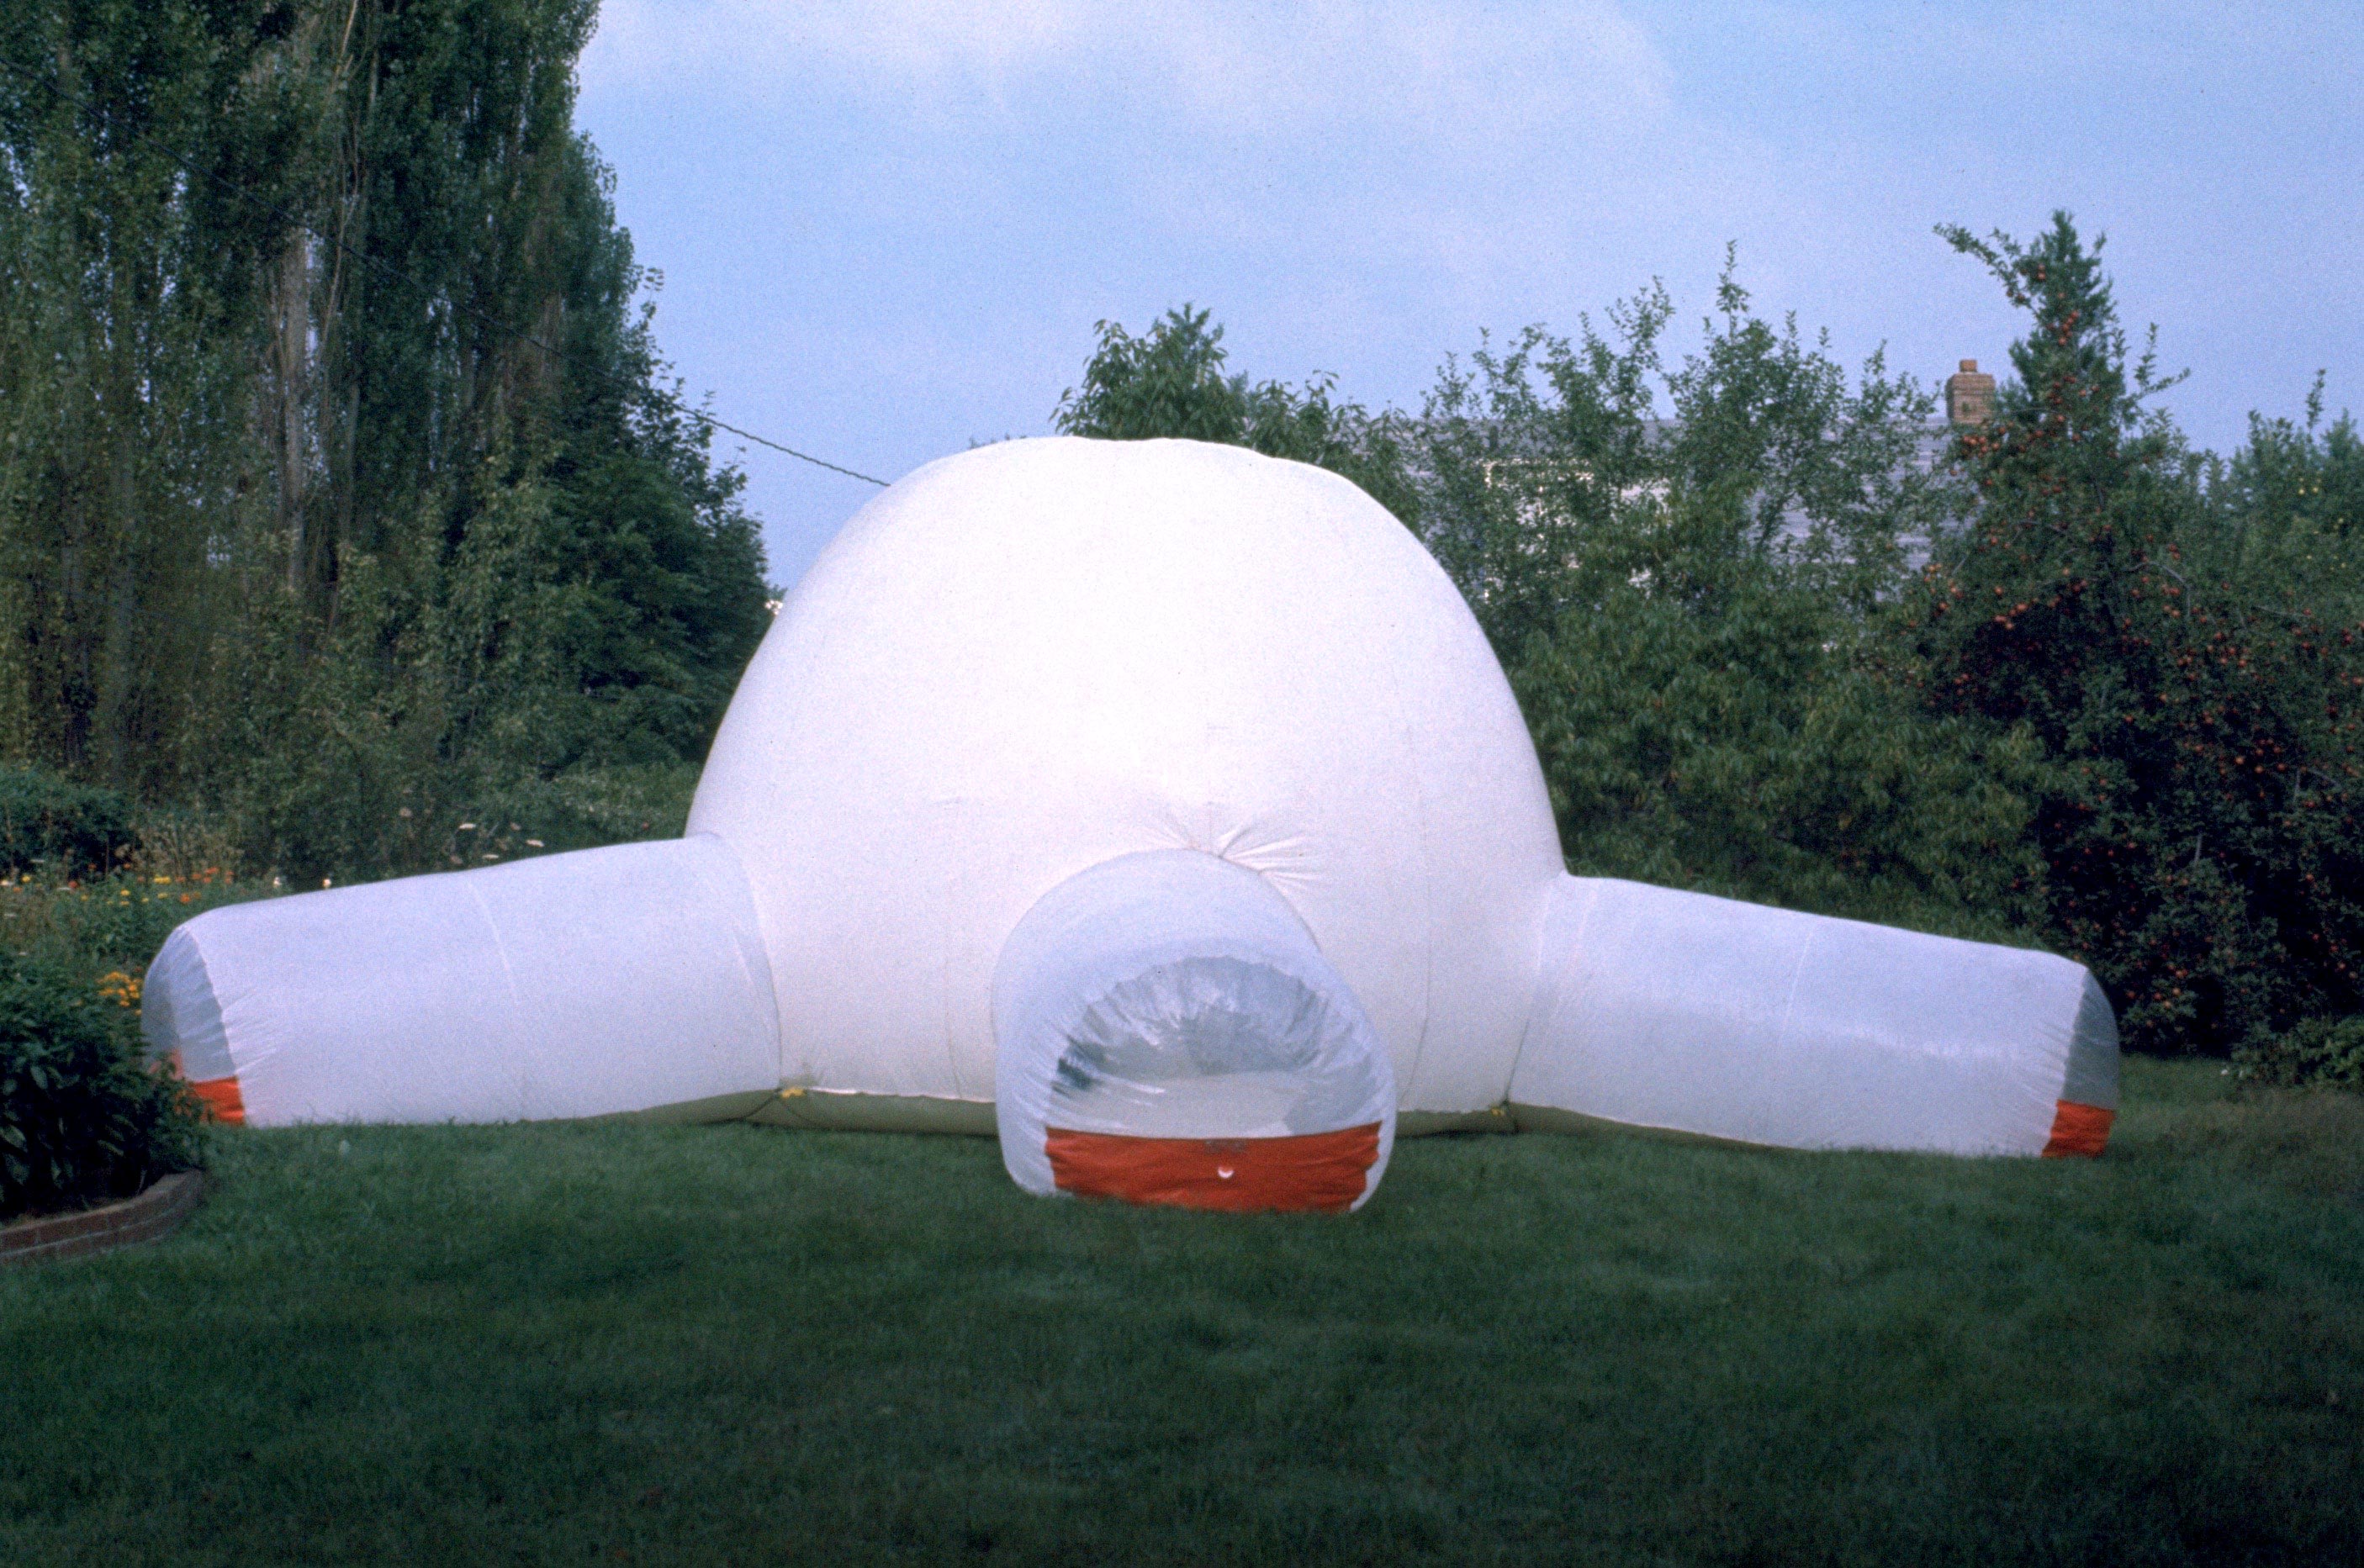
If your inflatable is going to be up outdoors in any wind, it will need an anchoring system. For small volume (500 sq.ft. of floor area or less) interior weights should work; these could be sand bags or water bags. Larger structures require heavier anchoring. There are a number of ways of doing it: integrally made tie downs, buried edge, weighted edges, taped edge, or tension net anchors. Buried edge is good for a semi-permanent installation where you can dig a trench. A taped edge is good for a small installation on a smooth floor; tie downs and tension nets are good for sites with existing things to tie to (trees, fire hydrants), or where it would be easy to drive tent stakes or augers. The anchoring system must withstand not only windloading but also the internal air pressure of the structure. Precise structural calculations should be left to 2 engineers, 3 Ph.D. mathematicians, and a computer, but a little rough math can give you a close enough estimate of what anchors to use. We will deal first with inflation pressure and second with wind loads.
PRESSURE LOAD… On any surface that is curved in one direction, i.e., a cylinder or a long pillow, the tension per unit of width is equal to the internal pressure multiplied by the radius of curvature. Work in pounds and feet. Some ball-park figures on figuring pressure: the highest pressure you are likely to get with a powerful direct drive fan is 2 pounds per sq. ft. (21b./sq.ft.). A normal working pressure is 11b./sq.ft. On a water manometer, 1" of water equals 51b./sq.ft. (see manometer drawing). Indoors you can keep a structure up with as little as ¼ lb./sq.ft.
Make a sketch of the shape, find the radius of curvature by making a section through it, on this diagram the tension equals pressure times radius of curvature. The tension is the downward force you need per foot of edge.
T/ft = downward force needed per foot of edge
P = pressure (in lbs./sq.ft.)
Rc = radius of curvature (in feet)
EXAMPLE: The Earth Day Bubble by Charley Tilford in New York City was 200'X60', radius of curvature was 30.The anchors were parking meters spaced at 9' along the long edges (the 200' dimension). The pressure which the bubble was designed to withstand was 21b./sq.ft. The ropes spanned between parking meters so the load on each rope was (tension per foot of Q2 width) times (spacing between meters). Tension= (30)(21b./sq.ft.) and Tension per rope= (9)(30) (21b./sq.ft.) = 540 lbs. per rope. 2500 lbs test 3/8 inch dia nylon rope was used.
If you want to do an inflatable with the weighted edge (instead of a plastic floor): find the total downward force required, then divide by the perimeter to get force required per unit of length of the perimeter.
WINDLOADING
To figure windloads: find the area of resistance the structure presents to the wind. (length)(height). The horizontal force from the wind blowing on the structure can be up to 10lb./sq.ft. depending on the shape of the structure and the wind velocity. A lower, more shallow-sloping profile will create less resistance (and will create more negative pressure) on the leeward side of the bubble.
Bubble I presents a large area to the wind. The negative pressure is concentrated on the back side. (This negative pressure is created the same way as lift is created by an airplane wing.) Bubbles II and III are actually getting some lift help from the wind. Bubble III would probably need less fan pressure in the wind because of the negative pressure on the outside created by the wind blowing over the low profile. A structure to be left up for more than, say, an afternoon (or a structure for an event which you don't want to have to postpone due to high wind) should be designed for 10lb./sq.ft. pressure. For a structure 50' long and 15' high, the design force would be (50')(15')(10lb./sq.ft.) which is 7500 lbs force on the structure. FORMULA (area presented to the wind)(10lb/sq.ft.) = wind load
If 7500 lbs seems like a lot, think of the force on just the minimal area your body presents to the wind in a good, high wind.
TOTAL LOAD
This windload must be added to the inflation load to get the total load that the anchoring system has to counteract. If it is possible that he whole wind-load could be on one anchor point (such as when a square pillow with a square net anchored down at each corner presents one corner to the wind), then the total wind load must be added to the inflation load on each anchor. If the wind is coming directly against one side, then the windload divided by the number of anchors that will be under tension should be added to the inflation load for each anchor.
TYPES OF ANCHORING SYSTEMS
These systems have the structural advantage of distributing the forces evenly around the whole perimeter of the building. We used one with pieces of pipe taped into the edge over a waterbed environment so that we were able to remove the inflatable by lifting it over the bed without having to move the water bed which weighed 3000 lbs. Because the plastic floor is eliminated, this type of inflatable would also be good for a greenhouse, storage facility, pool cover, etc. These types might tend to last longer, too, because they are more static so people probably wouldn't walk through the walls or otherwise freak out at the expense of the plastic.
WEIGHTED EDGE
Weighted Edge is anything heavy that can be laid on the edge of the plastic or taped into the edge. See illustration.
I saw an interesting inflatable that John Reeves did in the Summer Thing program in Boston that was an inflated hemisphere (out of 2 mil silver mylar) that tied down to a piece of telephone cable that he had gotten the phone company to donate. A 20' diameter circle of this phone cable weighed about 200 lbs. The phone company usually just chops it up and melts it down again. John's bubble leaked air between the cable and the edge of the plastic. This could be desireable if you want to circulate a lot of air, but if you have pressure problems a flap could be taped on inside the bubble, like on giant Bird-Air and most commercial inflatables. A section of the detail might look like this: Looking at the elevation drawing of this, notice the catenary curves between each tie-down point. This is the natural configuration the line between two weighted points on an inflatable takes, so it will strengthen your bubble to actually cut a curve to an approximate shape, reinforce the edge by taping a piece of cord into the edge and running the tie-down loops through the string. This will distribute the force of the tie-downs through the whole edge of the inflatable, rather than gathering the stress at the point where the tie-down meets the edge of the plastic. This will minimize wrinkles and tears due to concentrated stress. lnflatables that are to be tied to stakes can be made in the same way as this. -

TAPED EDGE
Click here for text-only
Edges can be taped to anything smooth enough to tape to
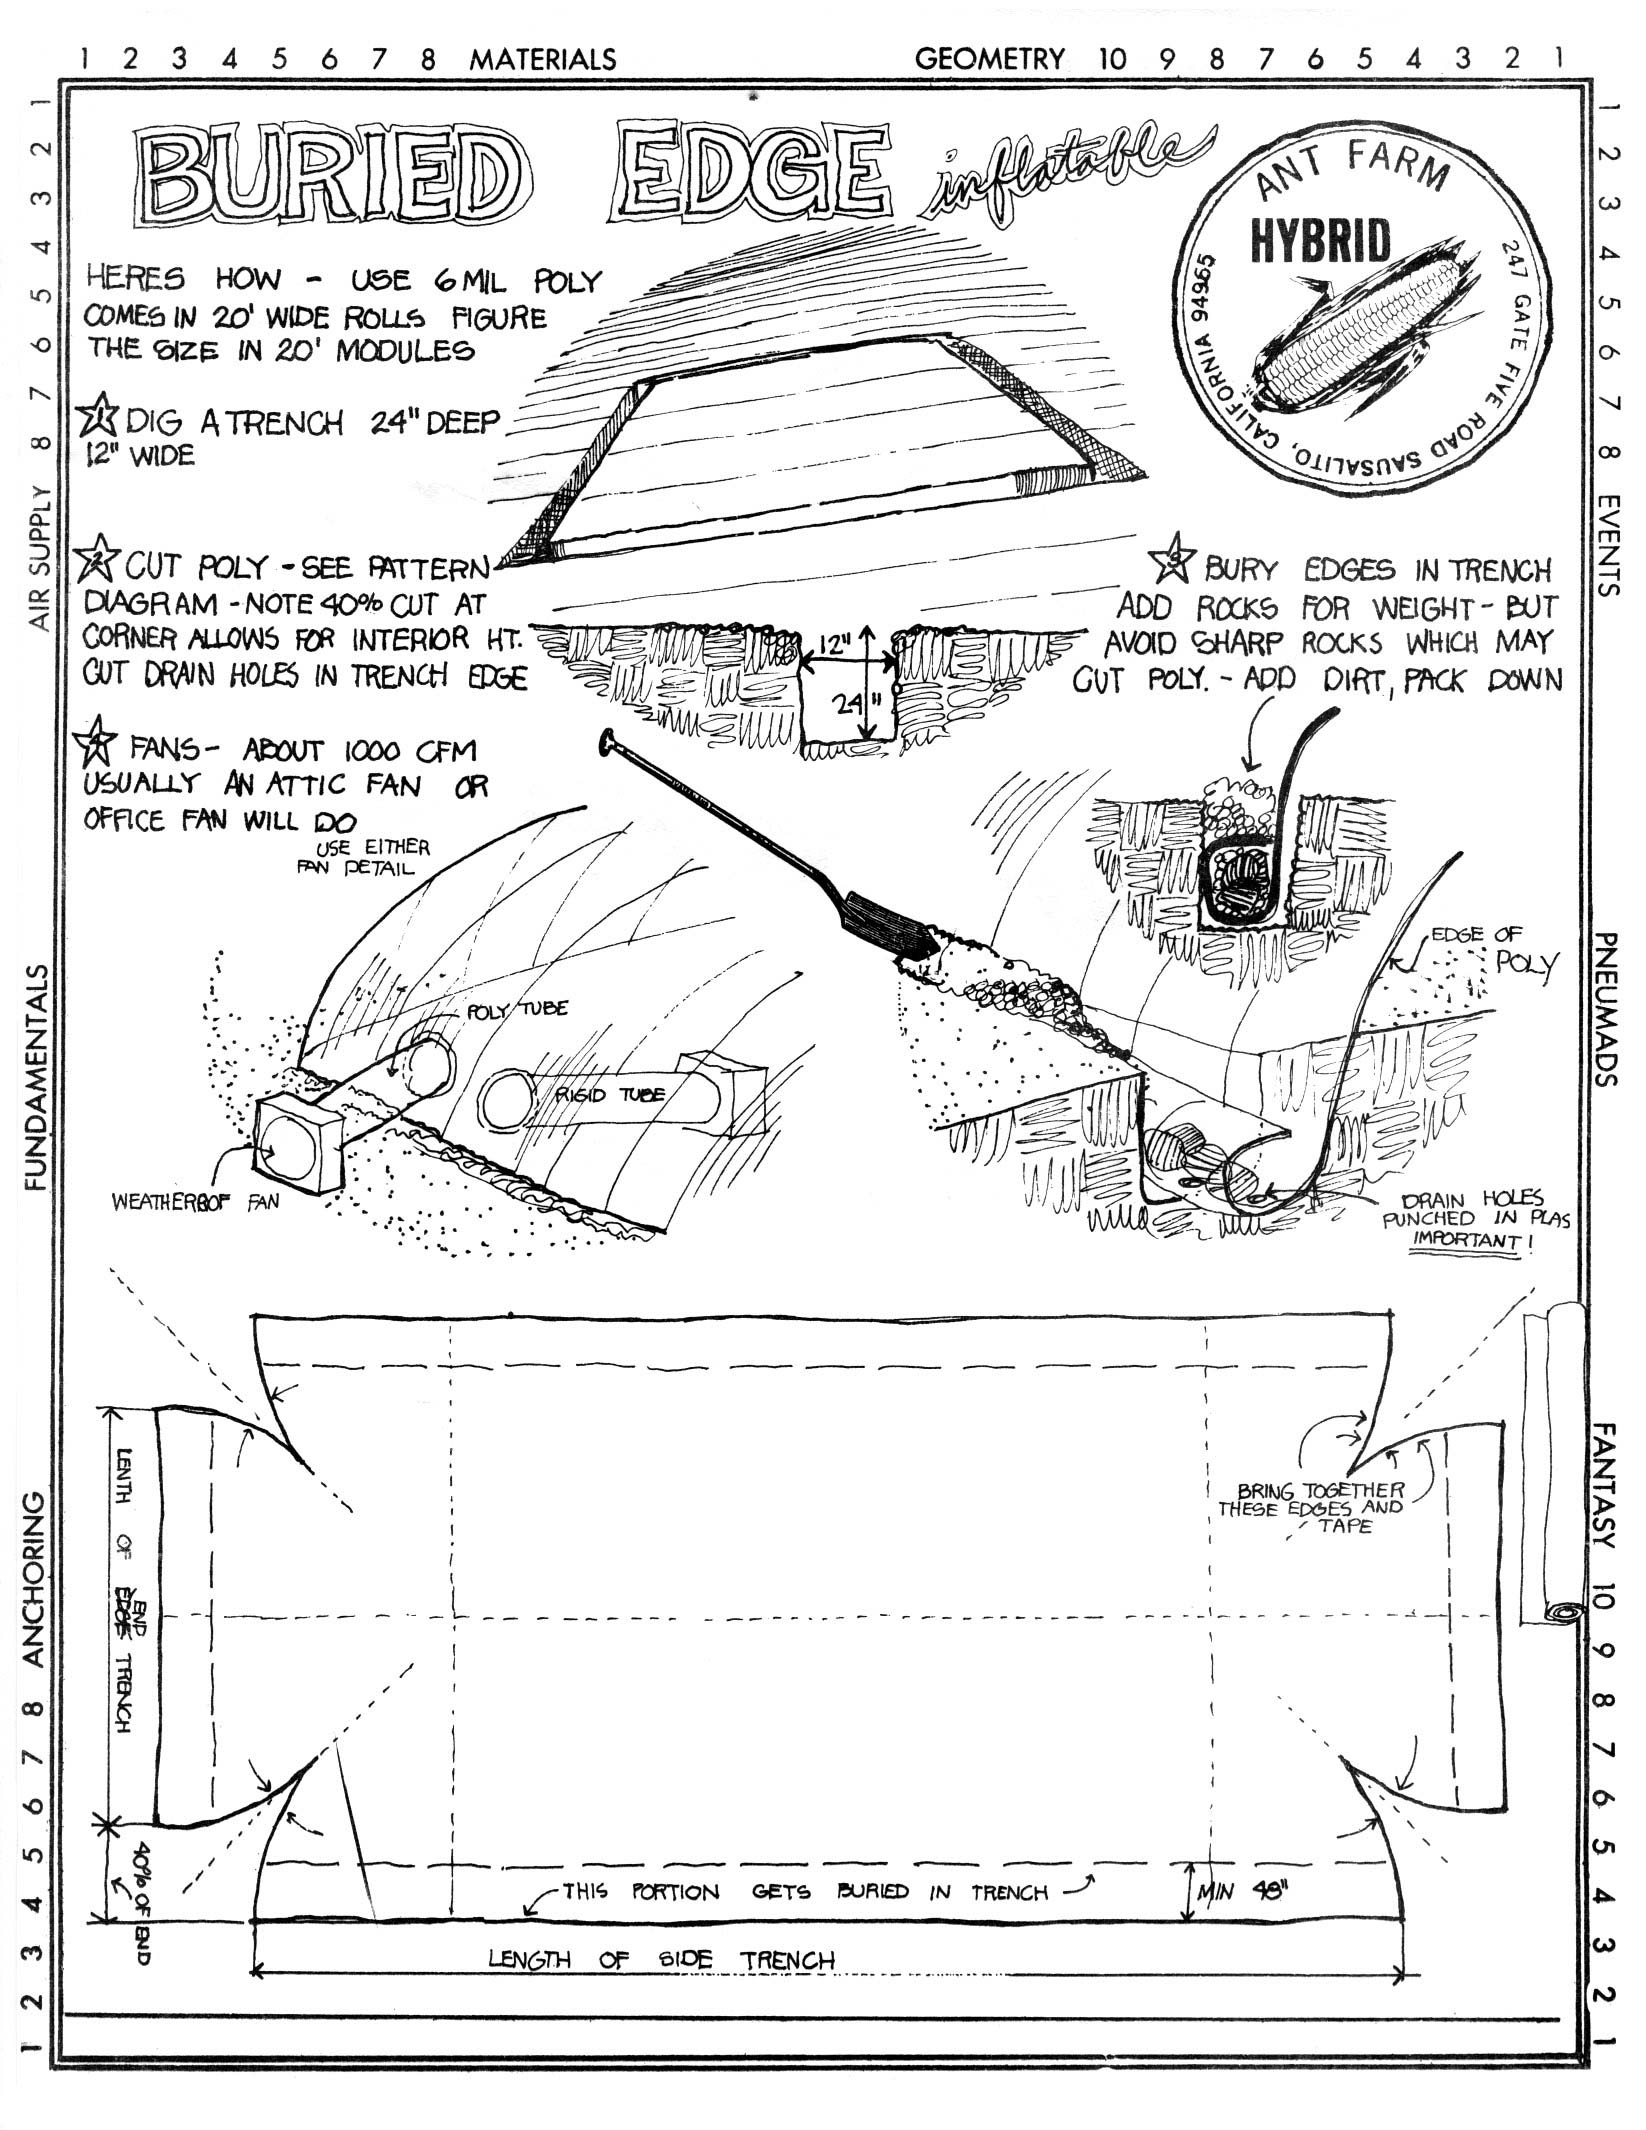
BURIED EDGE
Jim Cook at H. T. McGill Co. in Houston showed us this method of burying edges. He has had extensive experience with it. His company has done polyethylene swimming pool covers, Christmas tree warehouses, and other stuff. The holes in the bottom are important. Unless they are there, the underground poly collects water, makes mud, and the lubricated plastic slips out of the ground.
FRAME EDGE
Jim Cook also showed us pictures of a system he did with two by four frames. Wrap the poly at least one time all the way around the smaller piece of wood before nailing or bolting this one to the 2X4. The frame will act as tension ring containing the inflation pressure, as well as acting as a hold-down against the wind.
TAPED ROPES
This is one of the few ways to make a poly bubble that has a plastic floor without a net. Another way is just to put some heavy things like people or bricks wrapped in something soft inside the bubble while inflating it.
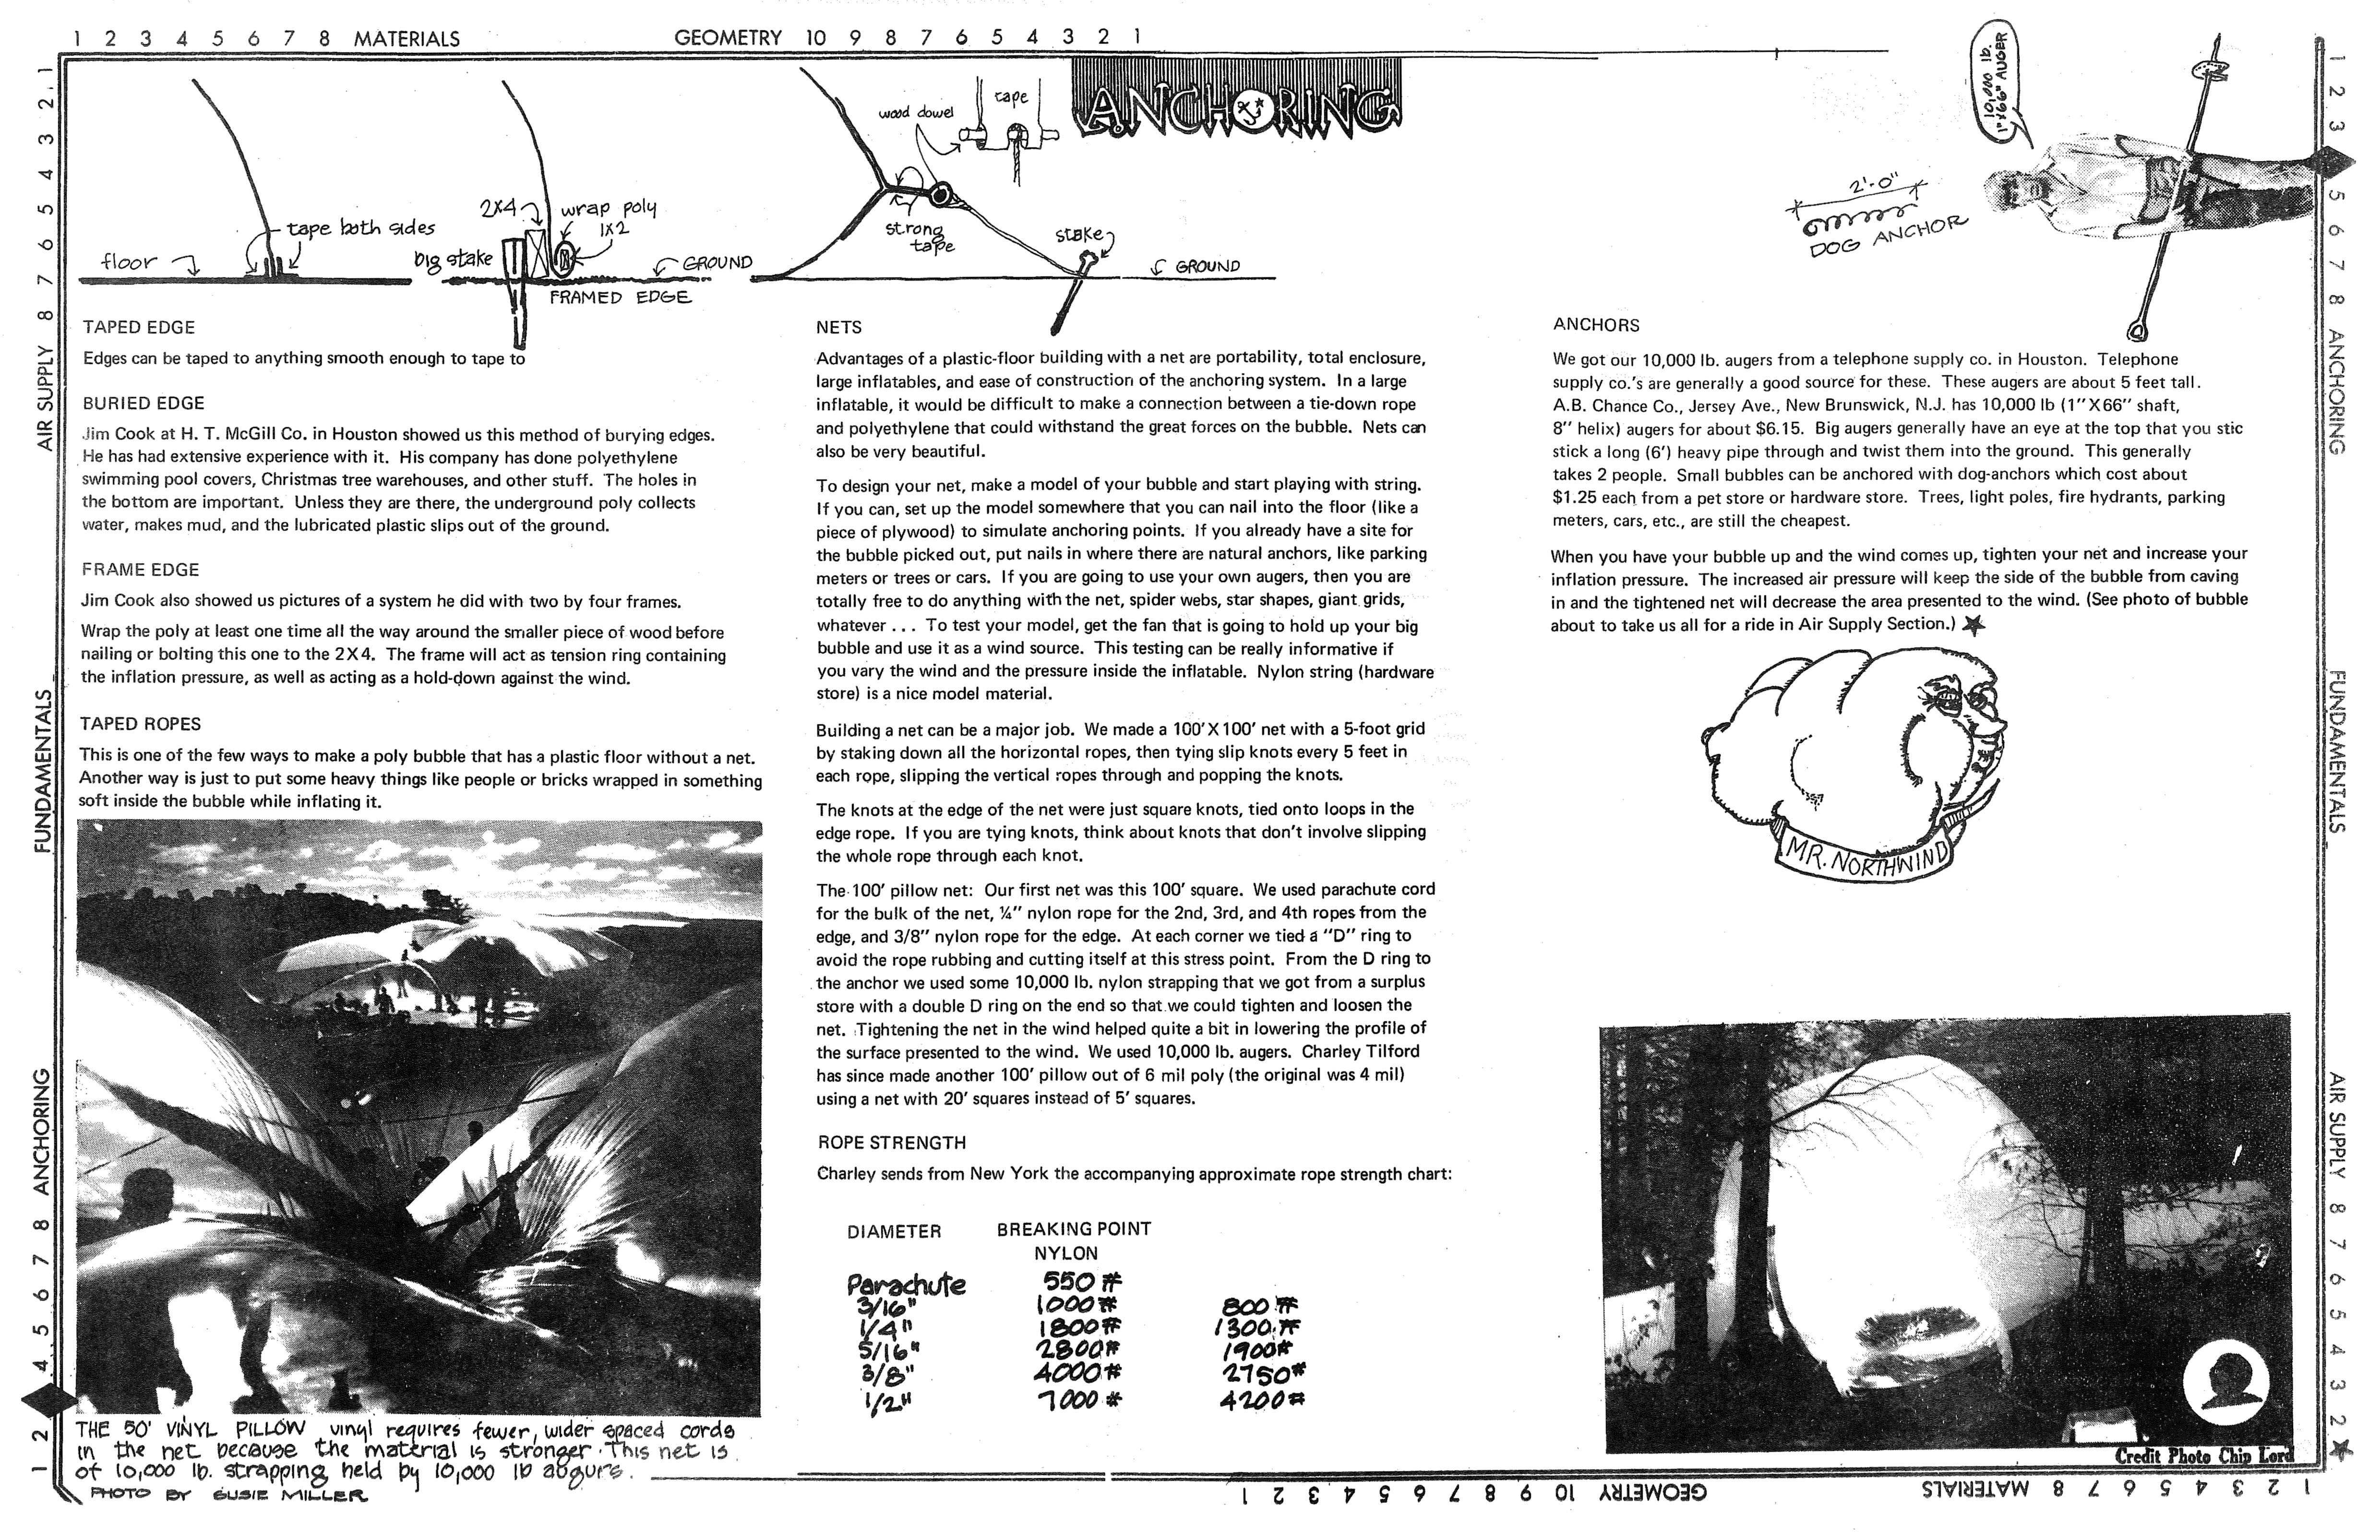
NETS
Advantages of a plastic-floor building with a net are portability, total enclosure, large inflatables, and ease of construction of the anchoring system. In a large inflatable, it would be difficult to make a connection between a tie-down rope and polyethylene that could withstand the great forces on the bubble. Nets can also be very beautiful. To design your net, make a model of your bubble and start playing with string. If you can, set up the model somewhere that you can nail into the floor (like a piece of plywood) to simulate anchoring points. If you already have a site for the bubble picked out, put nails in where there are natural anchors, like parking meters or trees or cars. If you are going to use your own augers, then you are totally free to do anything with the net, spider webs, star shapes, giant grids, whatever... To test your model, get the fan that is going to hold up your big bubble and use it as a wind source. This testing can be really informative if you vary the wind and the pressure inside the inflatable. Nylon string (hardware store) is a nice model material. Building a net can be a major job. We made a 100'X 100' net with a 5-foot grid by staking down all the horizontal ropes, then tying slip knots every 5 feet in each rope, slipping the vertical ropes through and popping the knots. The knots at the edge of the net were just square knots, tied onto loops in the edge rope. If you are tying knots, think about knots that don't involve slipping the whole rope through each knot.
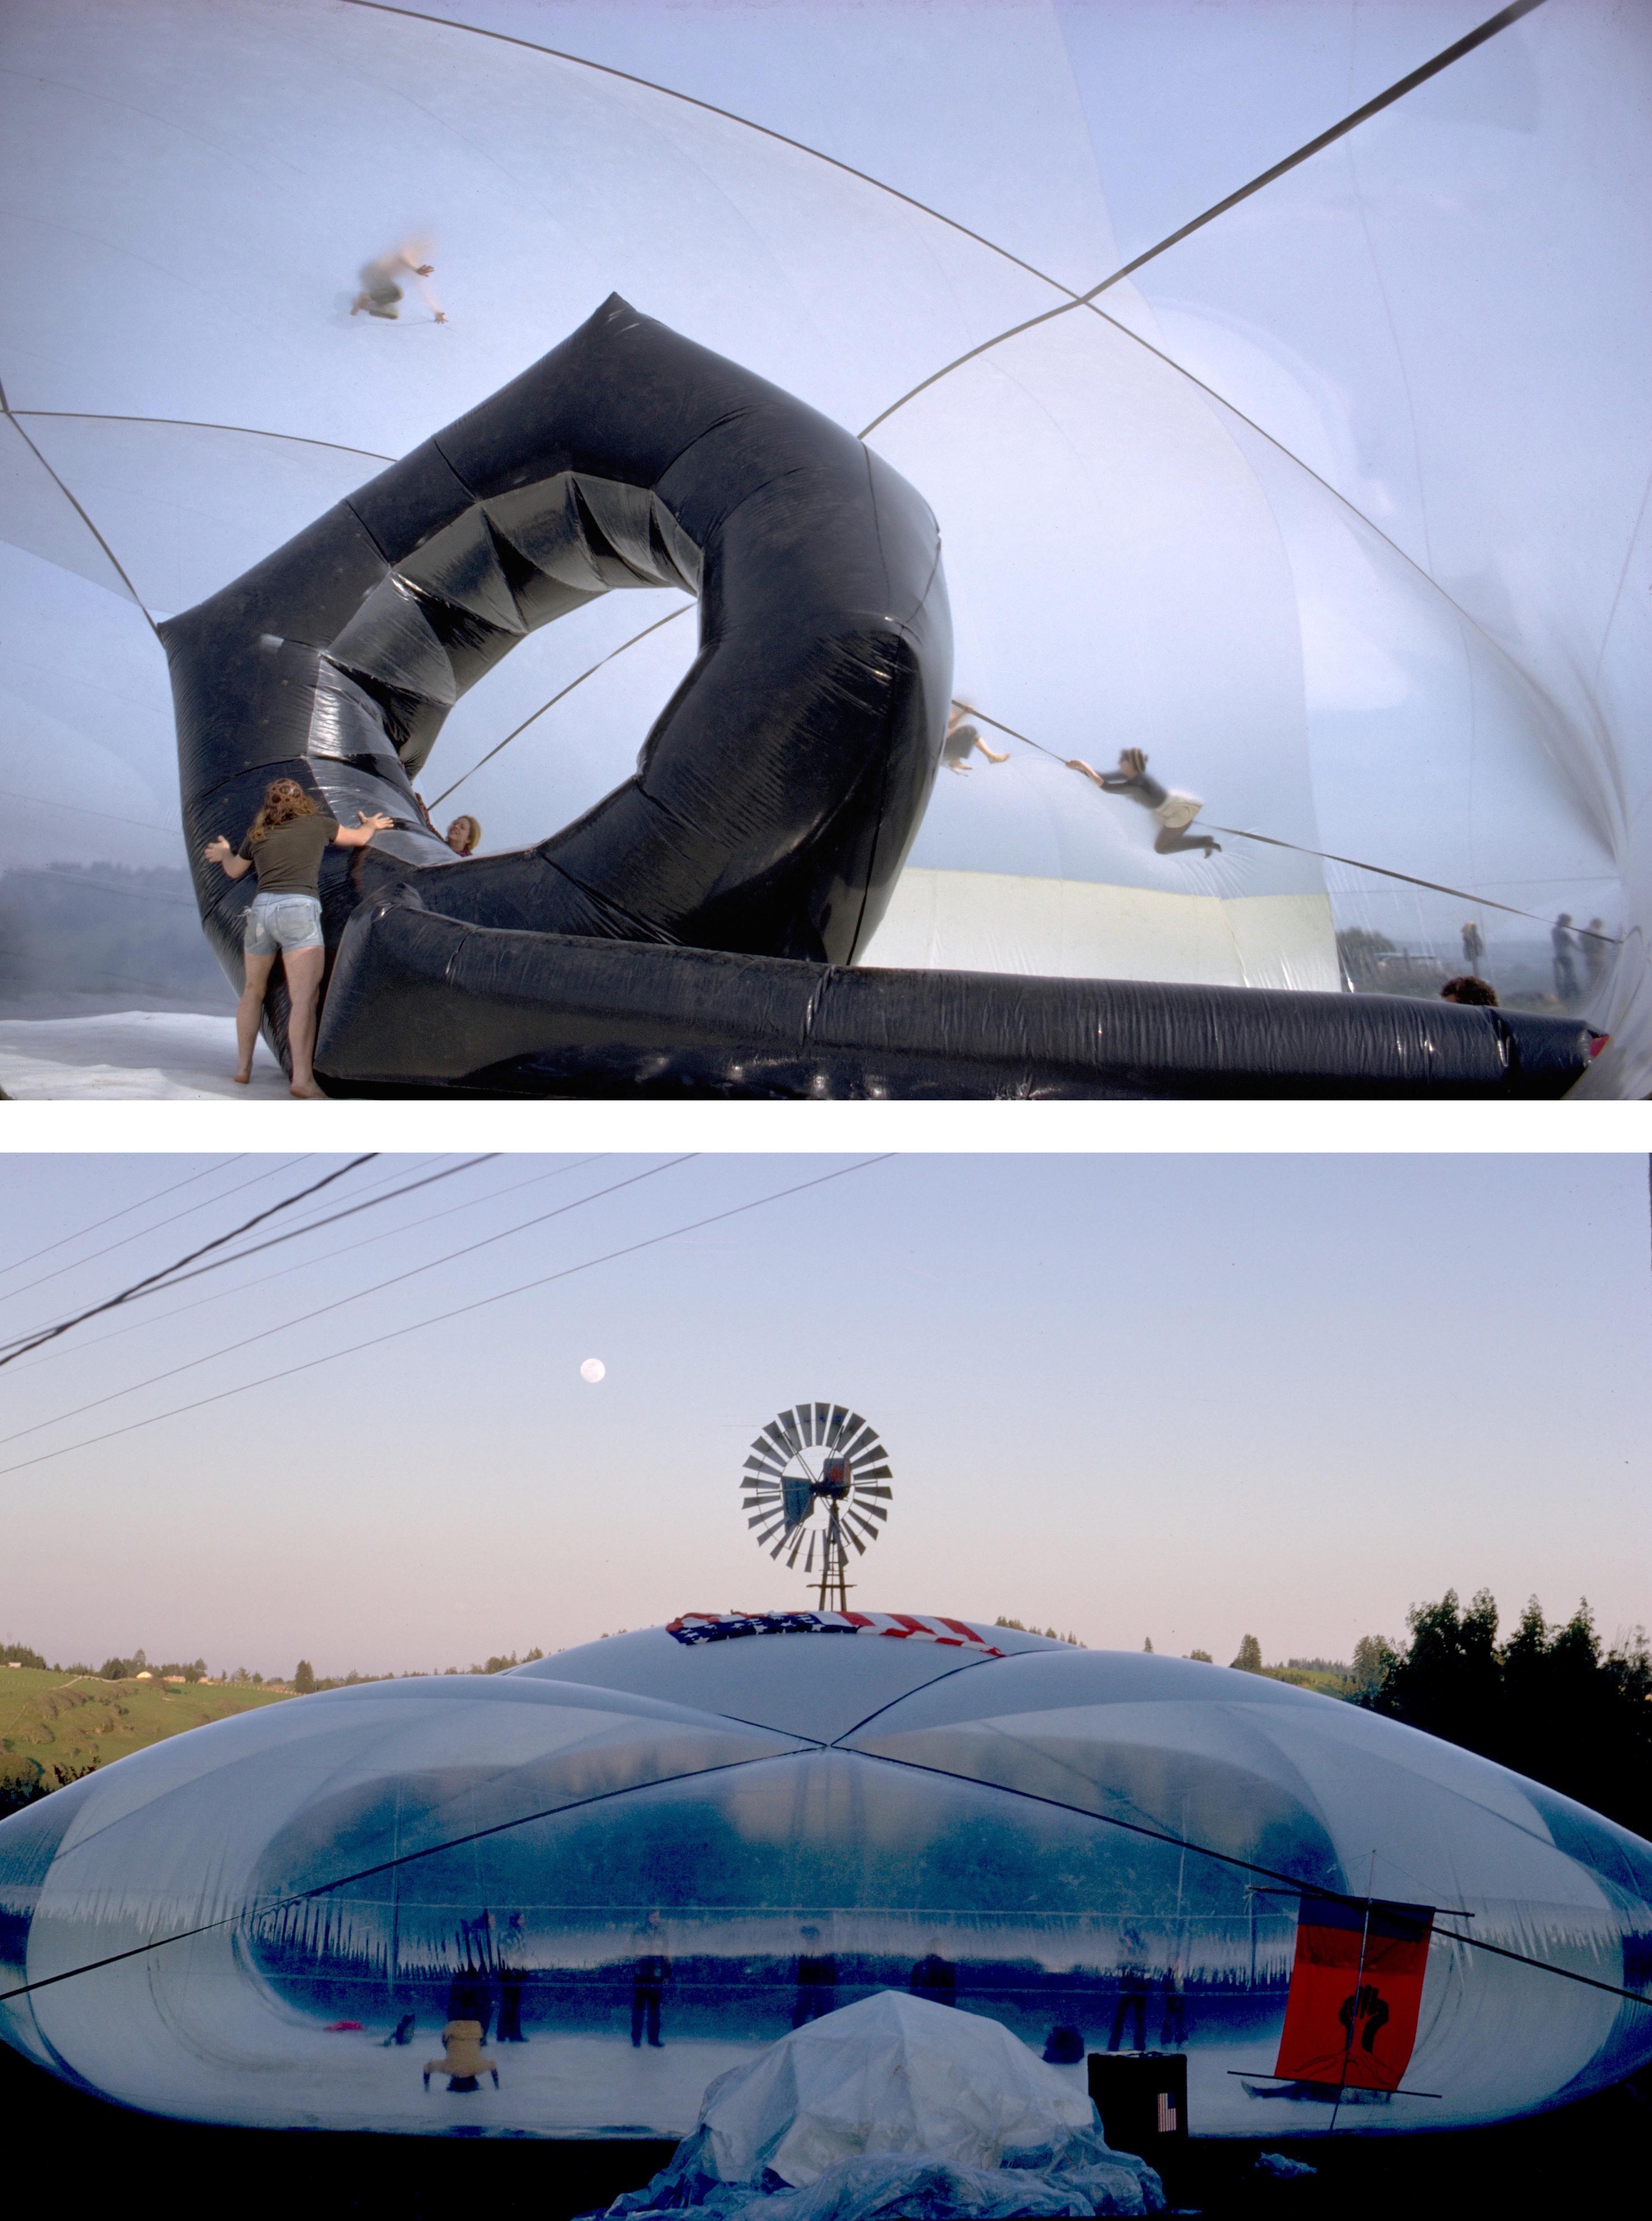
The 100 pillow net: Our first net was this 100' square. We used parachute cord for the bulk of the net, ¼" nylon rope for the 2nd, 3rd, and 4th ropes from the edge, and 3/8" nylon rope for the edge. At each corner we tied a "D" ring to avoid the rope rubbing and cutting itself at this stress point. From the D ring to the anchor we used some 10,000 lb. nylon strapping that we got from a surplus store with a double D ring on the end so that we could tighten and loosen the net. Tightening the net in the wind helped quite a bit in lowering the profile of the surface presented to the wind. We used 10,000 lb. augers. Charley Tilford has since made another 100' pillow out of 6 mil poly (the original was 4 mil) using a net with 20' squares instead of 5' squares.
ANCHORS
We got our 10,000 lb. augers from a telephone supply co. in Houston. Telephone supply co.'s are generally a good source for these. These augers are about 5 feet tall. A.B. Chance Co., Jersey Ave., New Brunswick, N.J. has 10,000 lb (1"X66" shaft, 8" helix) augers for about $6.15. Big augers generally have an eye at the top that you stic stick a long (6') heavy pipe through and twist them into the ground. This generally takes 2 people. Small bubbles can be anchored with dog-anchors which cost about $1.25 each from a pet store or hardware store. Trees, light poles, fire hydrants, parking meters, cars, etc., are still the cheapest.
When you have your bubble up and the wind comes up, tighten your net and increase your inflation pressure. The increased air pressure will keep the side of the bubble from caving in and the tightened net will decrease the area presented to the wind. (See photo of bubble about to take us all for a ride in Air Supply Section.) -
-
 Preping the pillow for the trip to the desert
 -
-
-
-

-
-
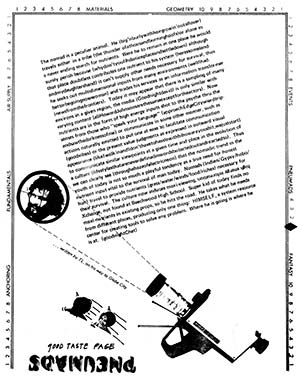
PNEUMATICS A KEY TO VARIABLE HYBRID STRUCTURING
Click here for text-only
After seeing Mr. Bird's impressive achievements and hearing Mr. Lundy's enthusiasm I wish to introduce a note of constructive pessimism. Pessimistically, I consider that the application in the field of structures of pneumatic techniques is too involved with solving normal structural and shelter problems. While the intermittent enclosure of swimming pools or protection of traditional construction work is extremely useful, such applications, if too widespread, can well result in the following actions which are detrimental to increasing the development of pneumatic technology:
• Over-emphasis may be given to the static siting of air structures.
• Direct cost comparisons with traditional structures may be made.
• The fixed-period accommodation available with air structures may only be exploited for disaster or random use of air structures.
All these actions can retard the investigation of new applications requiring improved and more complex air-structures. In addition the development of new materials and fabrication techniques should be related to new applications rather than concentrate on the perfection of existing applications since these very applications are still extremely arbitrary.
While space exploration and defense programs provide a valuable technical "spin-off" of the development air-structure technology, its very peculiarity is likely to restrict, in the near future, the technological advance of air structuring related to civil and social activities. Too many architects and designers wait to see what NASA and various Defence projects will produce. This conference must increase the content and frequency of exchange between scientists, engineers, manufacturers, architects, planners and social administrators. An immediate task could be to agree on the semantic definition of the various structures and systems we are now discussing (air-supported structures; air-inflated structures; air structures; pneumatic membrane structures; sealed pneumatic structures).
In this paper, reference to air structures includes air-supported and air-inflated structures, together with air-controlled and air-moved structures. In addition, we must keep mutually aware of the alteration of attitudes of authorities and others to the employment of air structures. In September 1965 the Department of Architecture and Civic Design of the Greater London Council refused to license a high-pressure air beam structure for temporary use as a place of public entertainment on the grounds that it constituted merely "a tent without poles or frame". In December 1965 the same department of the GLC we prepared to consider the use of the identical structure on receipt of calculations related to stability. Only when a continuous exchange is established can individual groups. In my case architects and physical planners – make accurate and substantiated demands on pneumatic technology. AT this stage of the conference I list some aspects of this technology which are of particular interest to me as an architect:
• Multi-membrane construction which enables variable pressurization and containment (cf. paper by R. Szilard).
• The availability and performance specification of transparent membranes.
• The control of light and radiation by both membranes, intermembrane construction and contained gases or liquids (cf. papers by R Szilard and N. Laing).
• The containment of granular substances between membranes to control humidity, sound transference etc.
• The capacity of controlled air movement through the material of the membranes. Such a possibility enables changes in the normal methods of foul air evacuation.
• Multi-layer bonding enabling variable cel construction. Such hybrid construction can enable the simultaneous use of high pressure sealed volumes and low pressure air-supported volumes.
• Ultra-sonic bonding enabling an increased variation of membrane material. An increase use of various materials is urgently required not only to enable varying structural performance specifications to be met but also to achieve varying textural qualities.
• Further information on the performance of high and low pressure structures in movement. The existing UK inflatable vehicle transporter which both protects the vehicle and propels it on the Hovercraft principles is an example of this. Movement must include the employment of the Hovercraft or Ground Effect Machine (GEM) principle.
• Self-packing, on deflation, of large volume membranes.
• A new method of costing air-structures which is related to the variation of use and not merely material and unit plant cost. Any mechanical plant, pumps, blower etc. must be accepted as a structural element.
The variation and individual control of volumes singly or in combination enables the separation of membranes related to the elimination of particular adverse conditions (cf. paper by R. Szilard). As roofs, walls and floors no longer exist in the conventional sense, their pneumatic equivalents no longer need to provide the additive structural support normally required and the air one breathes can become the major structural force. This being so, the interior fittings or divisions of such structures become relatively more permanent (see the interior of Lundy/Bird US Atomic Energy Commission's travelling exhibit).
Movement of such internal parts must also be investigated. The use of air-pallets for such intermittent movement is extremely valid. The use of an air-conditioning plant as the structural pressure feed is only one... (contintued on next page) -
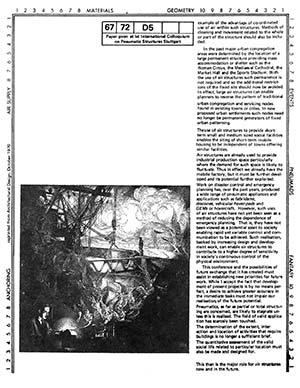
Paper delivered by Cedric Price at the 1st International Colloquium on Pneumatic structures, Stuttgart. Originally printed in AD.
Click here for text-only
(continued from previous page)
...example of the advantage of co-ordinated use of air within such structures. Methods of cleaning and movement related to the whole or part of the structure should also be included.
In the past major urban congregation areas were determined by the location of a large permanent structure providing mass accommodation or shelter such as the Roman Circus, the Mediaeval Cathedral, the Market Hall and the Sports Stadium. With the use of air structures such permanence is not required and so the additional restrictions of the fixed site should now be avoided. In effect, large air structures can enable planners to reverse the pattern of traditional urban congregation and servicing nodes found in existing towns or cities. In new proposed urban settlements such nodes need no longer be permanent generators of fixed urban patterning.
The use of air structures to provide short term small and medium sized social facilities enables the siting of short-term mobile housing to be independent of towns offering similar facilities.
Air structures are already used to provide industrial production space particularly where the demand for such space is likely to fluctuate. Thus in effect we already have the mobile factory, but it must be further developed and its potential further exploited. Work on disaster control and emergency planning has, over the past years, produced a wide range of pneumatic appliances and applications such as fabridams, dracones, vehicular hover-pads and GEMs or hovercraft. However, such uses of air structures have not yet been seen as a method of reducing the dependence of emergency planning. That is, they have not been viewed as a potential asset to society enabling rapid yet variable control and communication to be achieved. Such realisation, backed by increasing design and development work, can enable air structures to contribute to a higher degree of sensitivity in society's continuous control of the physical environment.
This conference and the possibilities of future exchange that it has created must assist in establishing new priorities for future work. While I accept the fact that development of present projects is by no means perfect, a desire to achieve greater accuracy in the immediate tasks must not impair our realisation of the future potential.
Pneumatics, as far as partial or total structuring are concerned, are likely to stagnate unless this is realised. The field of valid application has scarcely been touched. The determination of the extent, interaction and location of activities that require buildings is no longer a sufficient brief.
The quantitative assessment of the valid social life related to particular location must also be made and designed for.
This then lathe major role for air structures now and in the future.
-
-
-
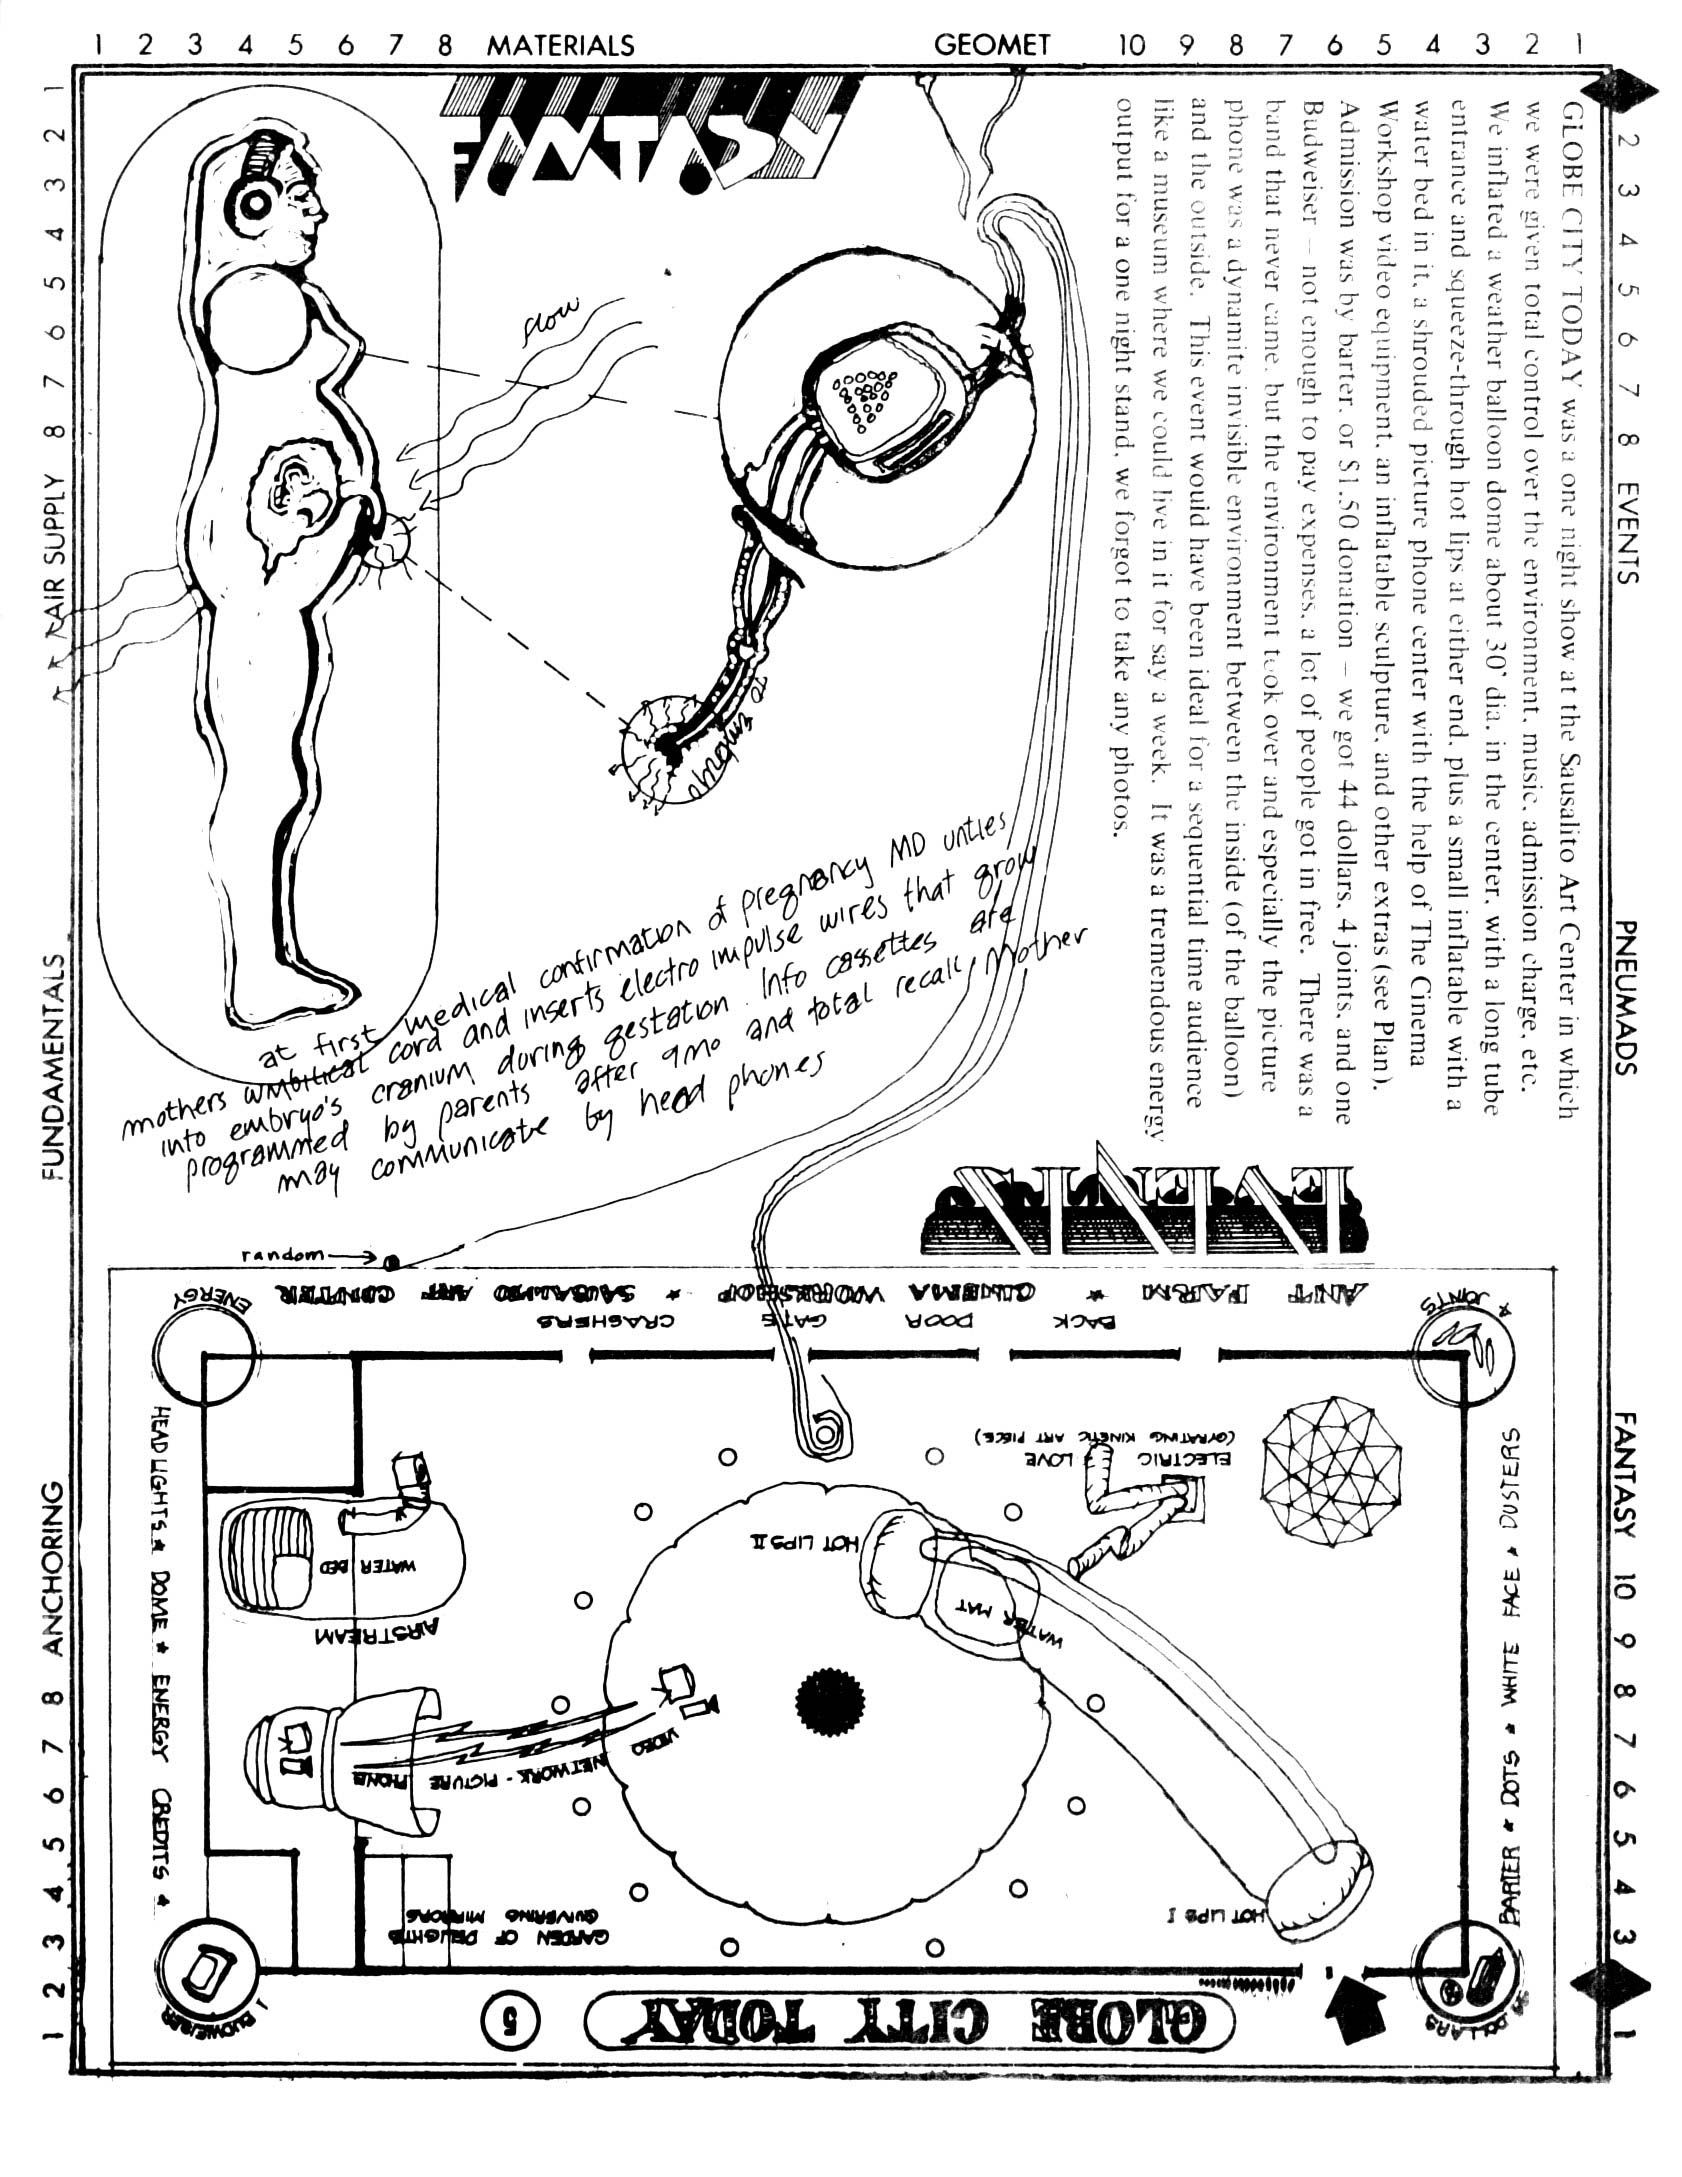
 Ice 9 at two college campus visits, 1971
 -
-
-
-
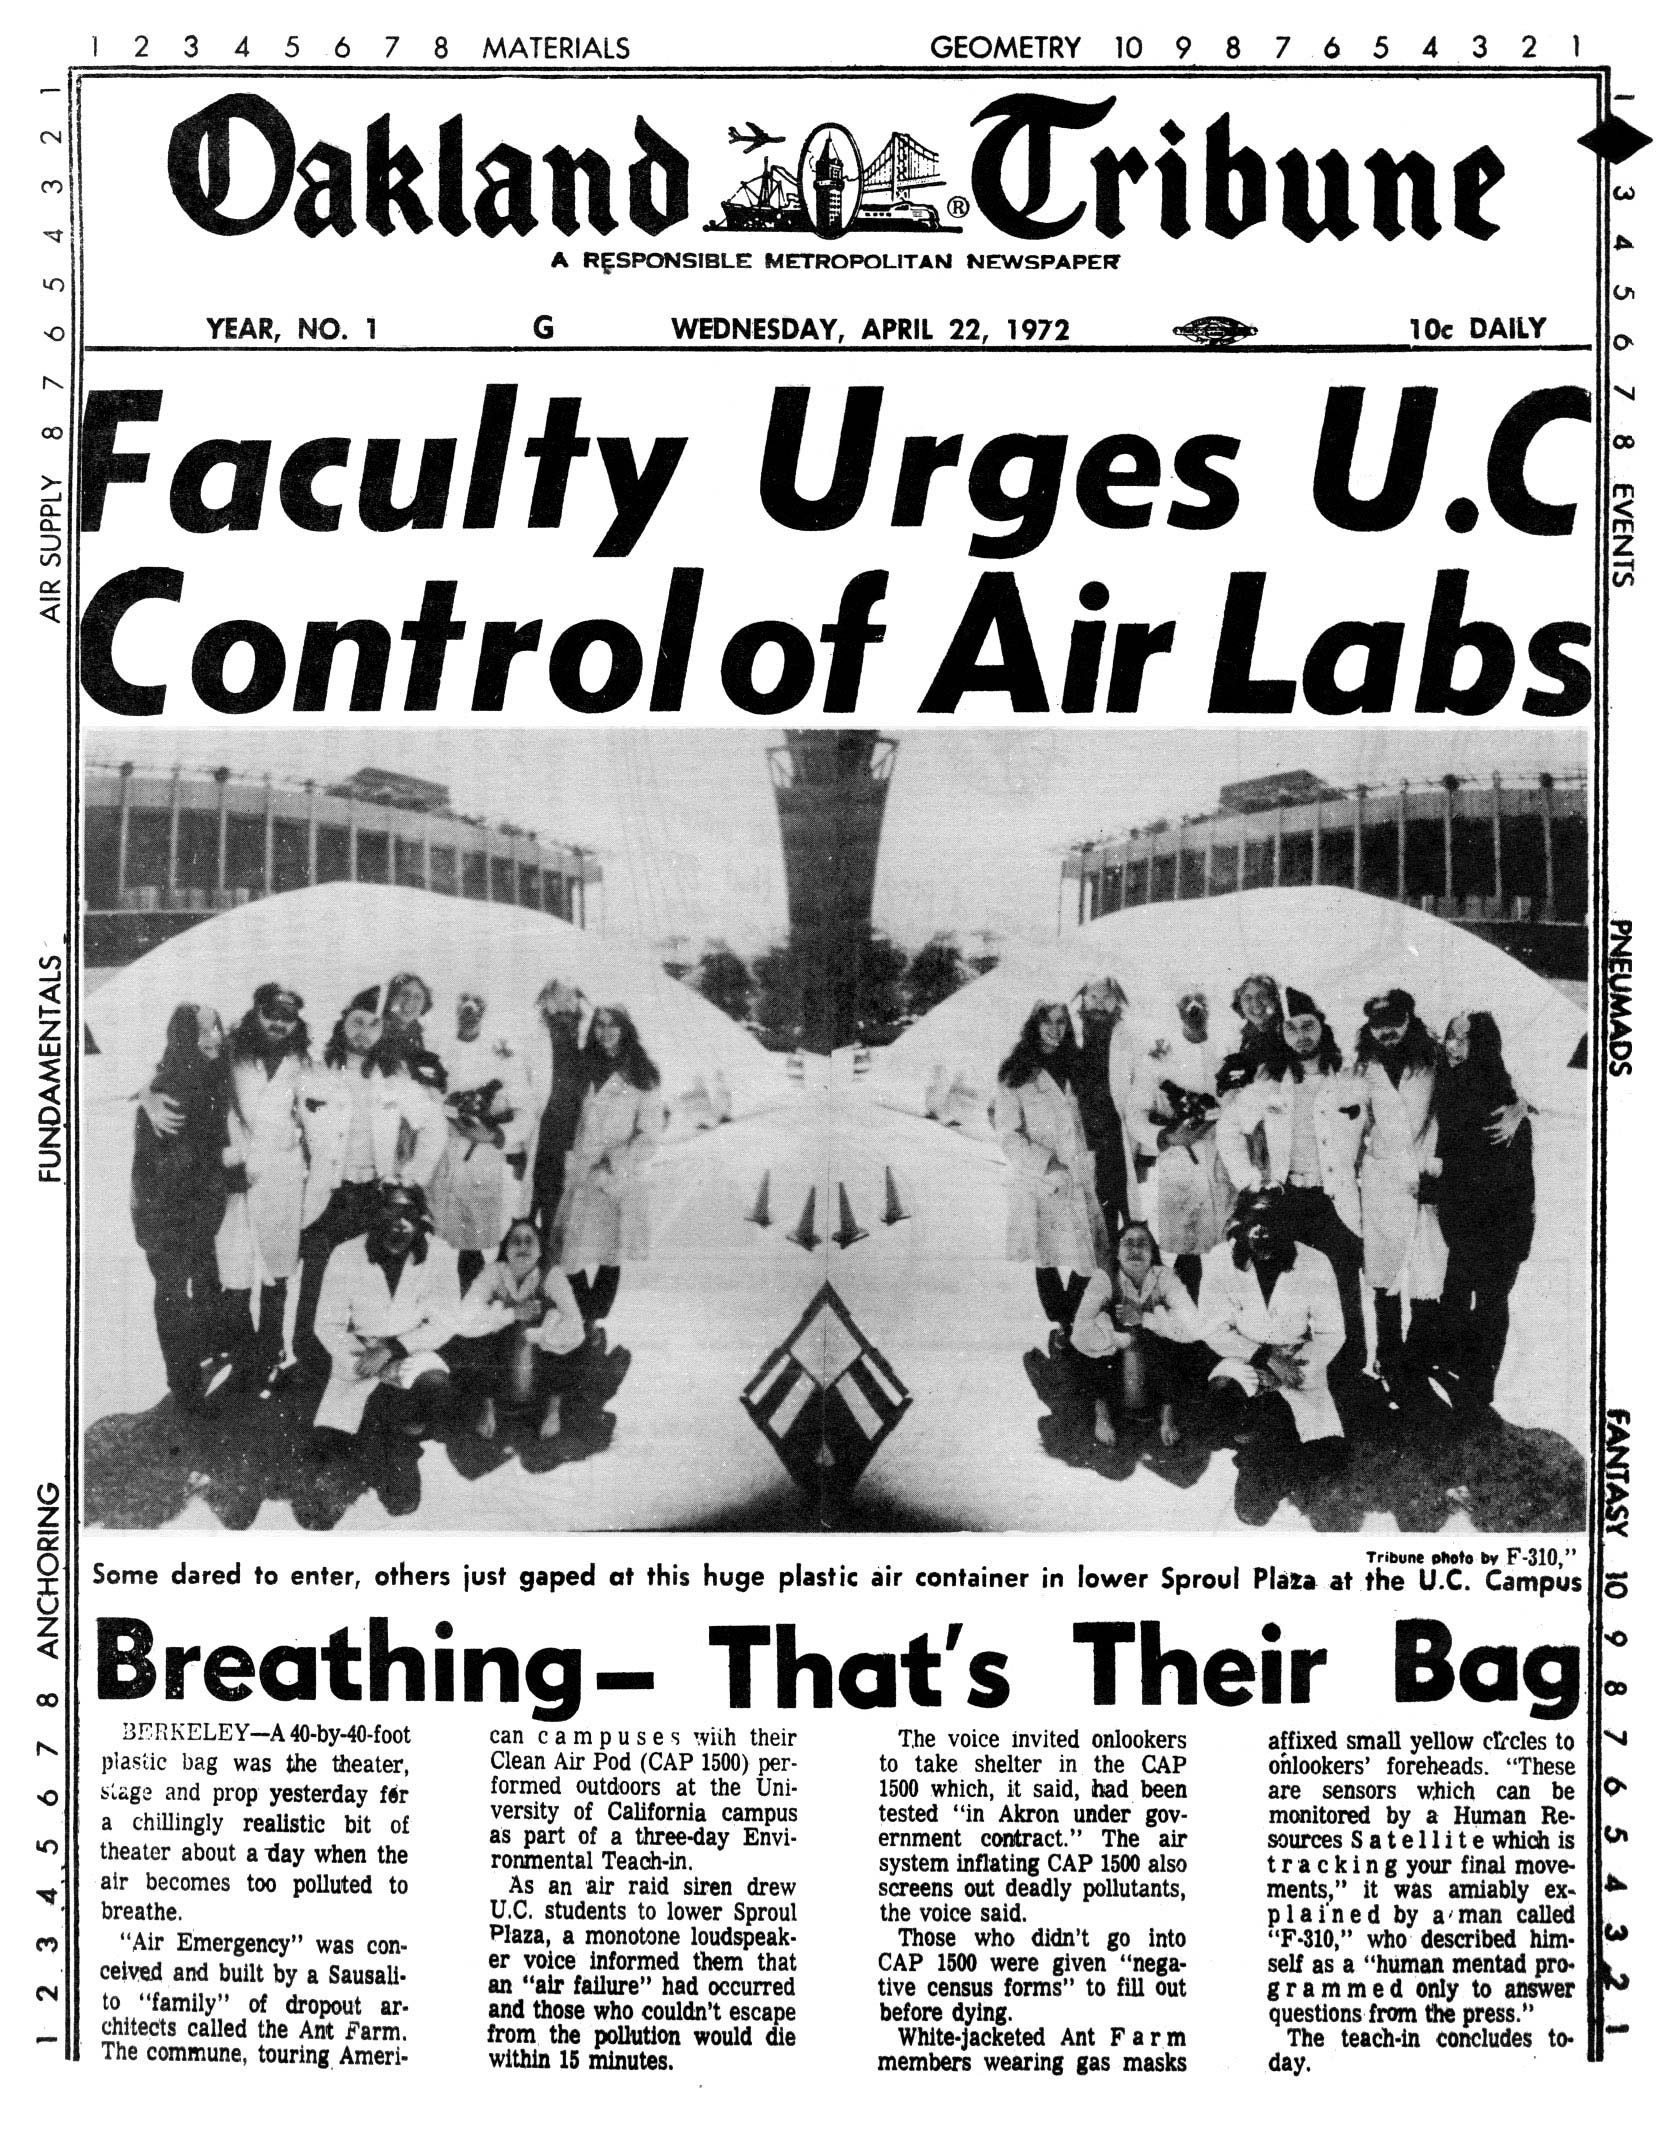
 Clean Air Pod
 -
-
-
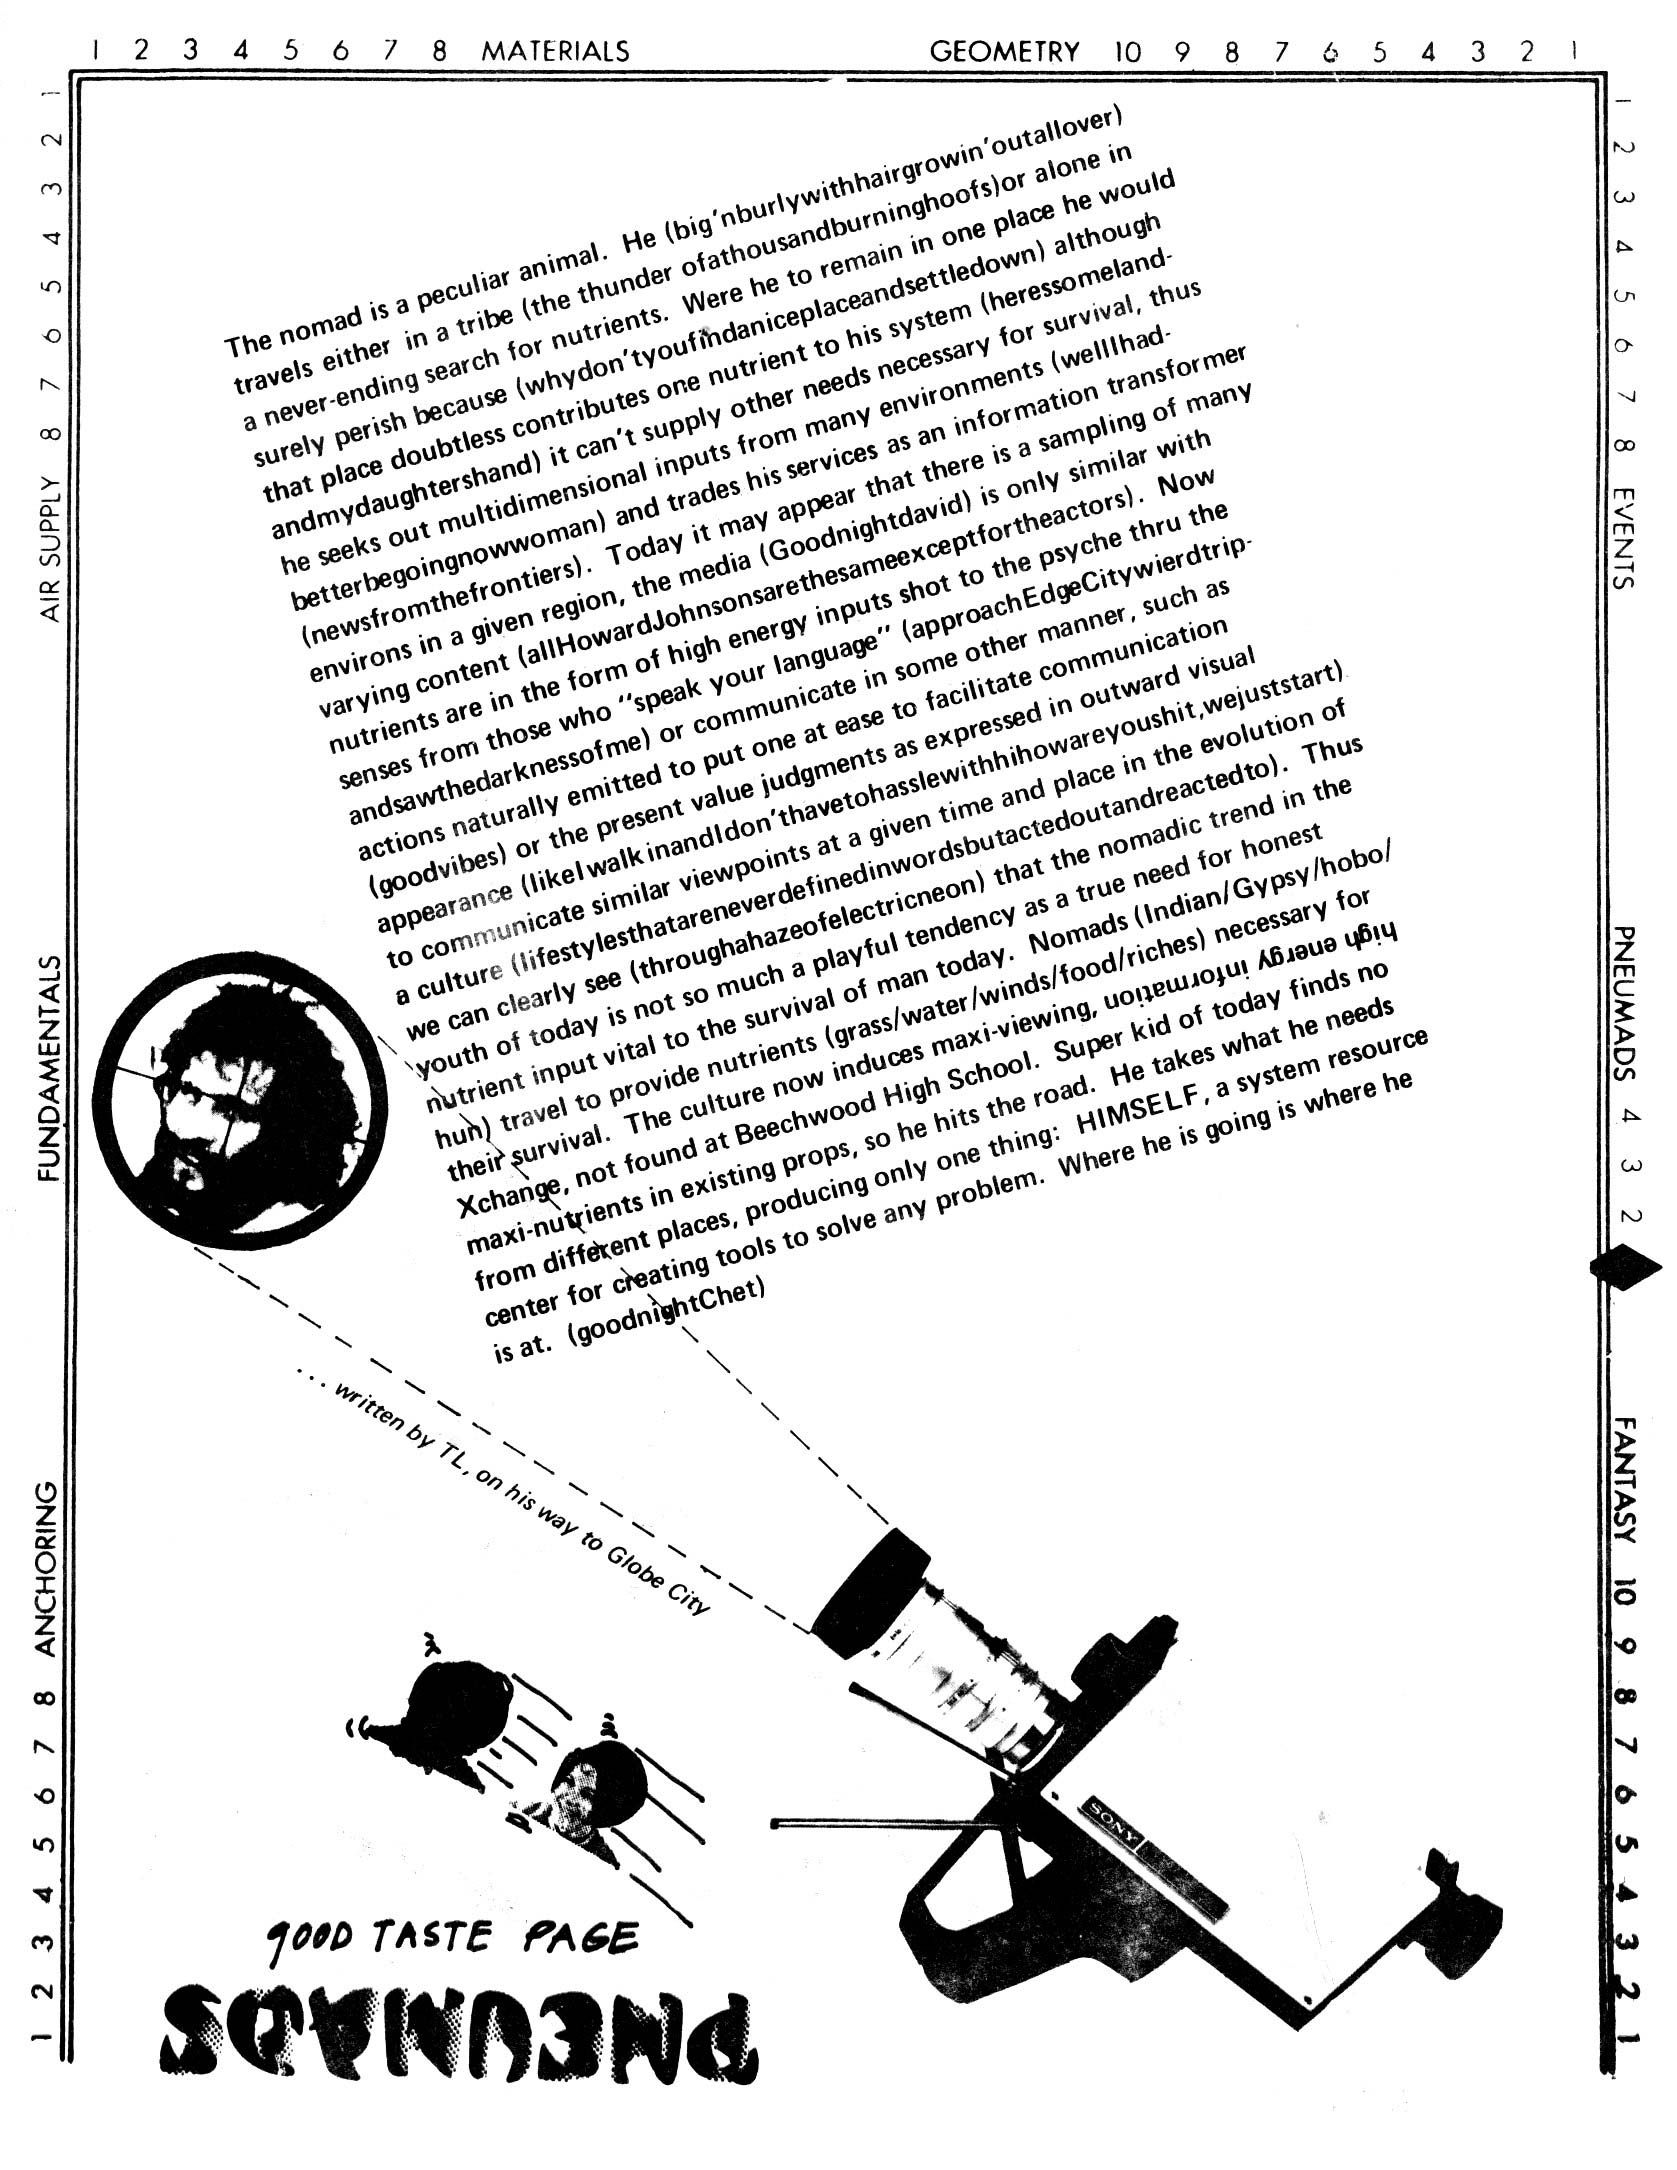
The nomad is a peculiar animal. He (big 'n burly with hair growin' out all over) travels either in a tribe (the thunder of a thousand burning hoofs) or alone in a never-ending search for nutrients. Were he to remain in one place he would surely perish because (why don't you find a nice place and settle down) although that place doubtless contributes one nutrient to his system (heres some land and my daughters hand) it can't supply other needs necessary for survival, thus he seeks out multi dimensional inputs from many environments (well I had better be going now woman) and trades his services as an information transformer (news from the frontiers). Today it may appear that there is a sampling of many environs in a given region, the media (Good night david) is only similar with varying content (all Howard Johnsons are the same except for the actors). Now nutrients are in the form of high energy inputs shot to the psyche thru the senses from those who "speak your language" (approach Edge City weird trip and saw the darkness of me) or communicate in some other manner, such as actions naturally emitted to put one at ease to facilitate communication (good vibes) or the present value judgements as expressed in outward visual appearance (like I walk in and I don't have to hassle with hi how are you shit, we just start) to communicate similar viewpoints at a given time and place in the evolution of a culture (lifestyles that are never defined in words but acted out and reacted to). Thus we can clearly see (through a haze of electric neon) that the nomadic trend in the youth of today is not so much a playful tendency as a true need for honest nutrient input vital to the survival of man today. Nomads (Indian/Gypsy/hobo/hun) travel to provide nutrients (grass/water/winds/food/riches) necessary for their survival. The culture now induces maxi-viewing, high energy information Xchange, not found at Beechwood High School. Super kid of today finds no maxi-nutrients in existing props, so he hits the road. He takes what he needs from different places, producing only one thing: HIMSELF, a system resource center for creating tools to solve any problem. Where he is going is where he is at. (good night Chet)
Click here for text-only -
-
-
-
-

BONUS: INFLAR en Español Download pdf


